
We are pleased to announce Mule 3 Activiti support. We’re very happy to be working with the Activiti team and see a lot of value for our community using Mule and Activiti together. I already discussed why BPM and ESB need to work together and two different uses of ESBs with BPM. Today I am going to present a real world example.
For those that may not be familiar, Actiiviti is an open source BPMN 2.0 modeling tool and BPM runtime, founded by Alfresco and developed with other open source companies.
Getting Started
My example application uses Mule ESB and Activiti allowing users to view low-resolution images and request a high-resolution version that needs to be approved by a human participant (similar to Stock.XCHNG). Mule will handle the creation of the Activiti process and will take care of exposing it as a service. Activiti will take care of orchestrating the process that requires a user task (approval).
This short demo will show you what we are building here:
[yframe url=’http://www.youtube.com/watch?v=3q138YQi4UM’]
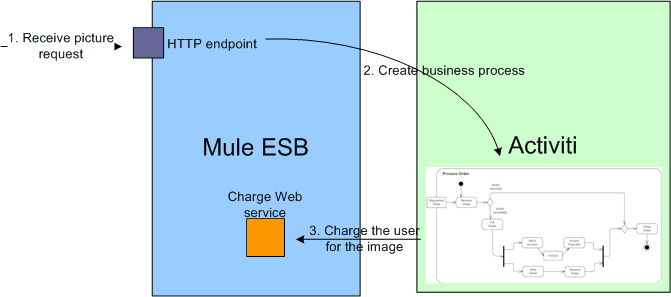
Mule will handle the picture requests using a HTTP endpoint (Step 1 of Fig. 1) and creating an Activiti process for it using Mule’s activiti module (Step 2 of Fig. 1). The process is the responsible of controlling the business logic under the picture approval. When the request is approved we need to charge the user with some amount of money; as we already have an existing component in our organization for that purpose we simply expose it as a Web service inside mule. Therefore Activiti calls this Web service to charge the user and also to notify him that the request has been approved (Step 3 of Fig. 1).
In this part of the post we will look in detail on how we handle the requests using Mule ESB to start the approval process handled with Activiti.
Mule application
The first step is to build our Mule application; for simplicity the application will show a set of predefined low resolution mule images that users can request and it won’t handle authentication. In our Home page we show the images as shown in Fig. 2.

When the user clicks on the request image button, it performs a request to a URL that will be handled by Mule. A flow inside Mule handles this HTTP request by creating a new process in Activiti and returning the ‘Success’ string. As the process needs the user and the image as variables, we will need a Script component that creates the parameters map to push them inside the Activiti process. Look at the script:component of the following flow:
Now we are ready from the Mule side; you can take a look at the Mule configuration by downloading the full project from here
Activiti stub configuration
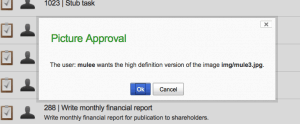
For part 1 of this series we just want to create a simple version of the Activiti process. To make sure everything works fine; therefore we will create a stub process that shows the variables that we have set from the Mule’s side. The process will prompt a form that shows the variables as shown in Fig. 3.
The definition of the process is pretty simple and is shown next; basically the process prompts a form that will show the variables:
The form is pretty simple and simply prints the variables inside a paragraph:
Next, you need to zip both files and publish them in Activiti to make them available using Activiti-probe. If you haven’t done this before please look at the Activiti’s user guide.
We are done with this part, if you need to take a look at the configuration details of Mule please download them from here. You can start the project by setting your MULE_HOME variable and running mvn clean install. Don’t forget to publish the Activiti deployment zip file under the activiti-picture-example directory.
The Activiti’s process will be a stub for now and we will complete it in part 2.We are pleased to announce Mule 3 Activiti support. We’re very happy to be working with the Activiti team and see a lot of value for our community using Mule and Activiti together. I already discussed why BPM and ESB need to work together and two different uses of ESBs with BPM. Today I am going to present a real world example.
For those that may not be familiar, Actiiviti is an open source BPMN 2.0 modeling tool and BPM runtime, founded by Alfresco and developed with other open source companies.
Getting Started
My example application uses Mule ESB and Activiti allowing users to view low-resolution images and request a high-resolution version that needs to be approved by a human participant (similar to Stock.XCHNG). Mule will handle the creation of the Activiti process and will take care of exposing it as a service. Activiti will take care of orchestrating the process that requires a user task (approval).
This short demo will show you what we are building here:
[yframe url=’http://www.youtube.com/watch?v=3q138YQi4UM’]
Mule will handle the picture requests using a HTTP endpoint (Step 1 of Fig. 1) and creating an Activiti process for it using Mule’s activiti module (Step 2 of Fig. 1). The process is the responsible of controlling the business logic under the picture approval. When the request is approved we need to charge the user with some amount of money; as we already have an existing component in our organization for that purpose we simply expose it as a Web service inside mule. Therefore Activiti calls this Web service to charge the user and also to notify him that the request has been approved (Step 3 of Fig. 1).
In this part of the post we will look in detail on how we handle the requests using Mule ESB to start the approval process handled with Activiti.
Mule application
The first step is to build our Mule application; for simplicity the application will show a set of predefined low resolution mule images that users can request and it won’t handle authentication. In our Home page we show the images as shown in Fig. 2.
When the user clicks on the request image button, it performs a request to a URL that will be handled by Mule. A flow inside Mule handles this HTTP request by creating a new process in Activiti and returning the ‘Success’ string. As the process needs the user and the image as variables, we will need a Script component that creates the parameters map to push them inside the Activiti process. Look at the script:component of the following flow:
Now we are ready from the Mule side; you can take a look at the Mule configuration by downloading the full project from here
Activiti stub configuration
For part 1 of this series we just want to create a simple version of the Activiti process. To make sure everything works fine; therefore we will create a stub process that shows the variables that we have set from the Mule’s side. The process will prompt a form that shows the variables as shown in Fig. 3.
The definition of the process is pretty simple and is shown next; basically the process prompts a form that will show the variables:
The form is pretty simple and simply prints the variables inside a paragraph:
Next, you need to zip both files and publish them in Activiti to make them available using Activiti-probe. If you haven’t done this before please look at the Activiti’s user guide.
We are done with this part, if you need to take a look at the configuration details of Mule please download them from here. You can start the project by setting your MULE_HOME variable and running mvn clean install. Don’t forget to publish the Activiti deployment zip file under the activiti-picture-example directory.
The Activiti’s process will be a stub for now and we will complete it in part 2.


