
Mule applications and deployments can be fully managed using Maven. In the development phase, Anypoint Studio makes it easy to manage your application dependencies using Maven. For Deployment tasks, Mule provides a Maven plugin that helps automate the application deployment to different target runtime environments such as Standalone, CloudHub, ARM, Cluster, and more.
There are different ways to install and run Mule Runtime:
- Local Standalone: This involves installing Mule Runtime on your local server; this means Mule runs as a single server instance.
- Local Cluster: This is similar to an individual instance set up on local, except the instances are part of a cluster that interact with each other.
- CloudHub: This is an Integration Platform as a Service (iPaaS) provided by MuleSoft, enabling your Mule apps to run in the cloud.
- Pivotal Cloud Foundry: This involves deploying Mule Runtime on Pivotal Cloud Foundry.
Deployments to all these environments can be managed through Manual Copy (for local), Anypoint Runtime Manager, or the Mule Maven Plugin.
In this post, we will see how we can leverage the Mule Maven plugin to perform deployments. We will do a deployment to a standalone Mule instance as well as to a CloudHub Instance. We will also automate our deployment using Jenkins Pipeline.
Version used in this how-to guide:
- Mule Runtime 3.9.0
- Jenkins 2.11.0
- Mule Maven Plugin 2.2.1
1. Mule Maven Plugin
1.1 Introduction
The mule-maven-plugin is a Maven Plugin provided as a part of the Mule Framework. It allows us to run integration tests for Mule applications, and also to deploy any application to various environments.
1.2 Configuration
This plugin is available in the Mulesoft public repository, so you will need to add the below repository to your settings.xml
<pluginRepositories>
    <pluginRepository>
        <id>mule-public</id>
        <url>https://repository.mulesoft.org/nexus/content/repositories/releases</url>
    </pluginRepository>
</pluginRepositories>
Once you have added the repository, you can include the plugin in your pom.xml as:
<plugin>
  <groupId>org.mule.tools.maven</groupId>
  <artifactId>mule-maven-plugin</artifactId>
  <version>2.2.1</version>
</plugin>
At this point, you are ready to add the configuration for your target server/environment.
1.3 Deployment Profiles
You can have different environments for deploying our application. In fact, you can have a mix of the local standalone and CloudHub approach described above.
So, instead of configuring our pom.xml for a single environment, we will use a Maven parent POM approach. We will define a Maven Parent POM and add a Maven Profile for each of our target environments.
The full parent POM is available on the Github here. Configuration parameters are available as properties, and with default values where applicable. |
The profile below will help us deploy to a local Mule server:
<profile>
<id>standalone</id>
<build>
<plugins>
<plugin>
<groupId>org.mule.tools.maven</groupId>
<artifactId>mule-maven-plugin</artifactId>
<configuration>
<deploymentType>standalone</deploymentType>
<muleVersion>${mule.version}</muleVersion>
<muleHome>${mule.home}</muleHome>
<applicationName>${artifactId}</applicationName>
<community>${mule.runtime.community}</community>
</configuration>
<executions>
<execution>
<id>deploy</id>
<phase>deploy</phase>
<goals>
<goal>deploy</goal>
</goals>
</execution>
</executions>
</plugin>
</plugins>
</build>
</profile>
- Target Mule version if you need to install Mule needs as a part of the deployment.
- This should be a path to our locally installed Mule server, such as
/opt/mule. The Mule version and Mule home are exclusive to each other. - The application name used when deploying to Mule instance.
- If you are using Community Edition, then this should be set to
true.
The profile below will help you implement the CloudHub deployment:
<profile>
  <id>cloudhub</id>
  <build>
    <plugins>
      <plugin>
        <groupId>org.mule.tools.maven</groupId>
        <artifactId>mule-maven-plugin</artifactId>
        <configuration>
          <deploymentType>cloudhub</deploymentType>
          <muleVersion>${mule.version}</muleVersion>
          <username>${anypoint.username}</username>
          <password>${anypoint.password}</password>
          <applicationName>${artifactId}</applicationName>
          <environment>${cloundhub.env}</environment>
          <businessGroup>${anypoint.businessGroup}</businessGroup>
          <region>${cloudhub.region}</region>
          <uri>${anypoint.uri}</uri>
          <workerType>${cloudhub.workerType}</workerType>
          <workers>${cloudhub.workers}</workers>
        </configuration>
        <executions>
          <execution>
            <id>deploy</id>
            <phase>deploy</phase>
            <goals>
              <goal>deploy</goal>
            </goals>
          </execution>
        </executions>
      </plugin>
    </plugins>
  </build>
</profile>
- Target the Mule Runtime version where the application should be deployed.
- The Anypoint Platform username with appropriate access to target environment.
- The Anypoint Platform password.
- Target Environment should be configured as on ARM.
- If you are running ARM on a private instance then specify the URL here. Example: anypoint.example.com.
- Only platform users are allowed in this configuration. It’s not possible to use SSO/Federated as the username.
List of available parameters varies based on the deploymentType. See the documentation for a full list of parameters for each deployment type. You may have to modify your profile to add new parameters as needed.
1.4 Demo Application
The full demo application is available on the GitHub.
Once we have our Parent POM ready, we use that in our Mule Application POM as:
<parent>
<groupId>com.javastreets</groupId>
<artifactId>mule-maven-parent-pom</artifactId>
<version>0.0.1-SNAPSHOT</version>
</parent>
1.2 Manual Deployment
At this point, we can deploy our application using the Mule Maven Plugin and running the Maven commands in terminal.
Deploying to a local standalone Mule:
mvn clean deploy -P standalone -Dmule.home=/opt/mule
Deploying to CloudHub:
mvn clean deploy -P cloudhub -Dmule.version=3.9.0 -Danypoint.username={your username} -Danypoint.password={your password}
You can pass additional parameter values as needed.
2. Jenkins Pipeline
2.1 Introduction
As per the Jenkins website:
Jenkins Pipeline (or simply “Pipeline”) is a suite of plugins which supports implementing and integrating continuous delivery pipelines into Jenkins.
In this post, I will not go into detail about Jenkins Pipeline. If you’d like to learn more, then please refer to this Jenkins Document to get a good overview.
2.2 Jenkins Setup
CloudHub and ARM deployment need to access Anypoint Platform. To provide access, let’s add Anypoint credentials in the Jenkins credential page. We will use these credentials in our Pipeline to avoid hardcoding and password exposure. If you don’t know how to create credentials, I suggest you follow this nice tutorial.
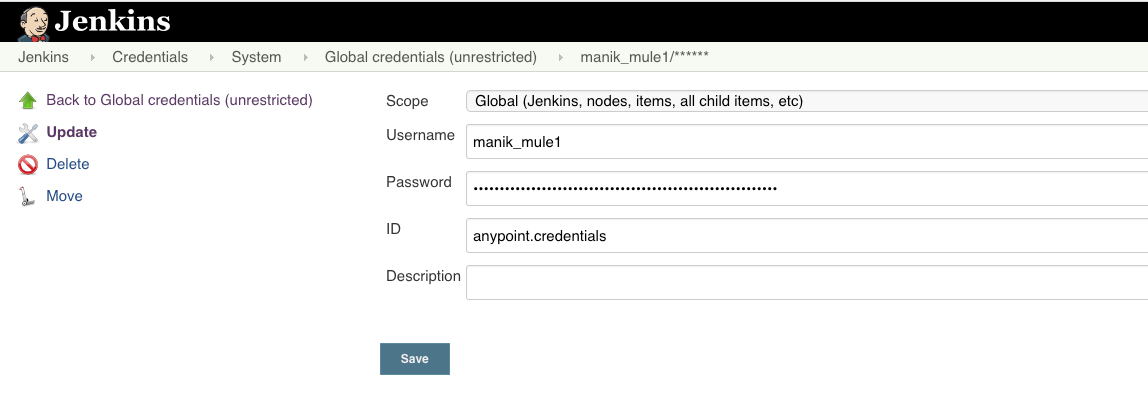
If you do not specify anything in the ID attribute, Jenkins will assign an auto-generated ID. We will need this ID value for credential lookup in Pipeline.
2.3 Simple Pipeline
Now, we have all that we need to add a Jenkins Pipeline to our Mule Application. For this, we will need to create a file named Jenkinsfile in the root of our application.
Here is the content of our Jenkinsfile:
pipeline {
  agent any
  stages {
    stage('Unit Test') {
      steps {
        sh 'mvn clean test'
      }
    }
    stage('Deploy Standalone') {
      steps {
        sh 'mvn deploy -P standalone'
      }
    }
    stage('Deploy ARM') {
      environment {
        ANYPOINT_CREDENTIALS = credentials('anypoint.credentials')
      }
      steps {
        sh 'mvn deploy -P arm -Darm.target.name=local-3.9.0-ee -Danypoint.username=${ANYPOINT_CREDENTIALS_USR}  -Danypoint.password=${ANYPOINT_CREDENTIALS_PSW}'
      }
    }
    stage('Deploy CloudHub') {
      environment {
        ANYPOINT_CREDENTIALS = credentials('anypoint.credentials')
      }
      steps {
        sh 'mvn deploy -P cloudhub -Dmule.version=3.9.0 -Danypoint.username=${ANYPOINT_CREDENTIALS_USR} -Danypoint.password=${ANYPOINT_CREDENTIALS_PSW}'
      }
    }
  }
}
- Stage to run Unit tests on our Mule Application.
- Deploy your Mule application to a standalone server. Since you are not passing in the mule.home parameter value, this step will actually download the Mule server from Mule Maven Repository and install it in the Jenkins workspace. If you want to deploy it to an existing, installed instance, then you may add a parameter -Dmule.home=/opt/mule in the Maven command.
- Deploy to a Mule Server Managed via Anypoint Runtime Manager.
- Credential lookup: You need Anypoint Platforms credentials for this step. We will use jenkins credentials() function to look up our credentials using ID value. This function automatically sets two environment variables named {ourvariable}_USR and {ourvariable}_PSW.
- Use Credential variables to set Anypoint username and password, while calling our arm profile.
- Deploy to CloudHub using your CloudHub profile. The process to setup credentials is same as deploying to ARM.
- For CloudHub deployments, mule.version must be same as it appears on CloudHub available Runtime version names.
To understand the syntax of the Jenkins file, you may refer this Jenkins Syntax Reference document.
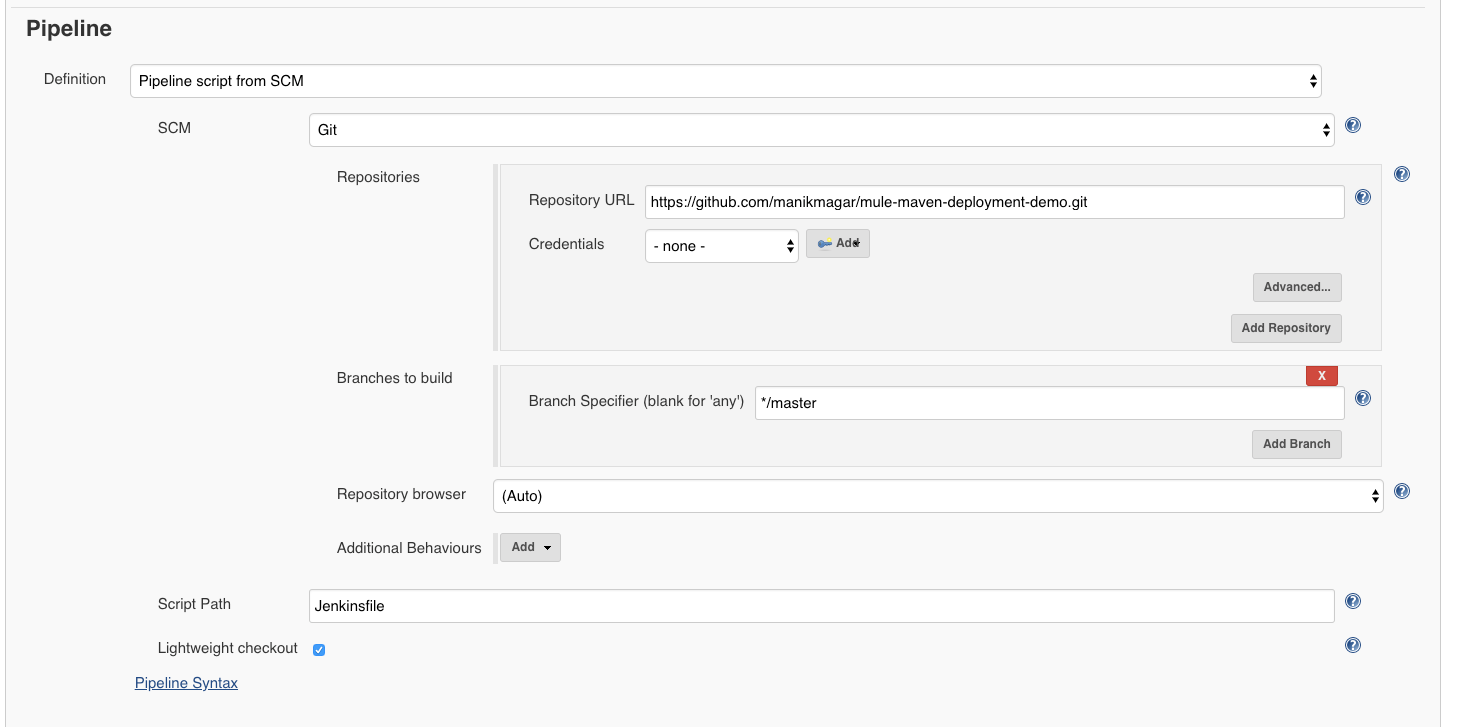
2.4 Jenkins Pipeline Job
Now, we can create a Jenkins Pipeline Job for our demo and configure it to use Jenkinsfile from SCM.
2.4.1 Job Execution
When this job runs, your pipeline should run and perform all deployments:
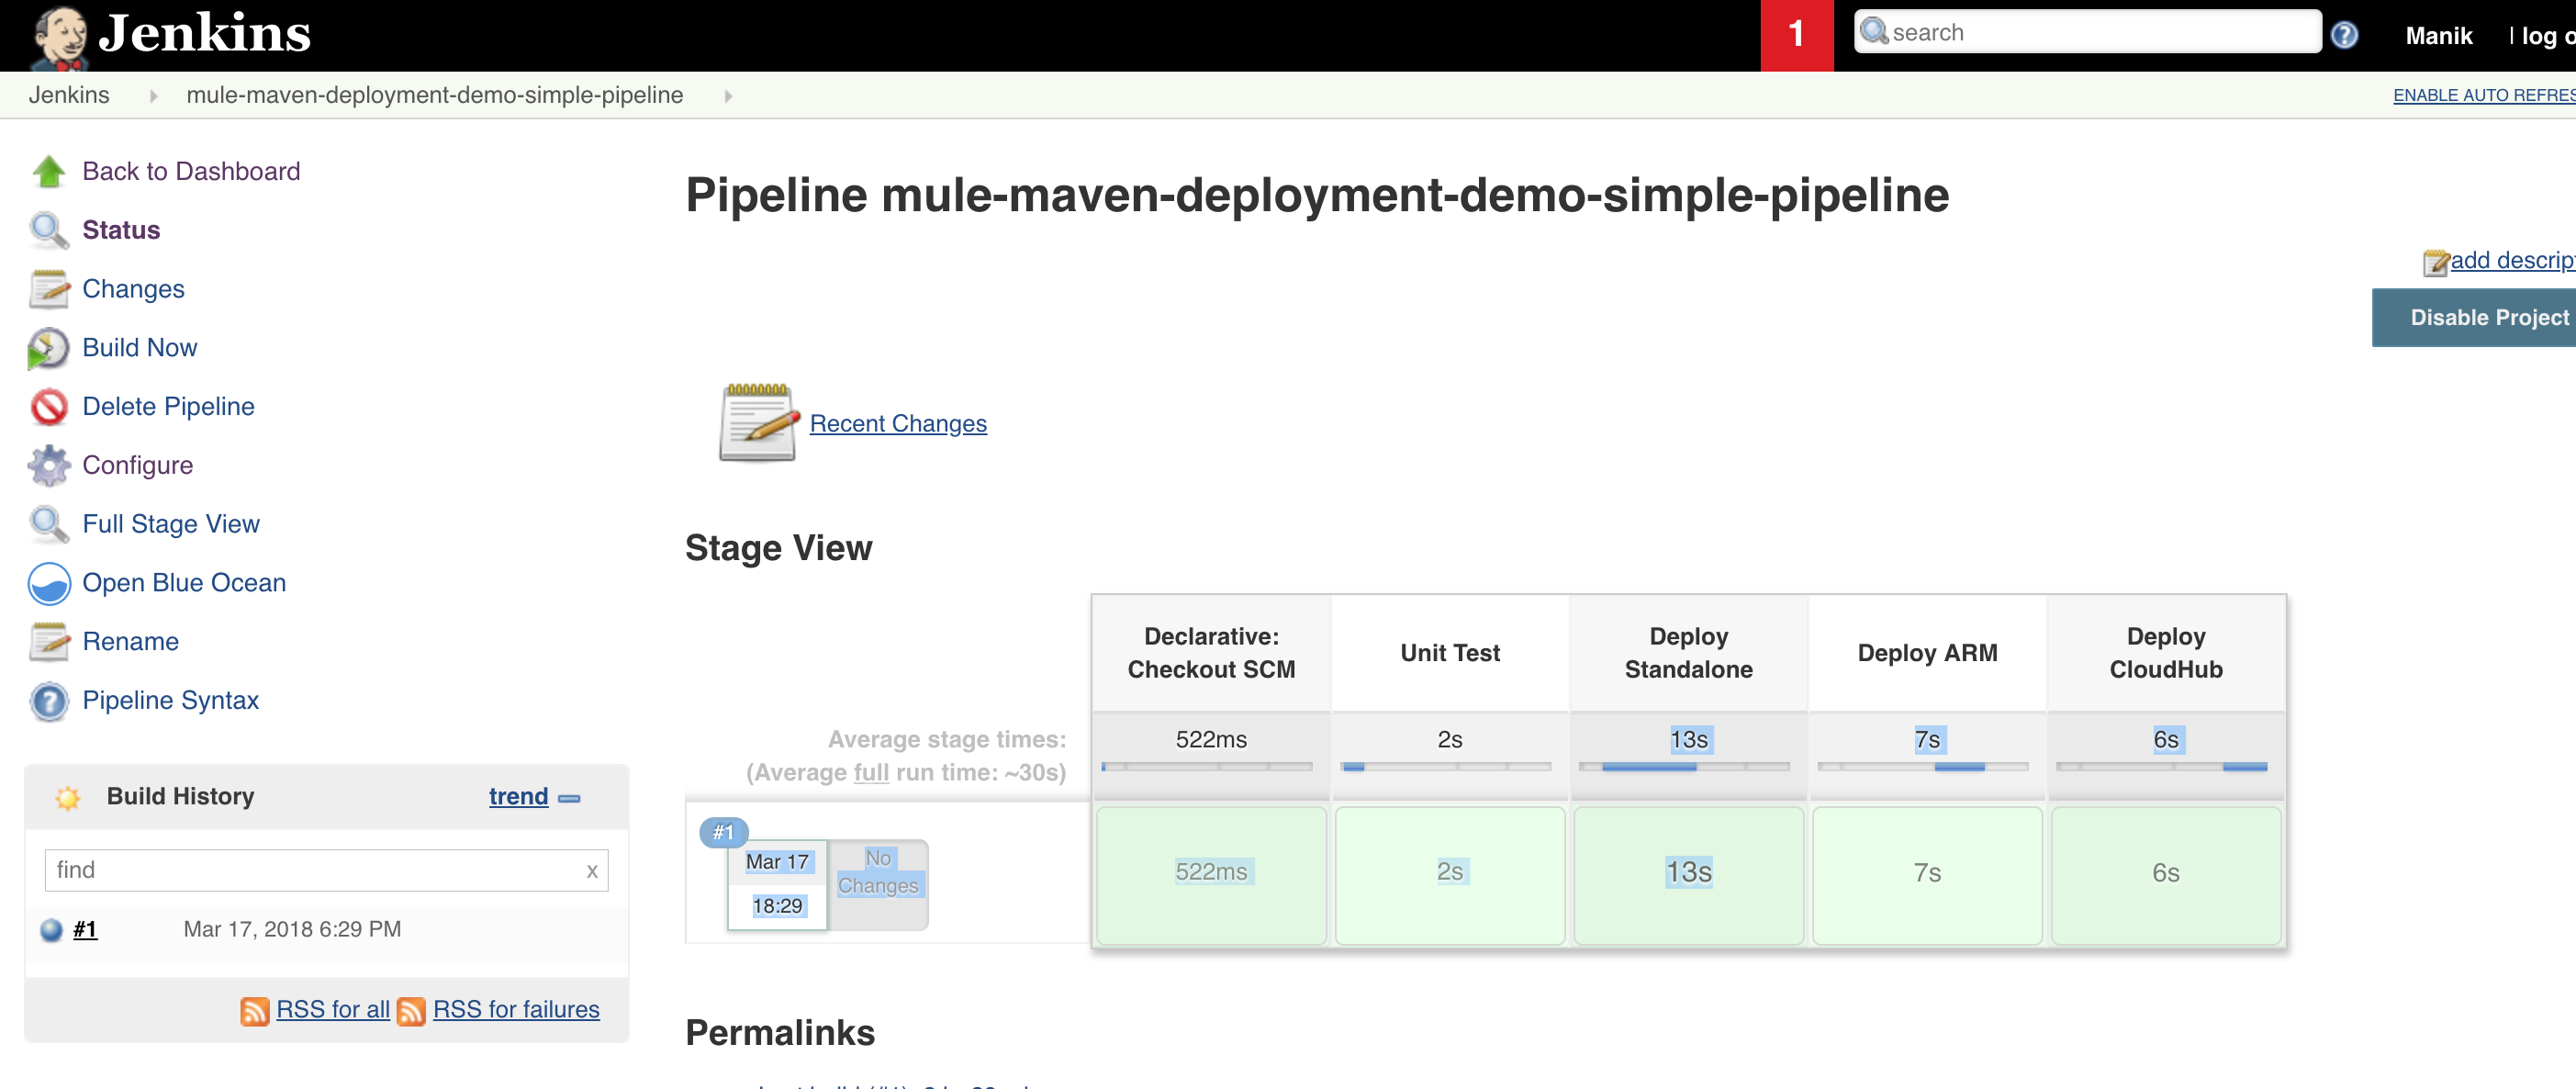
2.5 Deployment Result
2.5.1 Standalone deployment
[INFO] --- mule-maven-plugin:2.2.1:deploy (deploy) @ mule-maven-deployment-demo ---
[INFO] No application configured. Using project artifact: /Users/manik/.jenkins/workspace/mule-maven-deployment-demo-simple-pipeline/target/mule-maven-deployment-demo-1.0.0-SNAPSHOT-b0.zip
[INFO] Resolving org.mule.distributions:mule-standalone:tar.gz:3.9.0
[INFO] Copying /Users/manik/.m2/repository/org/mule/distributions/mule-standalone/3.9.0/mule-standalone-3.9.0.tar.gz to /Users/manik/.jenkins/workspace/mule-maven-deployment-demo-simple-pipeline/target
[INFO] Expanding: /Users/manik/.m2/repository/org/mule/distributions/mule-standalone/3.9.0/mule-standalone-3.9.0.tar.gz into /Users/manik/.jenkins/workspace/mule-maven-deployment-demo-simple-pipeline/target
[INFO] Using MULE_HOME: /Users/manik/.jenkins/workspace/mule-maven-deployment-demo-simple-pipeline/target/mule-standalone-3.9.0
MULE_HOME is set to /Users/manik/.jenkins/workspace/mule-maven-deployment-demo-simple-pipeline/target/mule-standalone-3.9.0
Mule is not running.
[INFO] Starting Mule Runtime
MULE_HOME is set to /Users/manik/.jenkins/workspace/mule-maven-deployment-demo-simple-pipeline/target/mule-standalone-3.9.0
Starting Mule...
[INFO] Deploying application [/Users/manik/.jenkins/workspace/mule-maven-deployment-demo-simple-pipeline/target/mule-maven-deployment-demo.zip]
[INFO] ------------------------------------------------------------------------
[INFO] BUILD SUCCESS
[INFO] ------------------------------------------------------------------------
- We did not specify mule.home parameter, so this step actually downloaded Mule Runtime and installed it.
- Then it deployed the generated application zip.
2.5.2 ARM deployment
[INFO] --- mule-maven-plugin:2.2.1:deploy (deploy) @ mule-maven-deployment-demo ---
[INFO] No application configured. Using project artifact: /Users/manik/.jenkins/workspace/mule-maven-deployment-demo-simple-pipeline/target/mule-maven-deployment-demo-1.0.0-SNAPSHOT-b0.zip
[INFO] Found application mule-maven-deployment-demo on server local-3.9.0-ee. Redeploying application...
[INFO] ------------------------------------------------------------------------
[INFO] BUILD SUCCESS
[INFO] ------------------------------------------------------------------------
| As the application was already deployed to ARM, it just redeployed our application. |

2.5.3 CloudHub deployment
[INFO] --- mule-maven-plugin:2.2.1:deploy (deploy) @ mule-maven-deployment-demo ---
[INFO] No application configured. Using project artifact: /Users/manik/.jenkins/workspace/mule-maven-deployment-demo-simple-pipeline/target/mule-maven-deployment-demo-1.0.0-SNAPSHOT-b0.zip
[INFO] Deploying application mule-maven-deployment-demo to Cloudhub
[INFO] Application mule-maven-deployment-demo already exists, redeploying
[INFO] Uploading application contents mule-maven-deployment-demo
[INFO] Starting application mule-maven-deployment-demo
[INFO] ------------------------------------------------------------------------
[INFO] BUILD SUCCESS
[INFO] ------------------------------------------------------------------------
Redeploying our application to CloudHub.

3. Conclusion
As this how-to blog has demonstrated, Mule Runtime can be installed on many platforms and the Mule Maven plugin simplifies the deployment process. We can also do integration tests using this plugin. We used the Mule Maven plugin and Jenkins Pipeline to automate our Mule deployment to Anypoint Runtime Manager as well as CloudHub environment.
For more information, please refer to the source code on GitHub: mule-maven-deployment-demo and mule-maven-parent-pom.
This is a guest post is by one of our MuleSoft Ambassadors, Manik Magar.


