I was at the StrangeLoop conference last week and was surprised by the level of interest in dynamic and functional languages, in particular Clojure. It was one of the most talked about languages, along with JavaScript and Scala. The general consensus seemed to be that it is a very powerful language once you get your head around it.
Suppose that you have a Maven project and you want to download Node.js modules previously uploaded to NPM. One way of doing that without running node is by using the npm-maven-plugin. It allows the user to download the required Node modules without running node.js: It is completely implemented on the JVM.
Getting Started
First of all you will need to add the Mule Maven repo to you pom.xml file:
After doing that, you will need to add the following to the build->plugin section of your pom.xml file:
Then just execute:
mvn generate-sources
and that’s it!
One more thing…
By default, the modules can be found in src/main/resources/META-INF but that path can be changed setting the ‘outputDirectory’ parameter.
Also, module transitivity is taken into account. That means that it will download all the required dependencies before downloading the specified module.
Show me the code!
The source code can be found here. Feel free to fork the project and propose changes to it.
Happy (Node.js and Maven) hacking!
Update: Another interesting approach of achieving the same (but actually running node) can be done using the Frontend Maven Plugin.
Reading Time: 6minutesIn the past few months, you may have noticed that we have regularly announced the release of new Mule connectors for NoSQL data-stores. Two main forces are at play behind the need for these types of data-stores:
Big Data – The need to deal in realtime or near-realtime with the vast amounts of data “web-scale” applications can generate,
BASE vs ACID – The need to scale reliably in the unreliable environment that is the cloud leading to the relaxation of RDBM’s ACID properties (Atomicity, Consistency, Isolation and Durability) towards BASE ones (Basically Available, Soft state, Eventually consistent).
So where is Mule coming into play in this equation you might ask?
Mule can help integrating such NoSQL data-stores with the resources that produce and consume data. This integration goes way beyond than simply establishing protocol connectivity: thanks to Mule queuing, routing and transformation infrastructure, important tasks like data capture and curation can be achieved. Mule can also be used to expose APIs that make either raw data or processed data available for use in custom applications.
Your API can be a key to your company’s success as it has been for companies like Twitter, Twilio and Box. Get it wrong and you lose out on a big opportunity.
While at Google, Joshua Block presented in 2006 How to Design a Good API and Why it Matters in the context of one of the most widely used APIs ever created – the Java Core APIs – which may have been used by up to 10 million developers.
He cited a two main reasons why API design is important, including:
Public APIs are forever – you have one chance to get it right.
Fast-forward nine years later and everything Joshua said holds true, even if the technology and approach for creating APIs is vastly different today. A well-designed API can be a tremendous asset to your company and if adopted by your developer community it can grow your business in ways you might never have anticipated.
Today Twitter’s API handles over 13 billion API calls a day and there are over 750,000 developers around the world contributing applications to the Twitter ecosystem. There are over 9 million applications built on the Facebook Open Graph API. Neither of these companies could have built out the application ecosystems they have today without having great APIs in place.
So how do you design a great API? Is there such a thing? What does it look like?
Keep it simple
Make your API simple and easy to understand. Follow a RESTful approach and model your API after HTTP resources and actions – the same way a browser interacts with the web.
Here is an example of a REST API from a well known subscription billing company.
The API is intuitive and you can tell what it does at a glance.
However, beyond the technical advantages of using REST, modeling your API after real-life things and relationships in your business has a real advantage.
Take the following example.
You can immediately see that this API call returns the address for a specific invoice for a particular account. It’s modeled on real life example. You can imagine a customer on the phone saying “Hi, my account number is 6242525. I have a question. Could you pull up invoice number 345?
Taking this approach means you end up with a common and meaningful language throughout your API that maps to your business and makes it easy for developers to understand.
Another benefit of following RESTful practices is that many API calls can easily be invoked via your browser address bar which makes trying them out relatively simple.
Leverage new standards
Say goodbye to your old friends – XML is out and JSON is in. While many APIs still support XML, many developers are building new APIs to only respond with JSON. Twitter threw its hands up and now only supports JSON after determining that XML usage was significantly low and JSON was more lightweight and developer friendly. Box ditched XML support after learning that it was horrendous at talking about objects and that less than 0.5% of users still wanted to use it.
Protect your loved ones
Use SSL, without any exceptions. It’s easy for hackers to eavesdrop and hijack credentials from users and only supporting HTTPS provides safeguards against this. In addition, when using this approach access tokens can be used instead of requiring users to digitally sign each API request with expensive cryptographic hash functions.
Use OAuth or an open standard for authorization versus creating some custom solution. It will give you more leverage than rolling your own solution that requires every developer needing to figure out how to use it and all its intricacies.
Put your users in control
Giving a user control over how the API operates is a powerful thing. This comes in many ways including the the ability to sort using various rules, searching and filtering. Field filtering is the ability to specify which fields should be returned in the response data. This can be especially useful in cases where there are bandwidth or performance issues, or where a user only cares about a very small subset of the API response data. Another benefit of this is that it limits the need for the API creator to have “different flavors” of the API since it is configurable by the client at runtime.
Show us around
Navigating an API and being able to paginate is especially important when dealing with large sets of data and most SaaSAPIs (and many web APIs) fall into this category. Instead of requiring a user to ‘figure out’ where to go next by manually constructing URLs, have your API ‘tell the user’ where to go to get the next page of data. The following is a good example from Facebook’s Open Graph API in which all responses return a ‘paging’ attribute which tells a user where to go to get the previous or next set of data. It’s simple and has the added value that a computer or crawler could use to navigate its way around your API.
Don’t break your users
Every API needs to support versioning in order to provide backwards compatibility and a way for users to bind themselves to a specific version if necessary. The easiest way to do this is to implement a version number into a base URI and also support the latest API version under a versionless base URI. This way API client developers can choose to lock themselves into a specific version of the API or always work with the latest one available.
Some companies such as Stripe have taken this even further with date based sub-versions, which account for smaller changes including newly added query parameters, field deprecation, etc. These sub-versions are chosen using a custom HTTP request header.
Beyond versioning, companies need to be careful around changing rules on how their APIs can be used. Changes need to be vetted and carefully communicated. Twitter had to deal with a developer revolt last year after changing how their APIs and content could be used by third-party developers.
Show us how it works
Documentation is key for any developer to be able to adopt and use your API. Your docs should be accessible, easy to find and provide up-to-date details on how they work.
Provide great documentation for developers and keep it up to date.
Building a great API can be a key to your company’s success as it has been for many companies so far. Companies like Twilio and DataSift have shown that you can actually build your core business around an API and even make it your primary product.
Creating the perfect API is close to impossible. However it’s clear that companies that look at their APIs as a key part of the business strategy and not just some add-on feature are the ones that will be most successful.
In your daily work as an integration developer you’re working with different kinds of patterns, even if you’re not aware of it.
Since Mule is based on EIP (Enterprise Integration Patterns) you’re most definitely using patterns when using Mule.
One of those patterns that seems to raise a lot of questions is the “fork and join pattern”. The purpose of the fork and join pattern is to send a request to different targets, in parallel, and wait for a aggregated response from all the targets.
This is very useful when you want to merge information from different systems, perform calculation based on information from different targets or compare data from a range of data sources.
Flowchart describing the fork and join pattern
Since I’ve noticed from questions on the forum and from colleagues in the business that this is tricky thing to do I thought I would show you guys a simple example on how it’s done.
In my example there’s a http request coming in that should return the lowest price from different shops. In the example the request is delegated to 2 different shops, shop1 and shop2, in parallel (asynchronous) and collected for comparison to return the lowest price. This is easily done with Mule and the key feature is the request-reply router. So let’s dig in to the configuration…
In this example I’m using the vm transport to simulate communication with external systems and a random price is returned from the different shops.
Notice that the vm endpoints could be replaced with whatever protocol you desire and the number of external sources could be as many as you like, just be sure to tell Mule how many results to wait for by using the property MULE_CORRELATION_GROUP_SIZE.
So by opening a browser and enter http://localhost:81/lowestprice a number is returned, not very useful but that’s not the point of the example.
When looking at the log the following can be seen:
That tells us that the request has been sent to both shop1 and shop2 and in this case the lowest price was received from shop2.
A simple example but I hope you get the idea on how fork and join pattern can be used and how to use it in more advanced scenarios.
This is a guest post from Mule Champion Tomas Blohm. Thank you Tom! If you would like to write a guest post please email us and get a T-shirt, squeezy Mule or other cool swag.
You probably heard we have been moving into a faster release cadence with the new mountain ranges releases in this post and this one. For many Product Managers or Business Owners releasing faster could be the difference between success and failure. Being able to shorten the cycle between an idea and valuable user feedback enables new companies to understand better market needs and improve based on it. Releasing valuable software earlier is the sweet spot for Agile and Lean methodologies.
Being able to release faster, it is notjust pushing code to production. I will cover how we get to the point to release faster Mule, the leading ESB. What challenges we faced and the places we have been focusing in the last 2 years. Yes, you heard it right, 2 years! Releasing faster is just one of the consequences of the work we have been doing on the ESB for a long time and not just a random request from Product Management. We have millions automated test executed to guarantee a release of mule in 2 months! Keep reading to find out how this happened.
Drivers for change
Two years ago we had about 5000 automated tests executed by our CI environment. It was not a bad initial state, but there was a lot of waste in our builds and development process. We had 5 different builds, for different integration environments with multiple DBMSs, JMS providers, email servers, FTP servers and so on. We had 1 build triggered by a commit and then all the others chained one after the other. In most cases we had to wait over a day for the builds to finish with our changes. It was hard for us to keep track if one of those builds was actually building our change, or it was still building a previous commit. If something got broken in the middle after a day we committed, we had to start researching which commit actually broke things, increasing more and more the effort and time to make a change in the ESB. We didn’t feel comfortable without a quick feedback to the developers if the changes were ok or not and changes taking a long time to go through our process. Feeling that pain over and over again was the trigger for us to change the way we build and develop Mule.
The commit stage
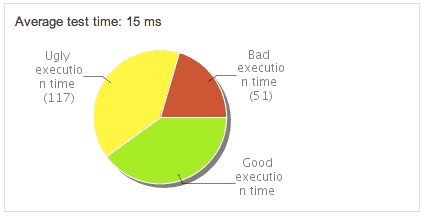
The good, the bad and the ugly
We created a pipeline for our builds, and we have a first commit stage, with the goal of running all unit tests and build all the binaries in less than 10 minutes. This is our quick feedback stage to know if changes are good. We marked which of all our JUnit tests was proper unit tests to belong to this build. We started using the @SmallTest annotation to separate them. Our commit stage still was taking too long, as SureFire scanned the whole project before executing a test. We created our own extension of the SureFire plugin to execute the tests as they are found. That reduced the build time considerably to about 7 minutes executing 1100+ unit tests we have today. We also needed a way to validate that we only have fast tests in this build so we created a Sonar plugin that displays the time each test take for this unit tests, and put them in a graph. We named it, “The good, the bad and the ugly“. Improving the tools we used has been key for us to meet our goals.
The acceptance stage
They were 4 builds, each one taking 2 or 3 hours and all triggered by single commits. We found ourselves stopping many of this builds, and executing them manually to be sure it was building our latest changes. If there was a problem, it was a bummer to find which of all the changes actually caused the problem.
We started working by reviewing all the acceptance tests, and making sure they were not doing unnecessary work. We found there over a thousand tests initialising many things taking longer than needed. We created a new hierarchy of base tests with different scenarios reducing a lot of waste in those tests. After tuning all our tests we reduced the time to 1 hour for each build. We now run them concurrently and take in total about 75 minutes to execute 8000 automated tests. The acceptance stage will run with the latest successful commit stage, reducing also the total time we wait for our changes to be exercised. After the acceptance test we already executed over 9000 automated tests for the ESB.
Nightly builds
We also have a few more nightly builds that executes the 10,000+ automated tests on different JVMs and platforms. On a nightly cadence we update our Sonar metrics, and execute more long running builds, like the HA and QA automated test suite with larger applications samples. At this point, we can be sure that everything works as expected when we make changes.
The Results
During this process, we doubled the amount of automated tests we execute on the ESB for each commit. We are true believers that automation of our tests is the only way to improve.
The work on automation and reducing waste in our development process lead to many benefits, releasing faster is one of them. We also went from an average of escalated bug to engineering from support 1 bug every 6 support cases in 2011, to an average of 1 bug every 20 support cases in 2013. We reduced the cost of maintaining each version of the ESB, reduced the time to create a patch for our customers, we improved the code base considerably, higher quality perceived by our customer and reduced time to market for new features. Only adding quality in less time each step allows you to release faster. The longer you wait, the longer and harder it will be to get back on track.
Mule is already running on premise and in the cloud and is soon bound to run virtually everywhere thanks to a new project called Anypoint Edge. This initiative not only focuses on allowing Mule to run on lightweight platforms, like the Raspberry Pi, but also to support protocols and devices relevant to the embedded world, like MQTT and Zigbee. The “Internet of things” had its rabbit, it’s now going to have its Mule!
If you follow this blog, you may remember that we’ve already discussed MQTT before. We’ve introduced the Mule connector for this lightweight publish/subscribe protocol with an example where MQTT was used in the context of conference booth QR Code scanners. In this post, we’re circling back to this example but we add a new twist to it: we’re taking it to the Edge!
In the original architecture, Mule was running on a laptop, using its webcam to scan QR Codes but now that Mule is able to run on the Raspberry Pi, we will revisit the example to run on this tiny device. We will also use the brand new blink(1) connector, which will allow us to use this smart USB RGB LED to flash a visual confirmation when the scan correctly happened.
So let’s start by reviewing our architecture diagram and let’s unroll the example from there.