What is a RESTful API?

Reading Time: 3 minutes

When you’re designing an API, it’s important to know the type of API you want for your specific project and what it’s advantages and disadvantages are. REST, or RESTful APIs are some of the most popular APIs; but how do you know that this type of API is right for what you want to do?

RESTful APIs are designed to take advantage of existing protocols. While REST – or Representational State Transfer – can be used over just about any protocol, when used for web APIs it it typically takes advantage of HTTP. Therefore, developers don’t need to install additional software or libraries when creating a REST API.

REST APIs provide a great deal of flexibility, which is one of their key advantages. Data is not tied to resources or methods, so REST can handle multiple types of calls, return different data formats and even change structurally with the correct implementation of hypermedia. This allows developers to build APIs that can meet their own needs while also meeting the needs of multiple types of customers.

The disadvantage to RESTful APIs is that you can lose the ability to maintain state in REST. They can also be more difficult for newer developers to use.

For more information about RESTful APIs, and how to select the right type of API for your project, download the eBook Undisturbed REST: A Guide to Designing the Perfect API.

Presenting MUnit Coverage

Reading Time: 3 minutes

For some time now users were able to see basic coverage in the Anypoint Studio UI.

With the new release of MUnit version 1.1.0, users will now be able to see coverage data of the whole  application in detail, all this by just adding a simple set of configurations to the MUnit Maven Plugin.

MUnit Coverage is the perfect tool for those developers who wish to have a quality metric over their applications. You can define metrics of minimum coverage for:

  • The application overall
  • Each configuration File
  • Each  Flow

With MUnit coverage you can see descriptive reports and you can configure all of this from your application pom file.


Reports

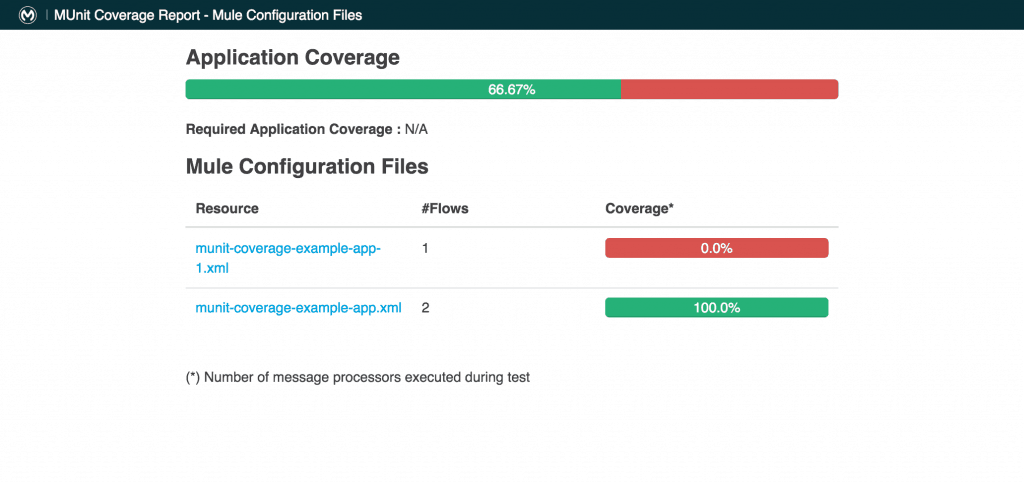
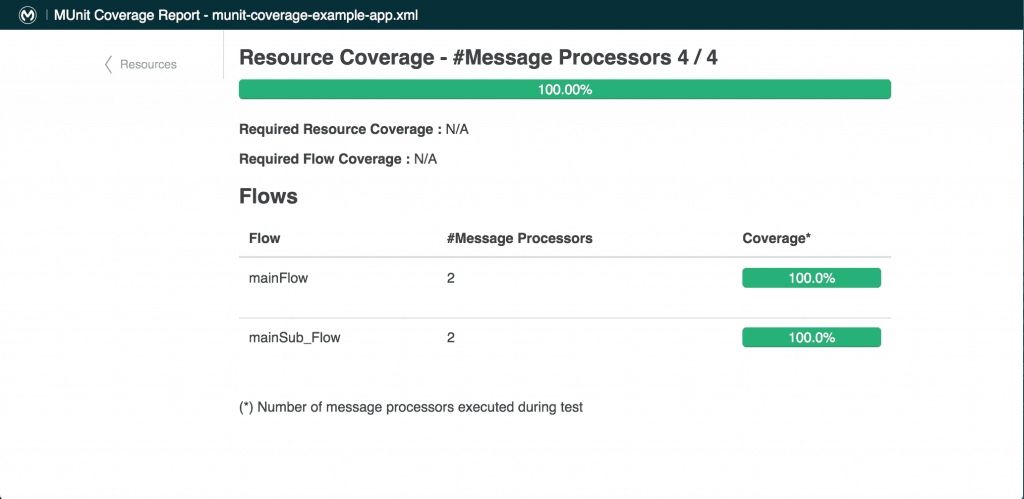
MUnit Coverage generate reports, those will allow you to check the coverage your application in detail, at a message processor level. You can view the reports in HTML format:

Screen Shot 2015-12-06 at 2.40.04 PM
Screen Shot 2015-12-06 at 2.40.39 PM

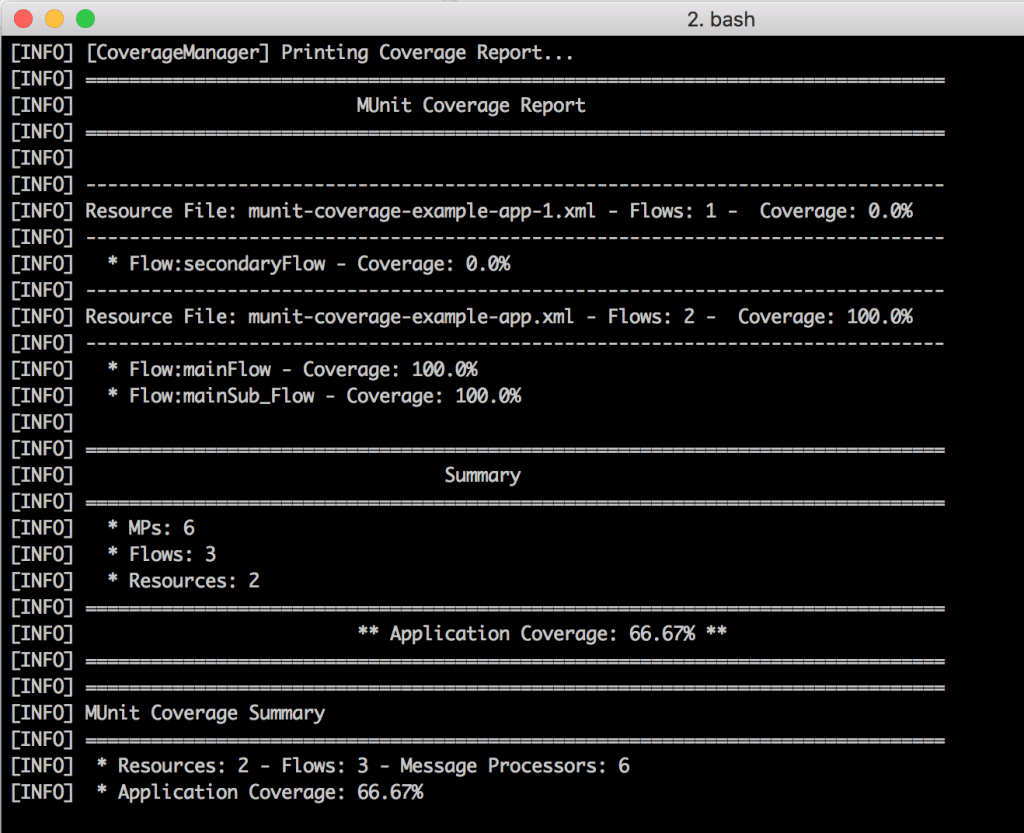
Also, you can see the data right in the console:

Screen Shot 2015-12-06 at 3.25.17 PM

Maven Integration

The full power of MUnit Coverage is unleashed when using it from Maven.

You not only configure how to present the reports, but you can also make your application build fail if a coverage metric is not achieved:

Screen Shot 2015-12-06 at 3.28.59 PM

Placing your application in a continuous integration system you can make sure that every time your application build, the coverage metrics are met.

For more information on how to use MUnit Coverage, please check our Documentation.

Anypoint Studio and Cloudhub integrated UI release

Reading Time: 4 minutes

We recently launched an enhanced CloudHub deployment for Studio feature.

This new interface allows users to deploy Studio projects to CloudHub as if they were using CloudHub in the browser, providing all the features and settings needed to get your app up and running.

To log in to the Anypoint Platform through Studio, you can either set a user in your Studio Preferences under the Anypoint Studio/Authentication section or simply right-click on your project name and choose the “Deploy to Anypoint Platform” option. For either of these options, a single sign in window for the Anypoint Platform will automatically appear if you are not already logged in.

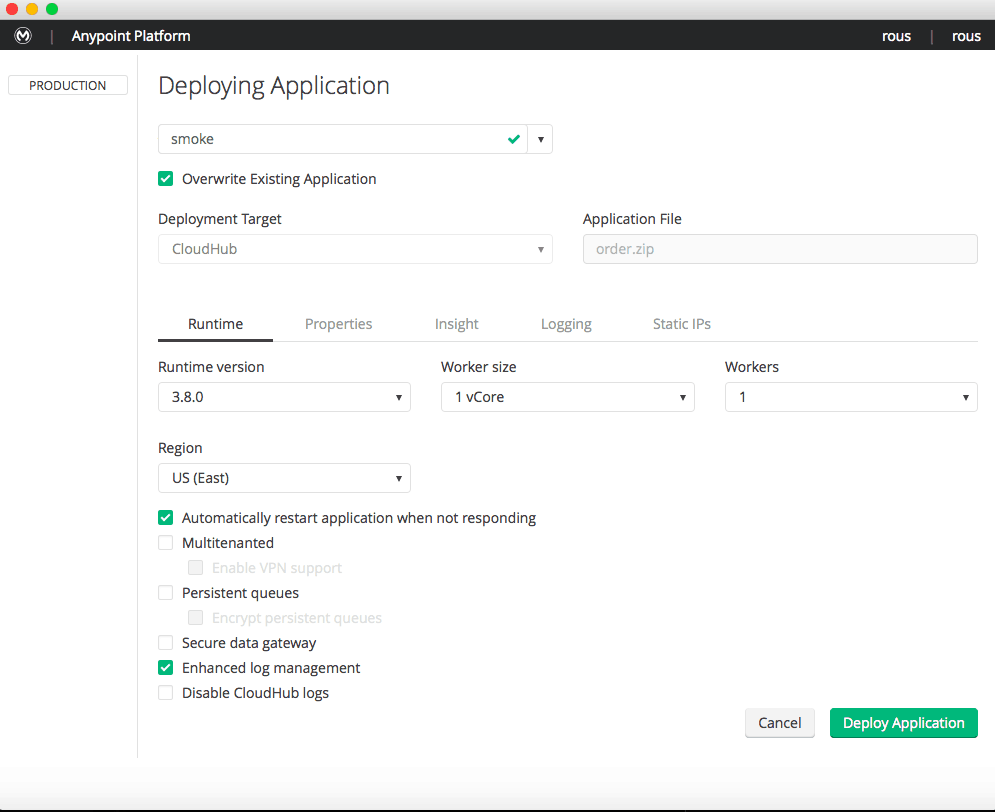
Once logged in, the CloudHub Deployment window will display. From there, a user can now adjust and control all of their application’s deployment settings without ever leaving Studio — this includes adjusting runtime settings, adding application properties, enabling enhanced logging and allocating Static IPs.  A user can also now choose which environment and which organization they want to deploy their application to directly from Studio.

Exclusive features for this UI:

Redeploying your application to CloudHub is now easy to do from Studio as well. If you choose the “Deploy to Anypoint Platform” option for a project that has already been deployed to CloudHub, the CloudHub Deployment window will load with that application’s current CloudHub settings pre-filled. If you wish to redeploy your project over another of your existing CloudHub applications, you can select an application from the Application Name drop down. Doing this however, will cause your previous application at that domain to be overwritten with the new deployment settings, so you must check the “Overwrite Existing Application” check box to confirm this action.

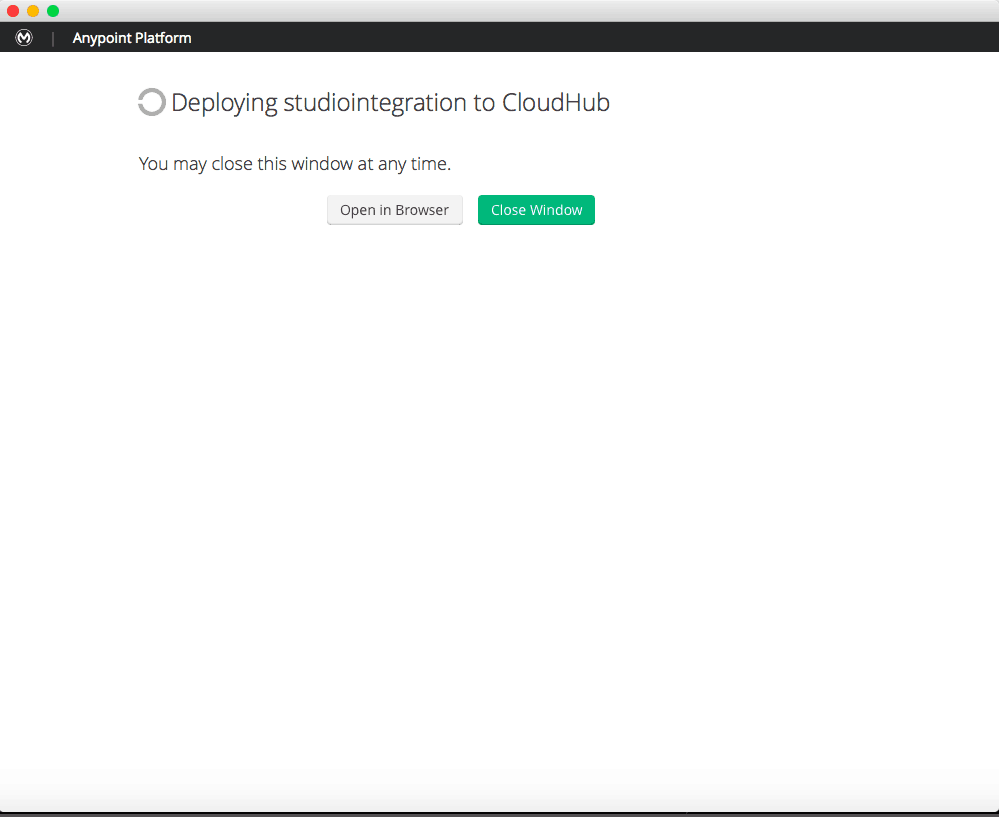
Once the “Deploy Application” button is clicked, a Deployment Status screen will display. From here, you can either click the “Open in Browser” button to be taken to CloudHub in your default Browser or watch your application’s deployment status.  You can close this window at any time, or leave it open and continue working in Studio.

HowTo – Apply an OAuth policy on a REST API

Reading Time: 11 minutes
In the previous post in the “APIfy your integrations” series, we went through an API design-first approach to building integrations to back-end systems.
 
We defined the API specification using RAML, implemented the API by importing the RAML into Anypoint Studio and deployed the implementation to mule runtime in cloud or on-premise.
 
We are now ready to share the API with the developer community. Before sharing, we need to make sure that the API is governed. Governing an API means applying policies like rate limiting, SLA based tiering and securing API access with industry standard protocols.
 
One popular way to secure APIs is OAuth (Open Authorization). OAuth 2.0 focuses on client developer simplicity while providing specific authorization flows for Web applications, desktop applications, mobile apps and Internet of Things. Here’s more< about how OAuth 2.0 works.
 
Mulesoft’s Anypoint Platform provides a policy template to implement OAuth out of the box. In this post, we will go through the step-by-step process of configuring the OAuth policy to enforce OAuth on an API.
Pre-requisites:

Steps:

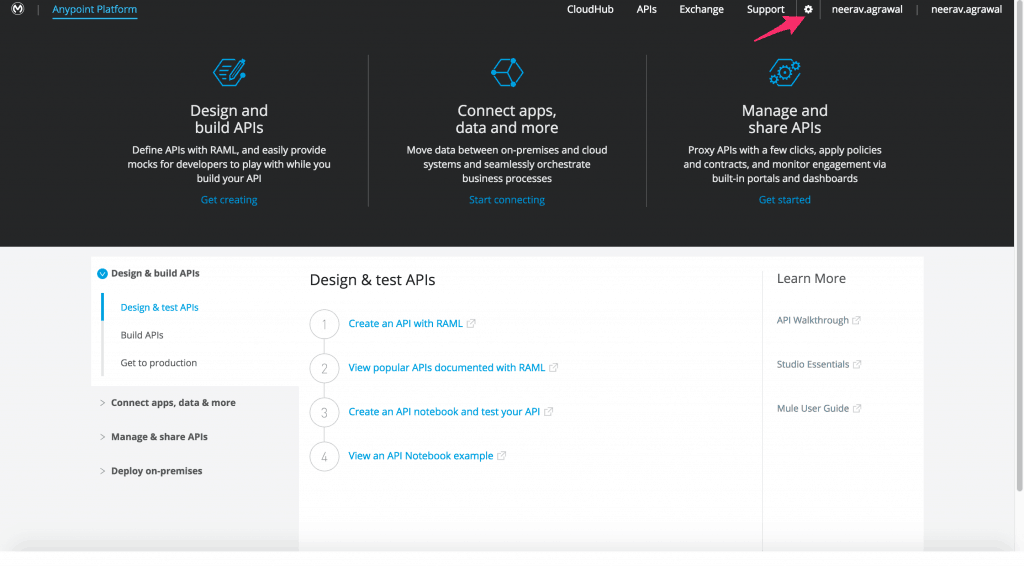
  1. We will obtain the client id and client secret for the Anypoint account so we can use it to configure the on-premise API gateway runtime. Click on the settings icon. Anypoint_Platform
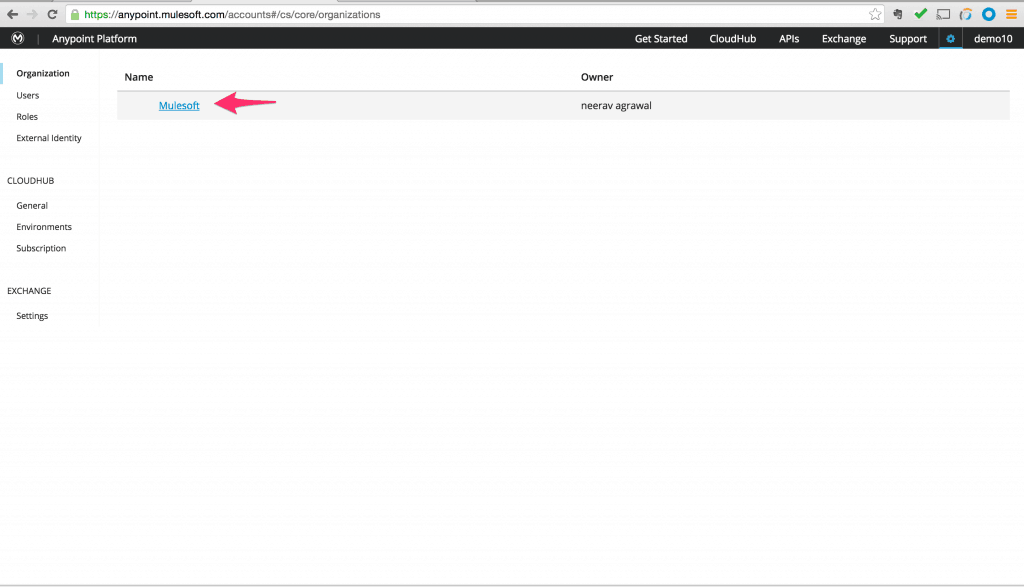
    Click on the Organization name that was used during the account signup. Fullscreen_11_27_15__5_01_PM
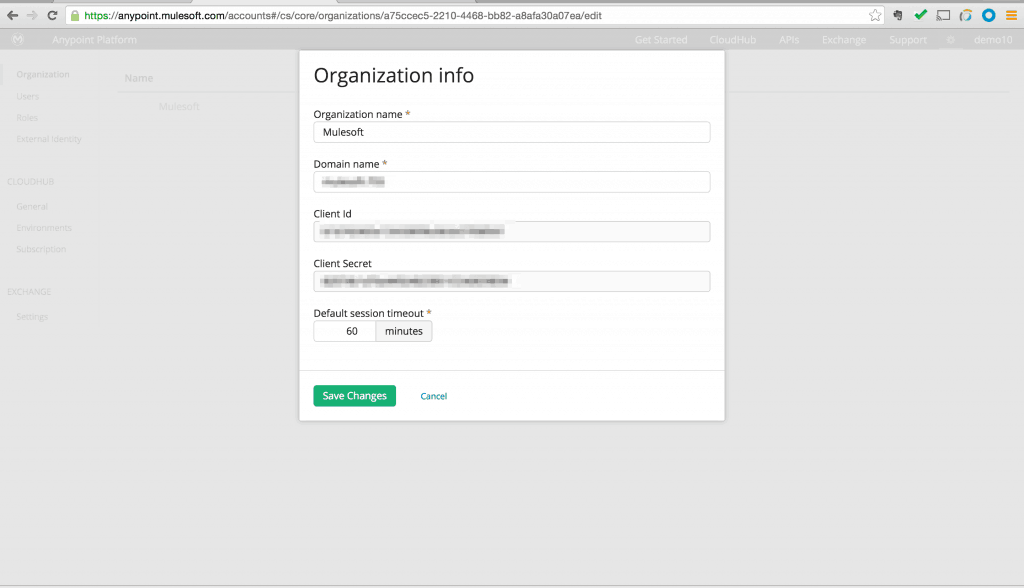
    This will bring up a dialog box that gives the client id and client secret for the Anypoint account. Fullscreen_11_27_15__5_02_PMWe will configure the on prem API gateway with these parameters so we can manage the APIs and visualize analytics from Anypoint platform for APIs running in the cloud.
  2. Download the on-premise API gateway runtime and refer to this link to configure it. After following the configuration, we can run it by giving the client id and secret we noted earlier for the platform account. We will also give the environment name as an argument. Following is an example. bin_—_bash_—_202×55_and_javascripting_—_bash_—_202×57
  3. In this tutorial, we are going to apply an OAuth policy to an API. There can be the following scenarios:
    • Existing SOAP or REST service – In this case please follow this link to create a proxy to the back-end web service. Download and deploy the proxy application to gateway runtime
    • Create a REST API using mule Anypoint platform – We walked through this use case in part 2 of this series. Deploy this application to the gateway runtime.
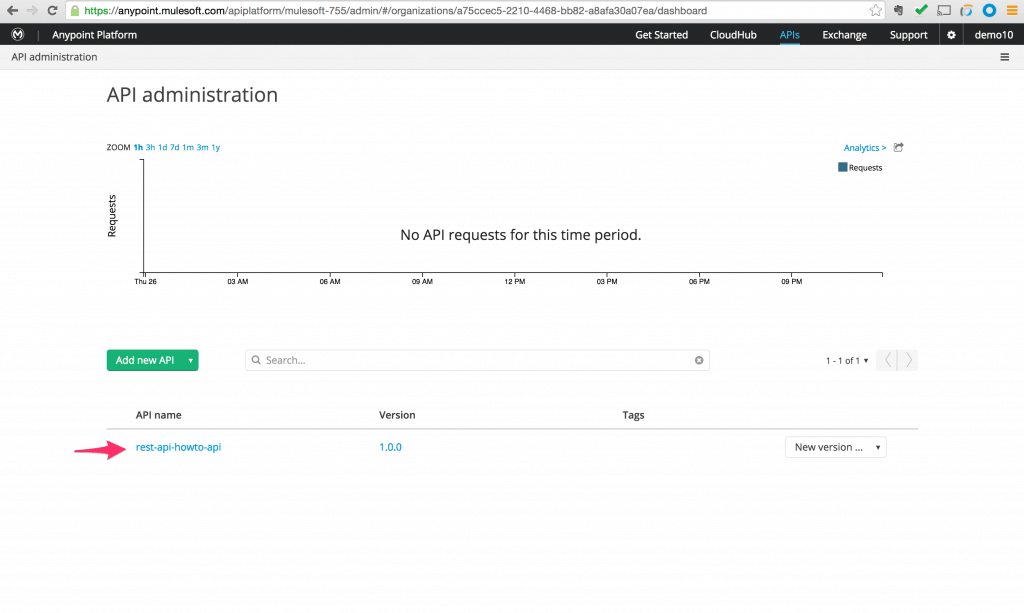
  4. Assuming we pick one of the above two scenarios, when we login to our Anypoint Platform account we can view the API application we registered. Using the example from part 2 we can see the application name “rest-api-howto” registered on the platform.
    Anypoint_Platform_for_APIs___API_administration
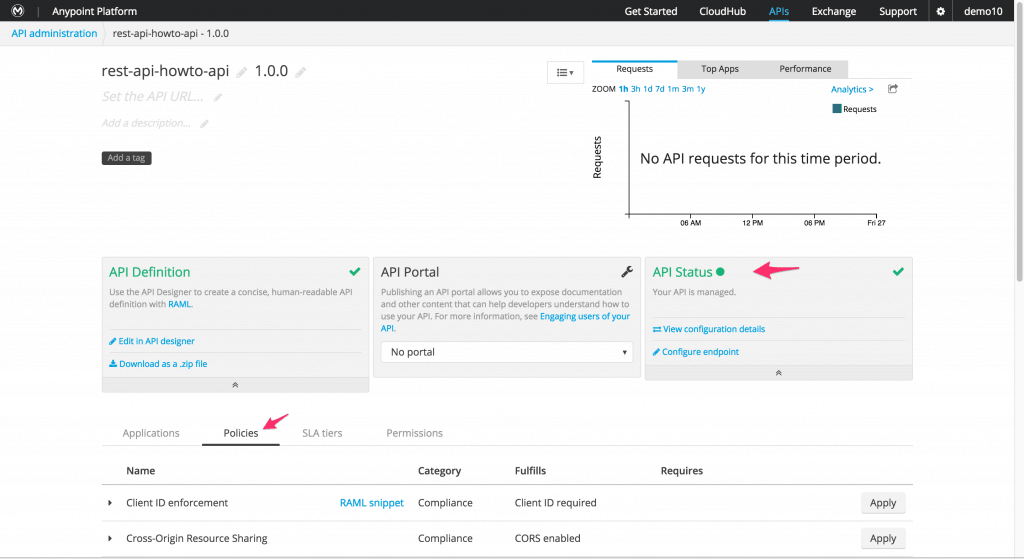
  5. Click on the entry and we will see the API detail page. Here we can see the API status is marked as green which says that we can actively manage the API. So we will click on the “Policy” tab to see all out of the box policies that are available.
    Anypoint_Platform_for_APIs___API_administration___rest-api-howto-api_-_1_0_0
  6. Now before we apply the OAuth policy we can have the following two scenarios.
    • Use an external OAuth provider: Make a note of the OAuth URLs for validation, authorization and access token provided by the external OAuth provider. Go directly to step 7
    • Use Mule to host an OAuth provider
    Exchange

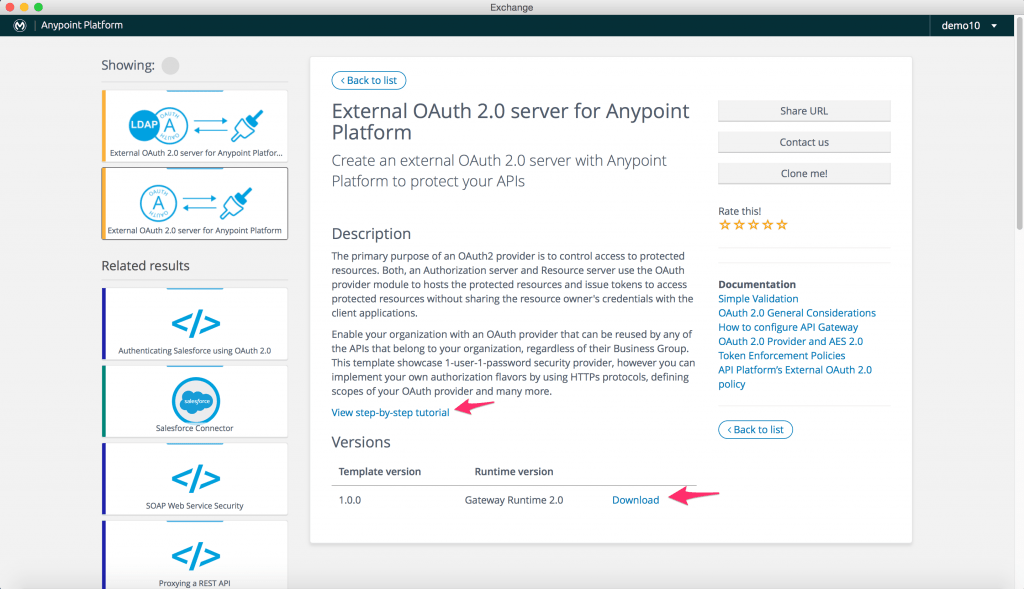
    In the case of using Mule to host an OAuth provider, log into Anypoint Exchange. Search for OAuth provider in search and you will see two entries show up. Click on the details for “External OAuth 2.0 server for Anypoint Platform“.
    Click on “View step-by-step tutorial” and follow the instructions for section 2 of the tutorial to configure the properties.
    After configuring the properties, make a note of the OAuth URLs for validation, authorization, and access token.

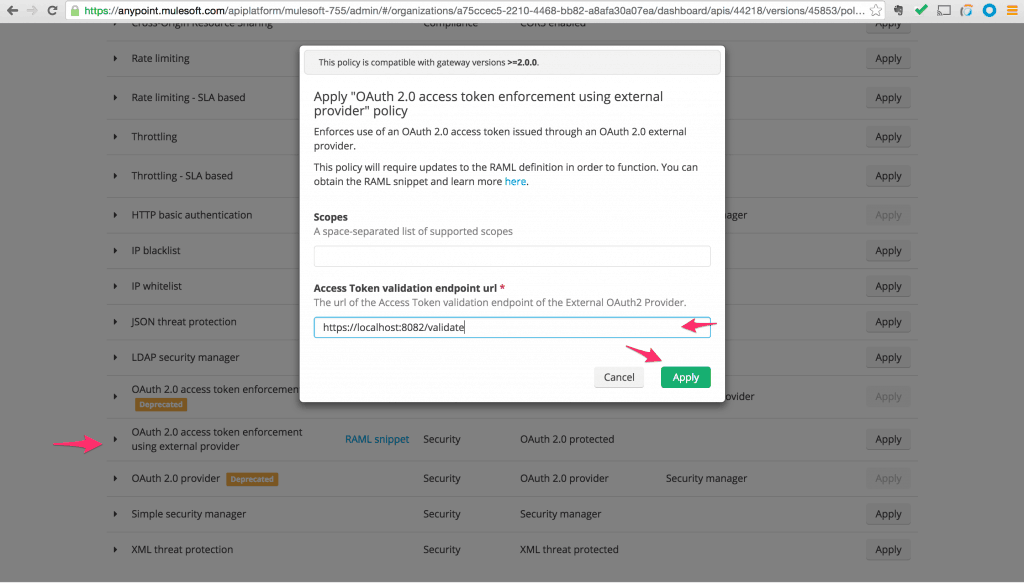
  7. Go back to the API detail page on Anypoint Platform for API management. On the “Policy” tab scroll down to find policy name “OAuth 2.0 access token enforcement using external provider”. Click Apply. This will pop up a dialog. Enter the OAuth validation URL in the box labeled “Access Token validation endpoint URL”. Click Apply. This will activate the OAuth policy on our API.
    Anypoint_Platform_for_APIs___API_administration___rest-api-howto-api_-_1_0_0
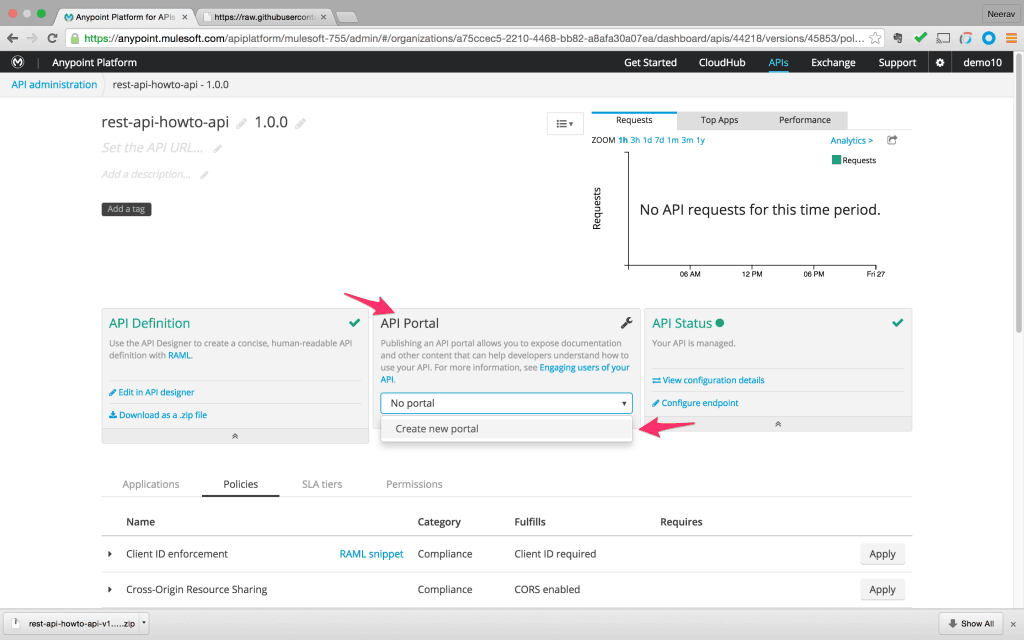
  8. Before we test our API we need to define a client application with which we will request access to the API. This is done via the developer portal for the API. Go to API detail page and on the central panel click on the drop down and pick “Create new portal”.
    Fullscreen_11_27_15__12_03_AM
  9. This will bring up the portal template. We can add styling and documentation to the portal. For now, we will use it as is and click on the “Public view” to bring up the developer portal public view.
    Fullscreen_11_27_15__12_03_AM
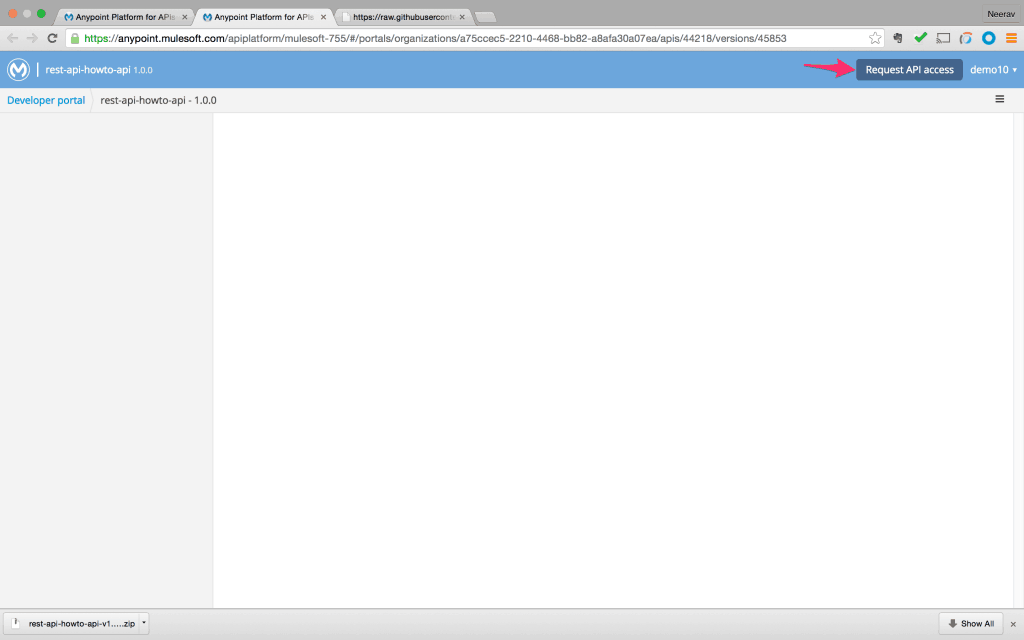
  10. Click on the top right button “Request API access”.
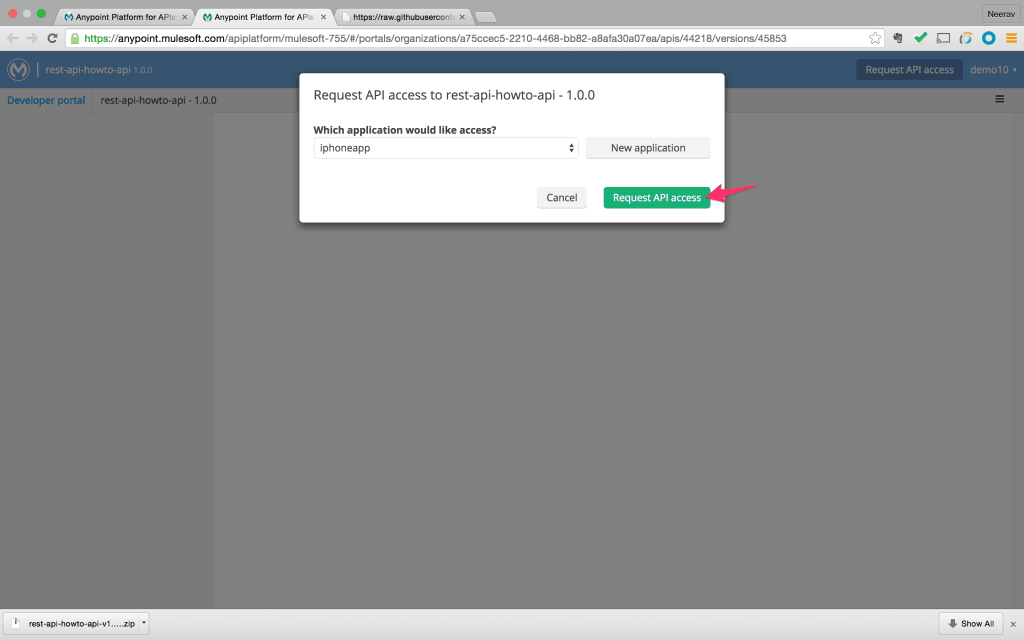
  11. This will bring up a dialog where we can either pick an existing application or create a new client application. Click on “Request API access” after creating a new application.
    Fullscreen_11_27_15__12_04_AM
  12. By default, the client application is auto-authorized and granted access. A client id and client secret is assigned to the client application. We can get this information from the developer portal view list of client applications. Note the id and secret.
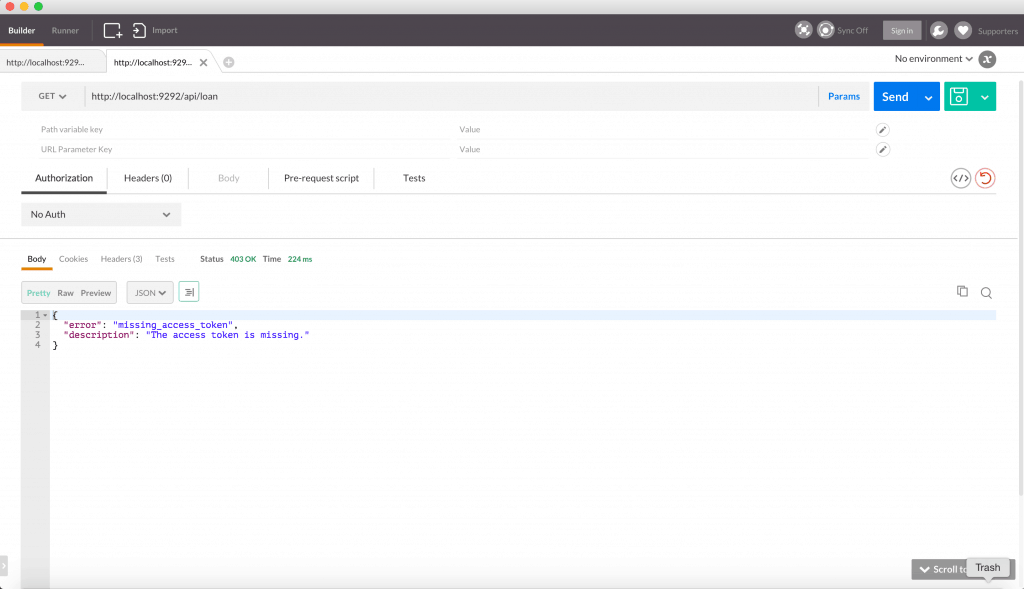
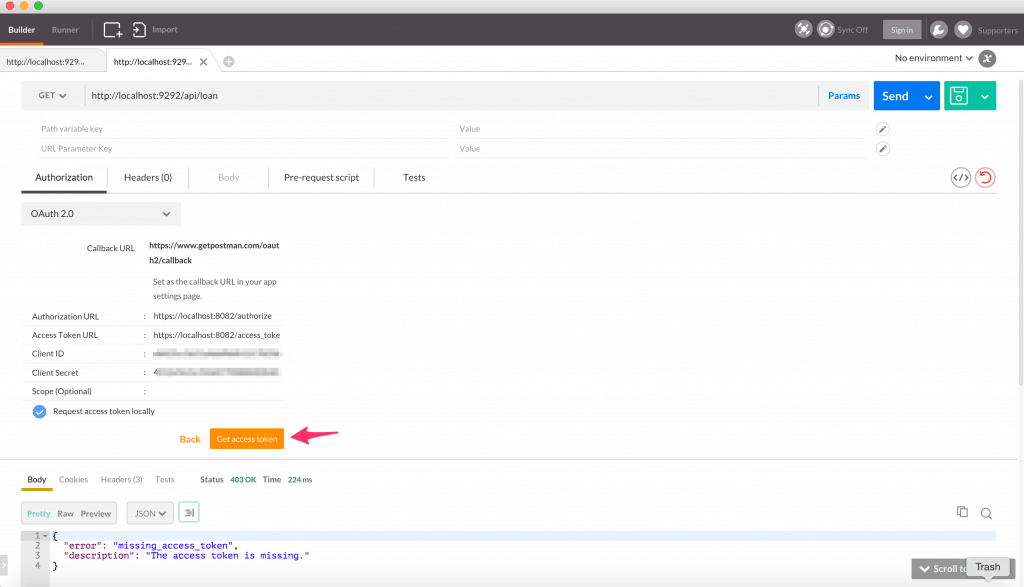
  13. Bring up Postman to test our API. Enter the API URL with the relevant query param and method. When we click on “Send,” we will get an error message saying “Missing access token”. This is because our API is protected with OAuth policy and requires relevant OAuth parameters in the request.
    Postman
  14. Refer to this link to see how Postman can be used to request for OAuth access token. Fill in the relevant OAuth URLs in postman.
    Postman
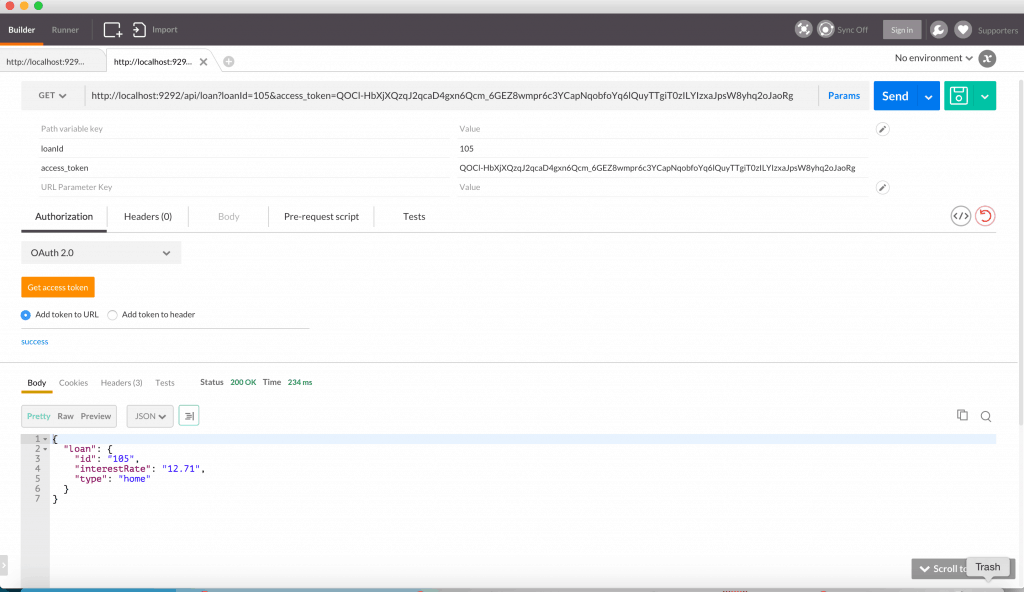
  15. Once we obtain the access token and click “Send” we get the response message populated with data.
    Postman_and_raml_snippet_oauth_-_Google_Search

Quick recap:

  1. An API needs to be protected with an OAuth policy.
  2. The policy can be added via Anypoint API management console.
  3. An OAuth provider can be external or hosted in Mule. The OAuth provider can be downloaded from Anypoint Exchange.

An API lifecycle is an iterative process of requirement gathering, design, and validation. Once validated, it is built, governed and shared with the community. Mulesoft’s Anypoint Platform offers a unified platform to achieve this entire process with a single console to manage.

HowTo – REST API proxy to SOAP webservice

Reading Time: 10 minutes

This blog post is a continuation of our first How To series, “APIFy your integrations,” where we started off by creating a SOAP API around a database.

Some organizations are entirely invested in either SOAP or RESTful web services. There is plenty of material already written on SOAP vs. REST, so there’s no need for us to take that on here.

It can be a use case driven decision where SOAP and REST can co-exist. With this approach, it is a common scenario to have a hybrid environment where some system APIs exist as SOAP based web services that need to have a REST interface defined.

In this blog, we will walk through creating such a REST API proxy on top of an existing SOAP web service.

To get the best fit for our REST API, we will adopt a design first approach. Before we touch a line of code to build the API, consider what value our API needs to offer its consumers and exactly how they will need to consume it. Allow time to get this interface right. Iterate on the design, mock the implementation to enable consumer interaction, and in parallel ensure it’ll be deliverable by your implementers.

We will make use of an API description language called RAML that:

1) provides a blueprint to design APIs from the top down with your team before you decide on an implementation or begin to code.

2) acts as a contract by which we communicate with the API consumers/partners/developers what this API will do and decouple them from implementation.

3) acts as the metadata that facilitates system-to-system and machine-to-machine interactions as well as a place to describe human readable descriptions about the API.

4) provides tooling and specification that is very simple and clean for API stakeholders to use.

System prerequisites:

Final Project

  • Download the finished project here.

Steps:

  1. If there is no existing SOAP web service to proxy to, check part 1 of this series.
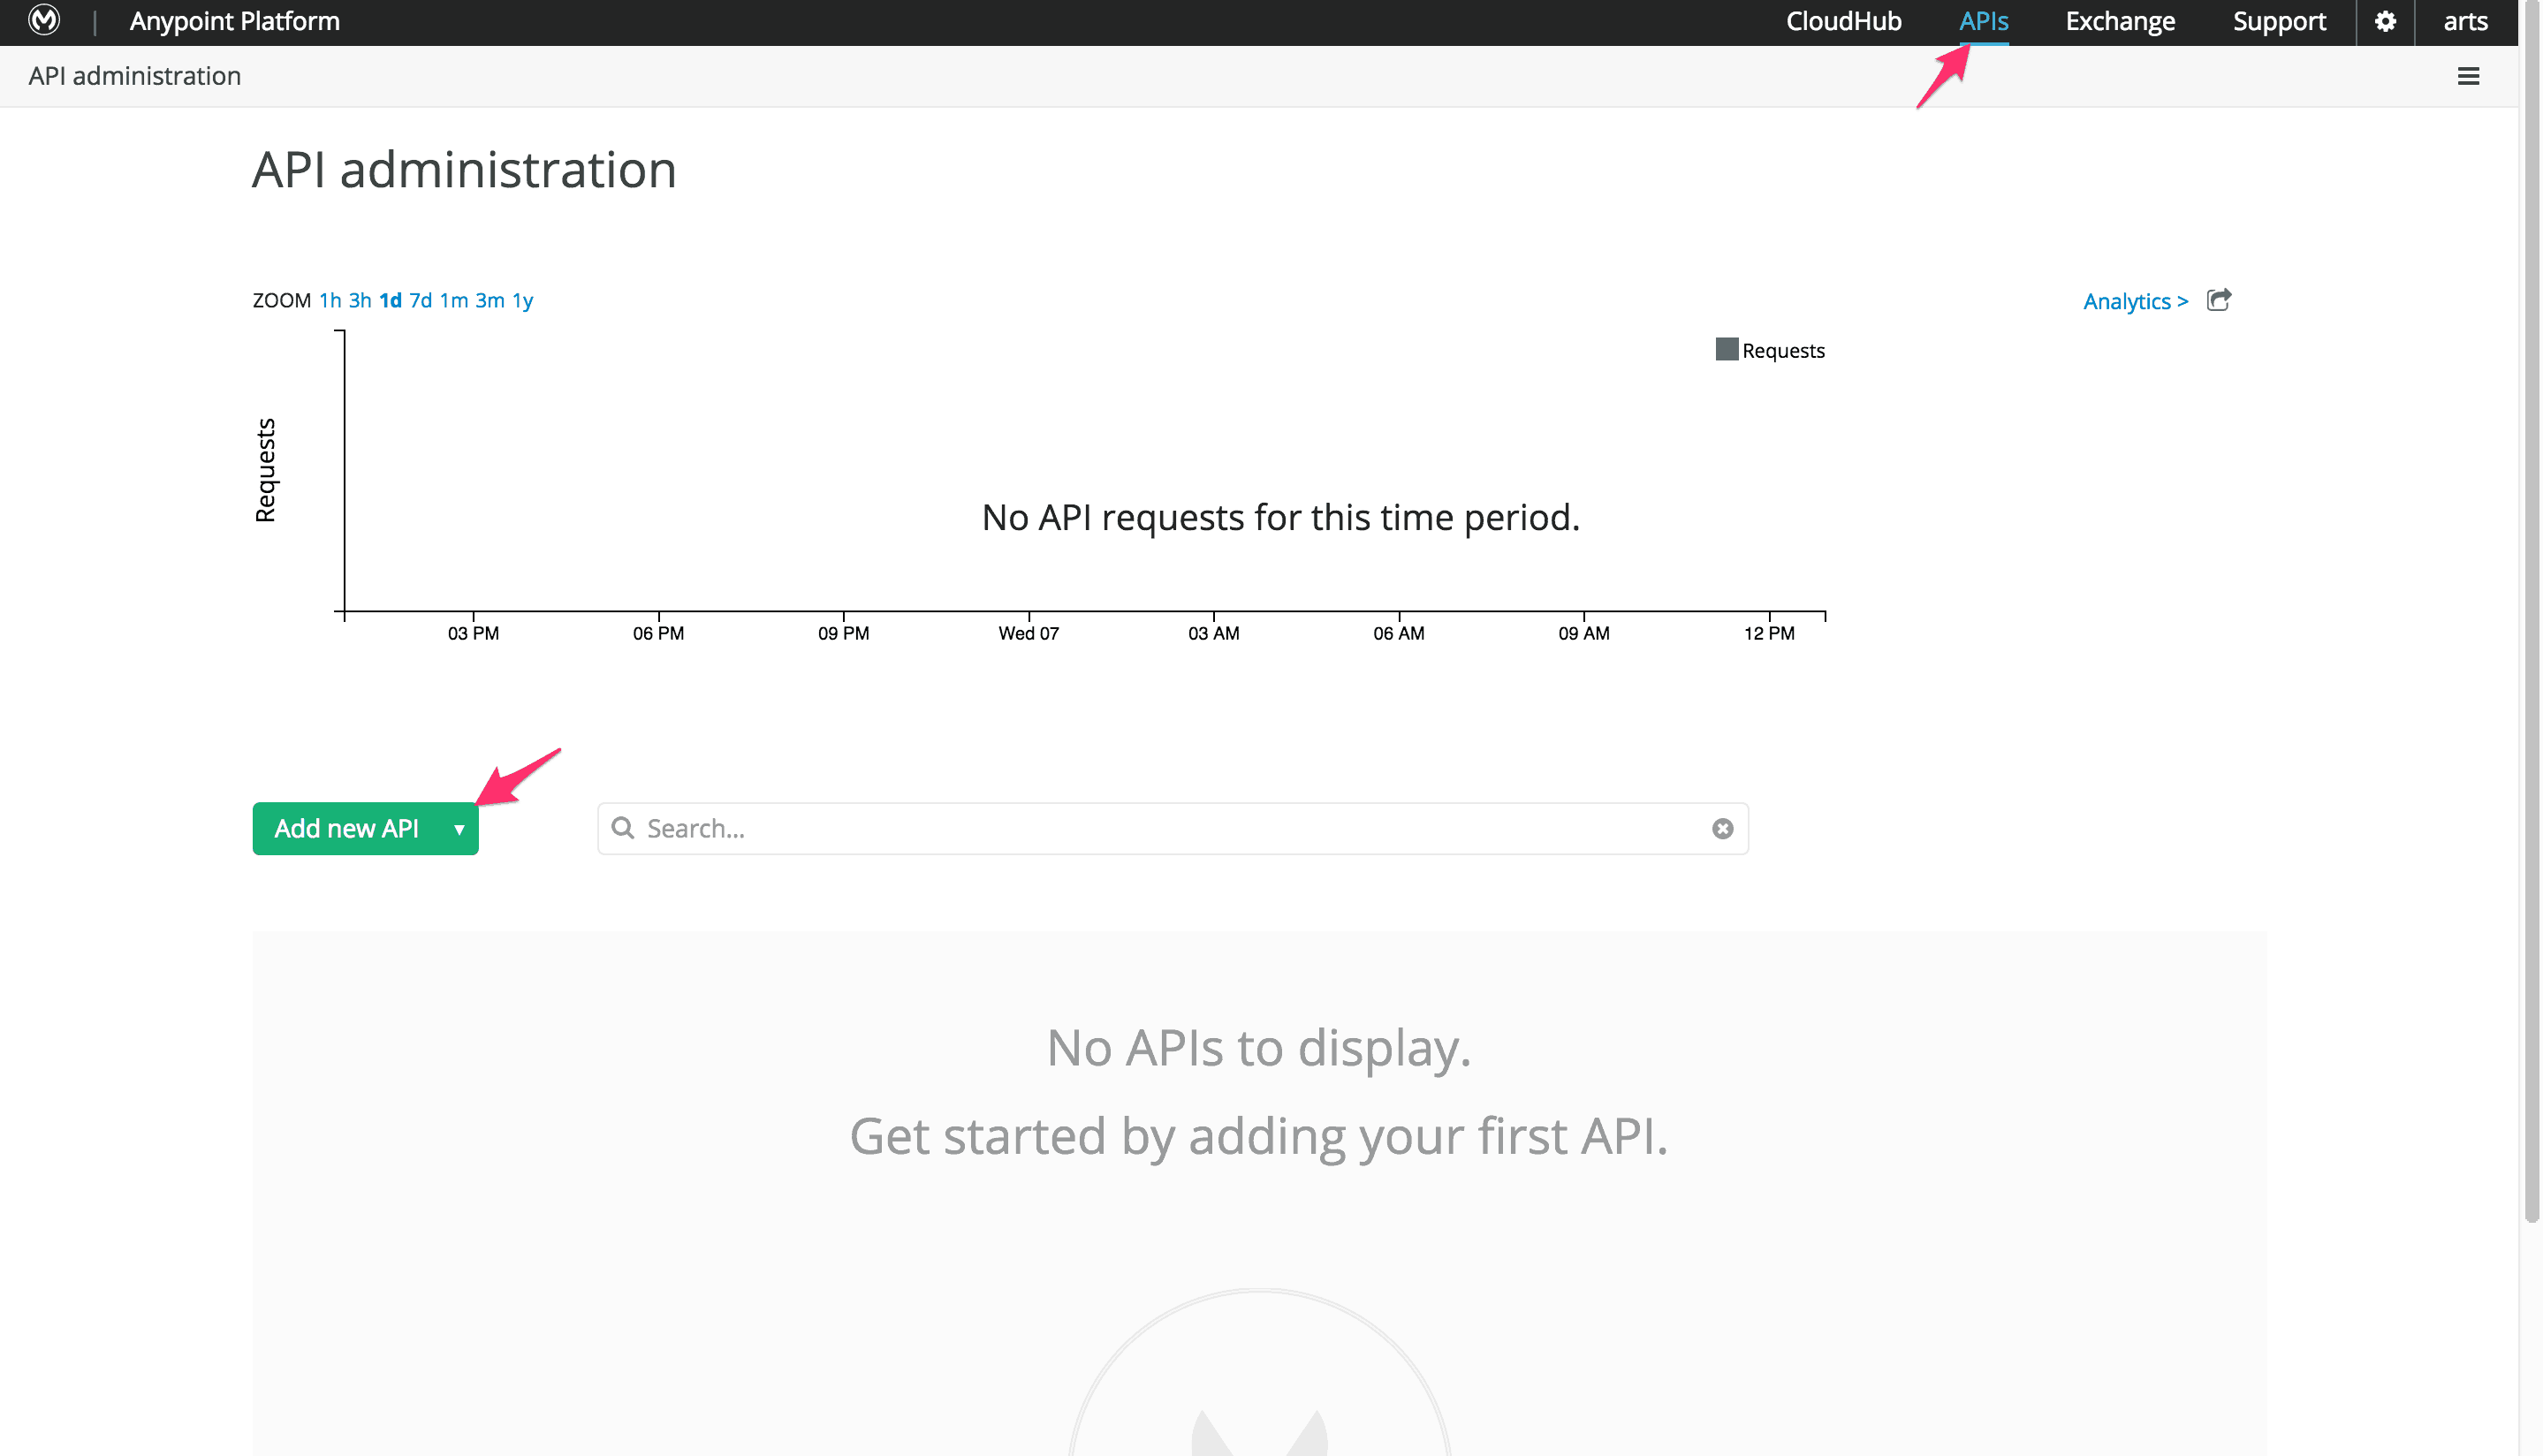
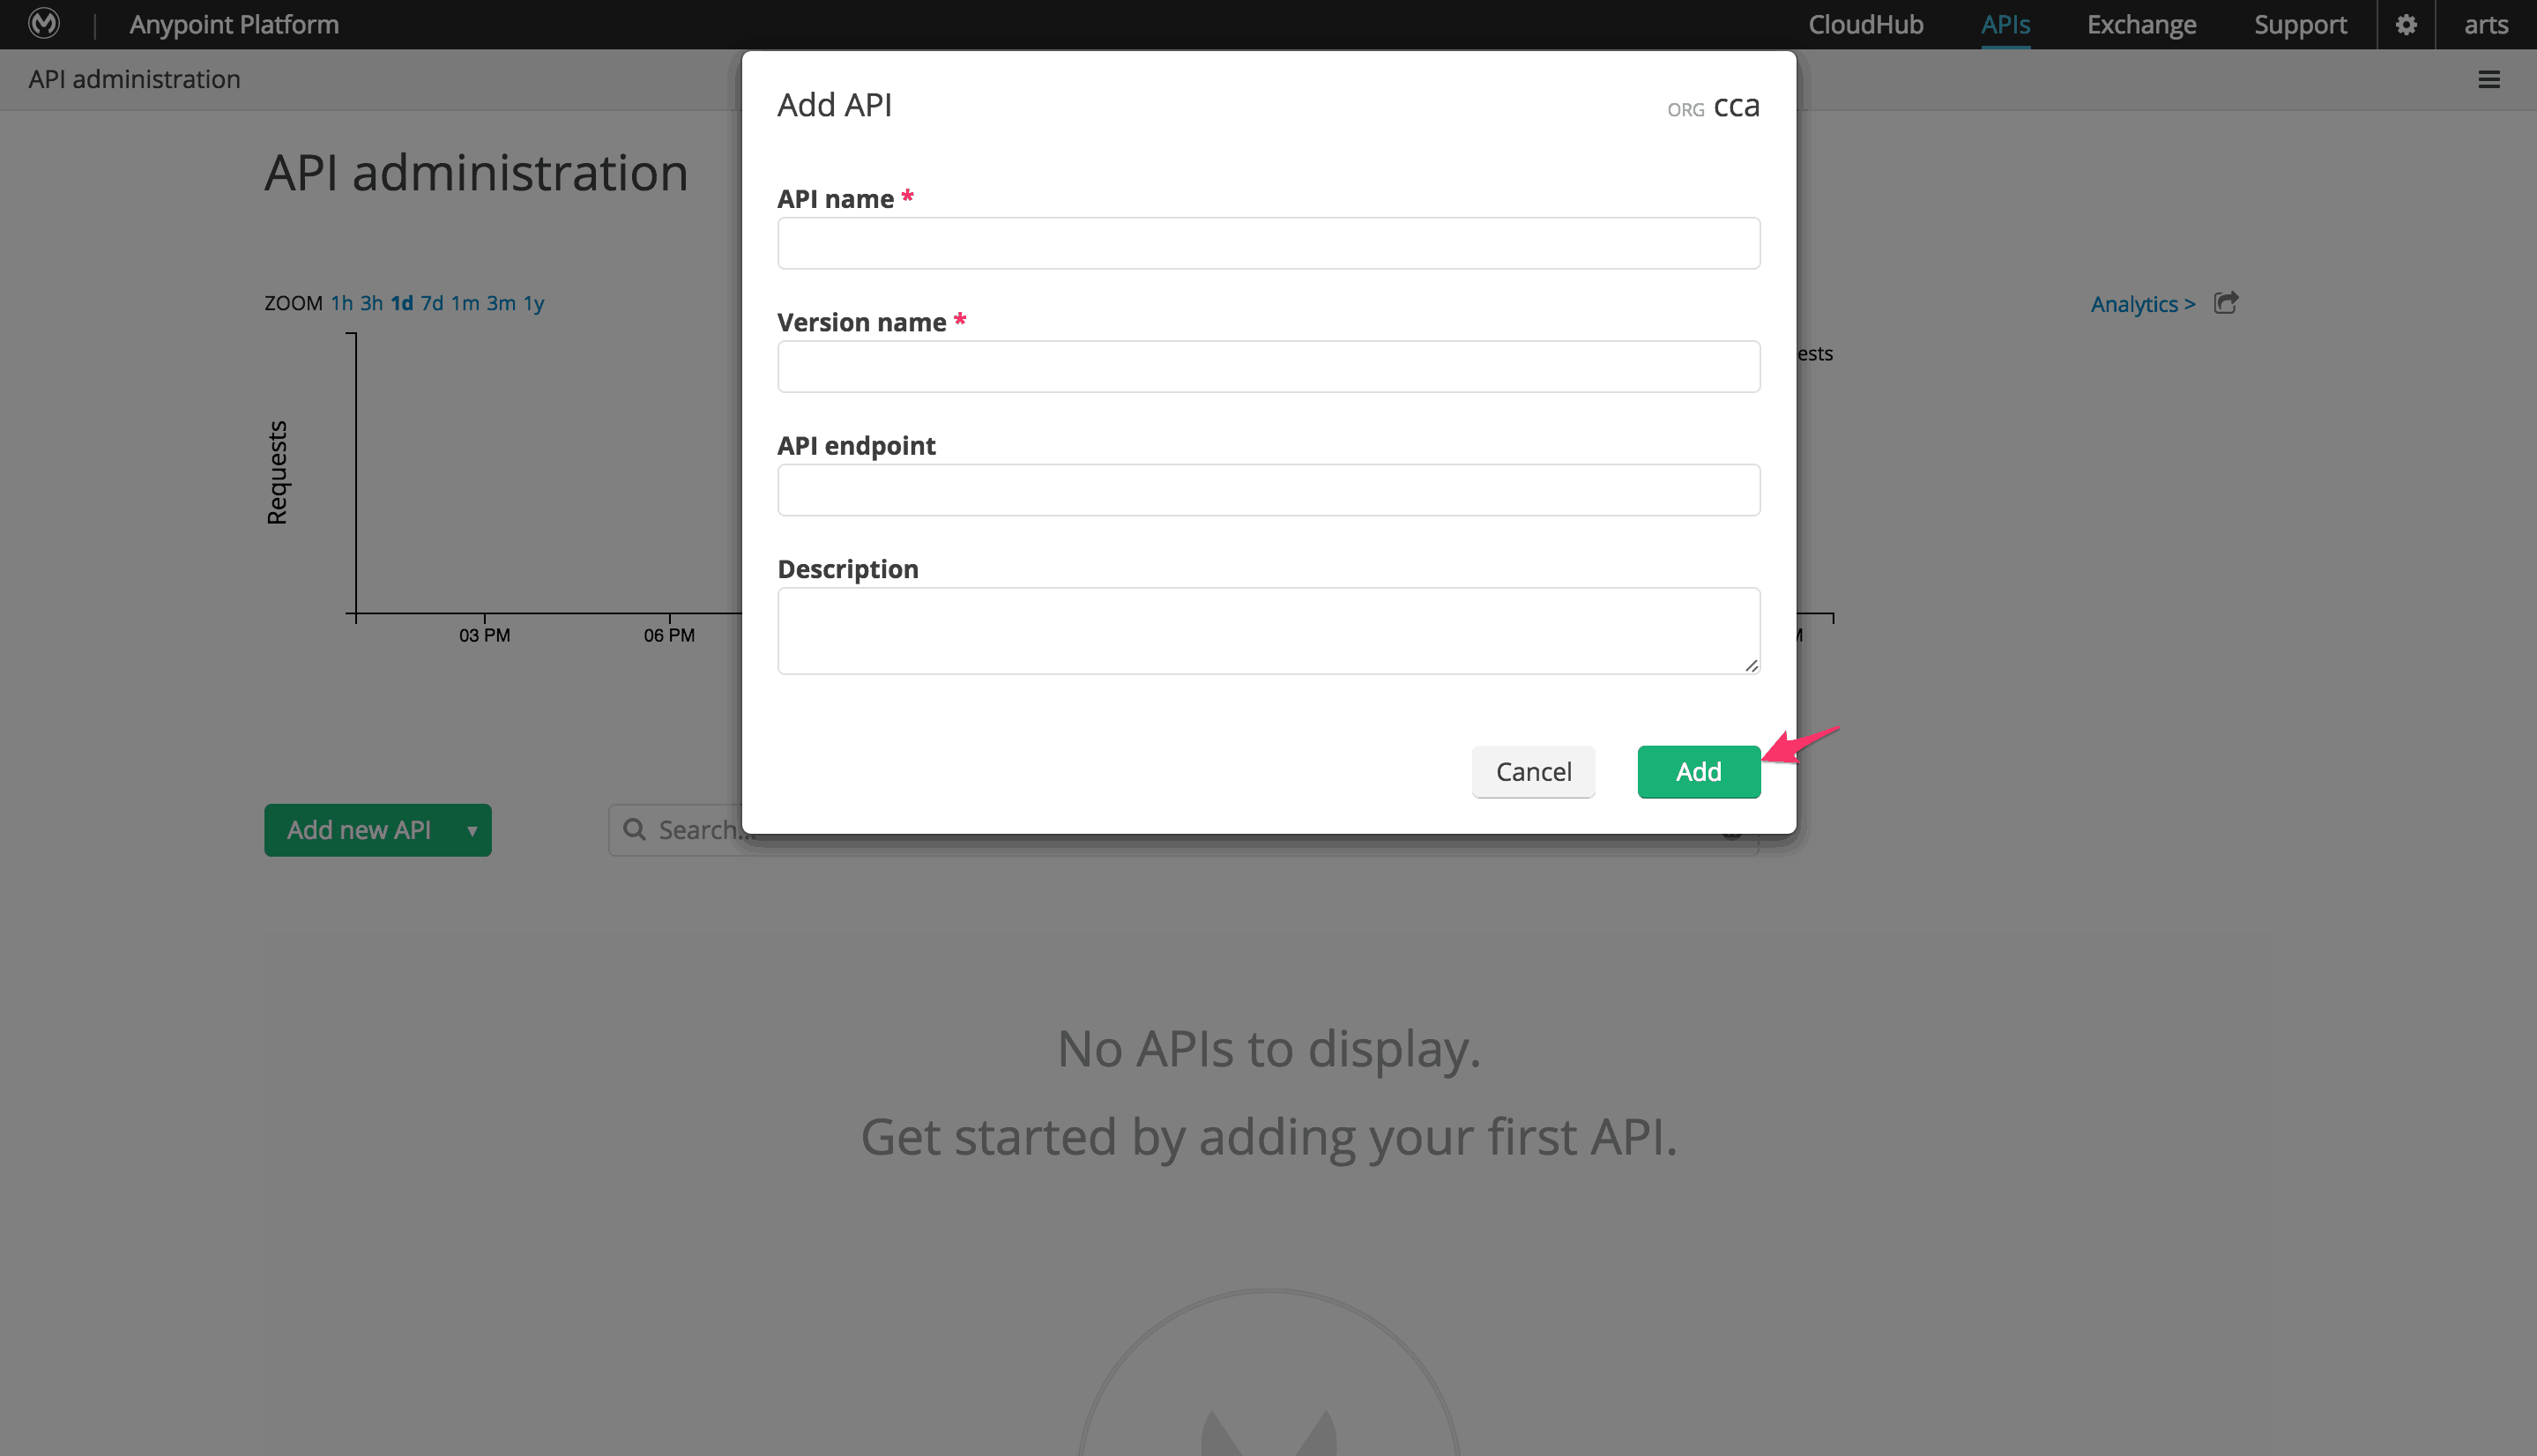
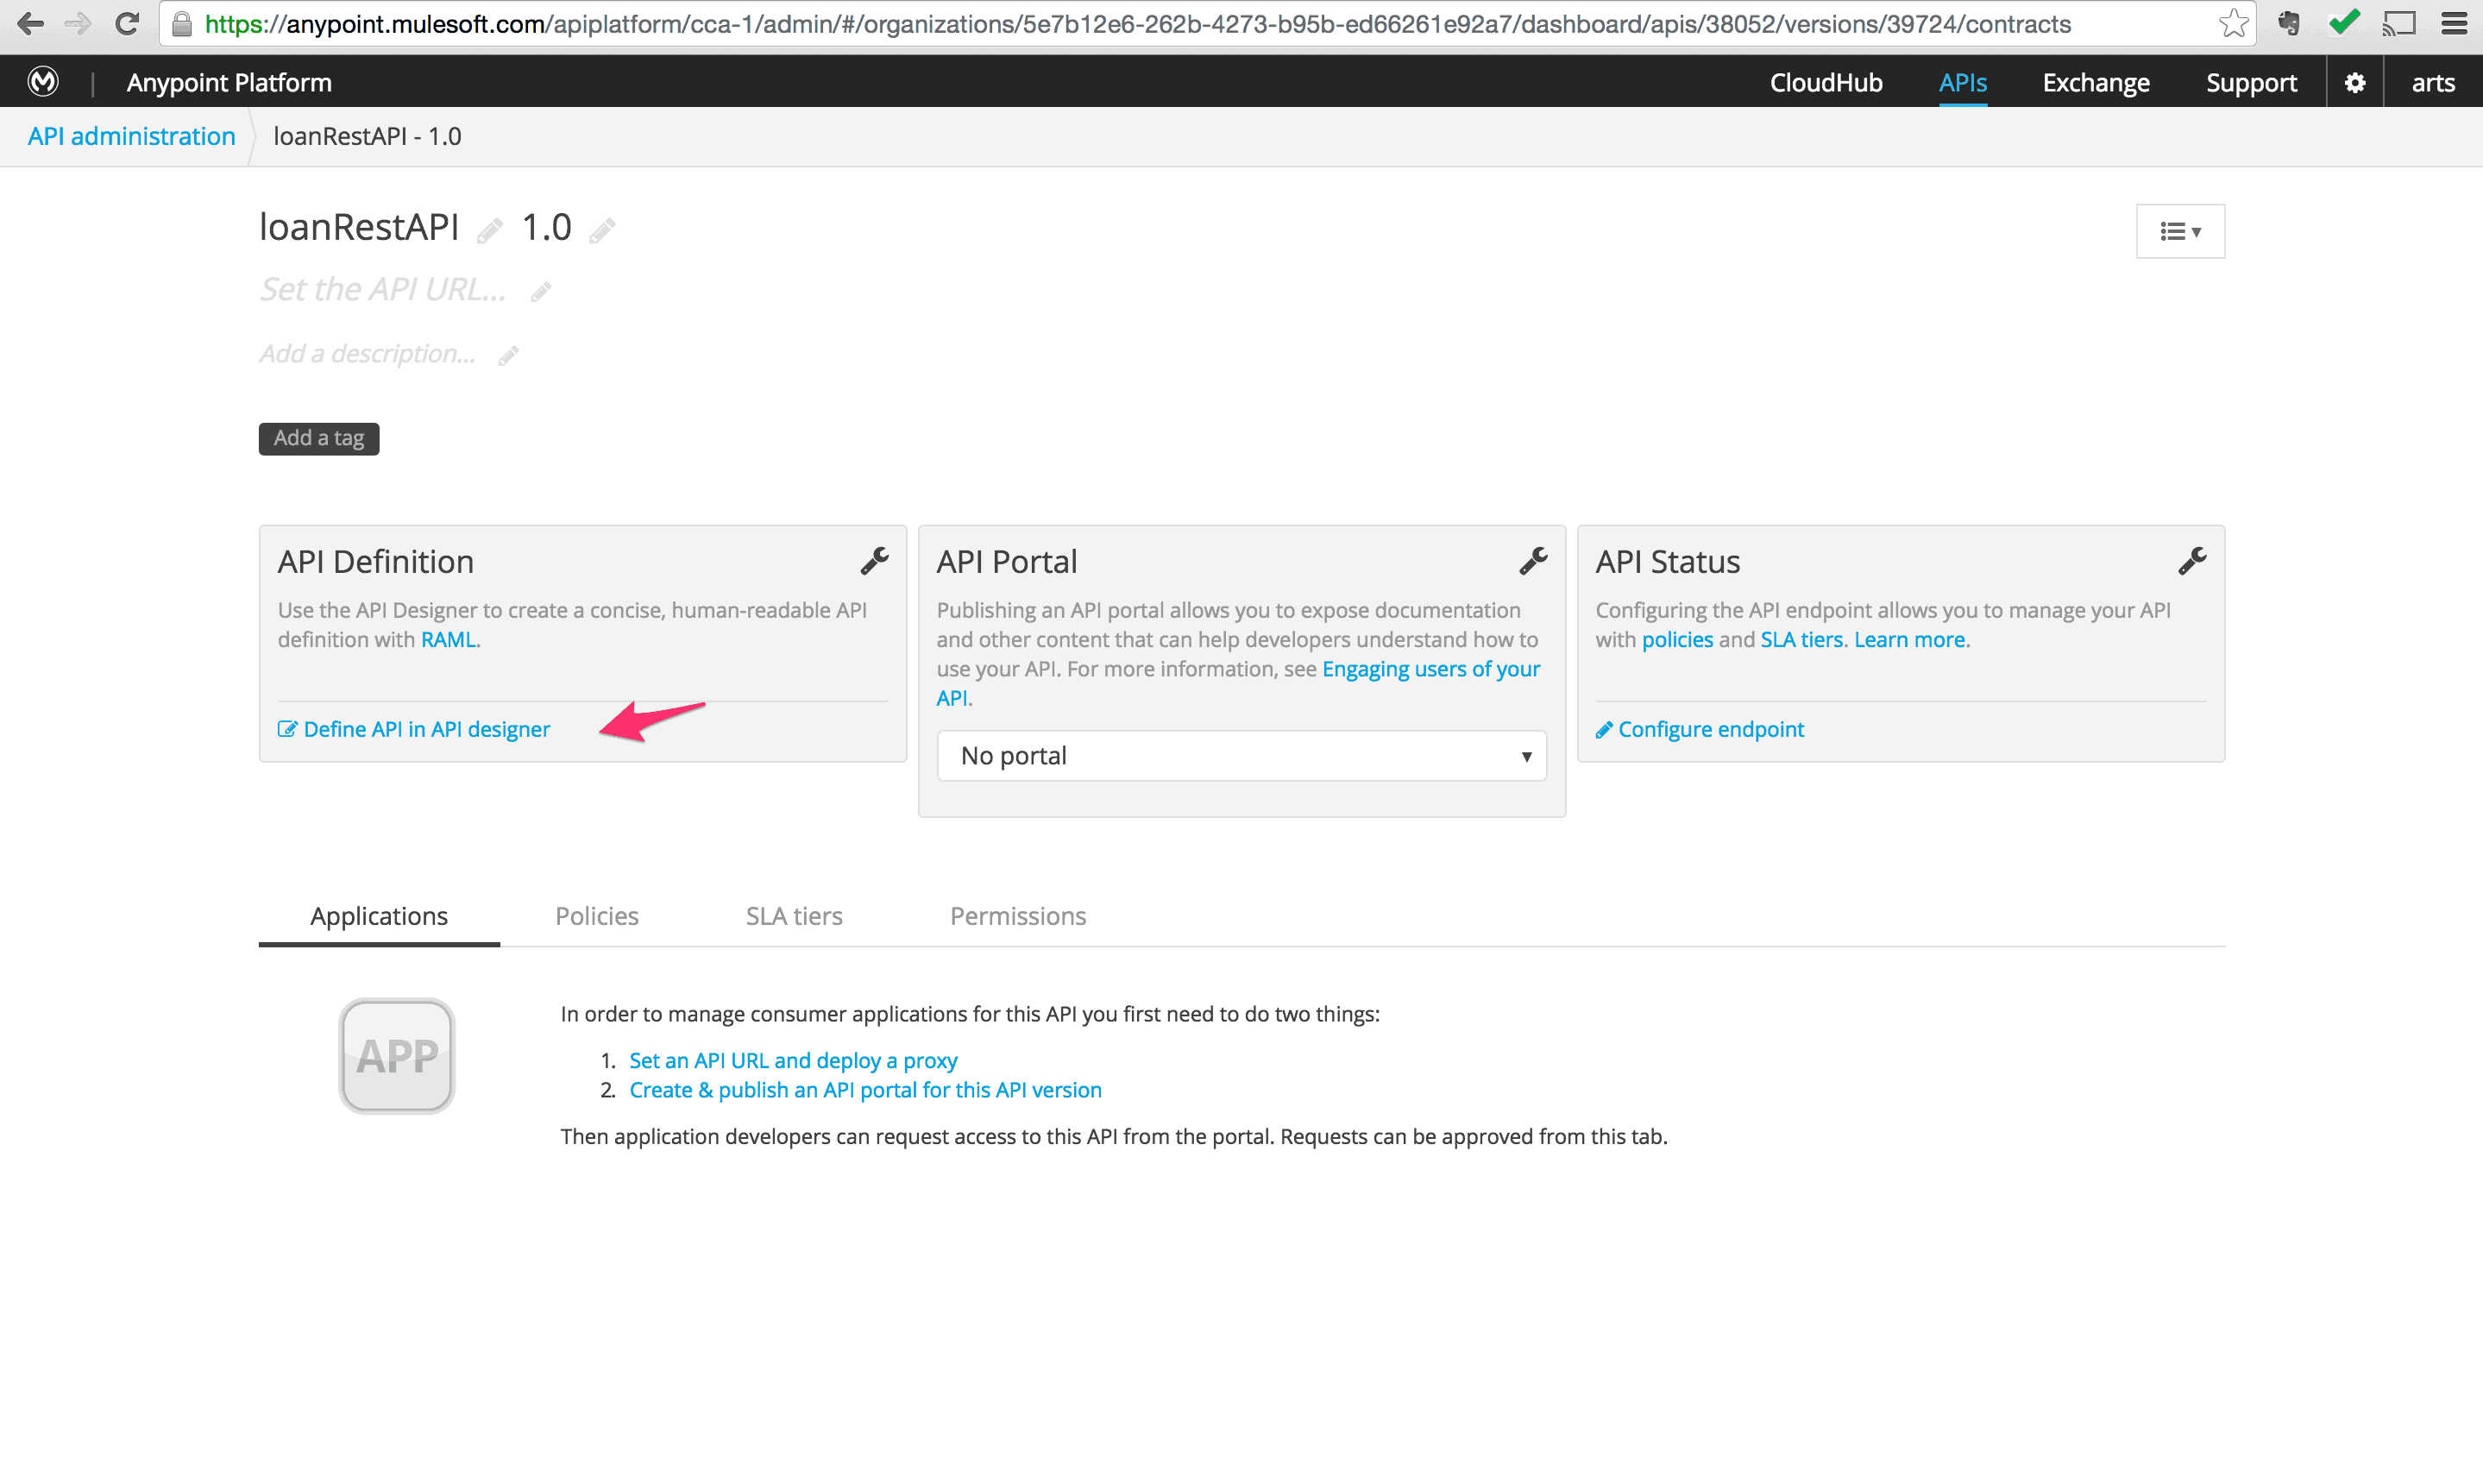
  2. Sign up for an Anypoint account. Log into Anypoint Management Console and create a new API. Anypoint_Platform_for_APIs___API_administration
    Anypoint_Platform_for_APIs___API_administration2
  3. Open API Designer in the API detail page. Anypoint_Platform_for_APIs___API_administration___loanRestAPI_-_1_0
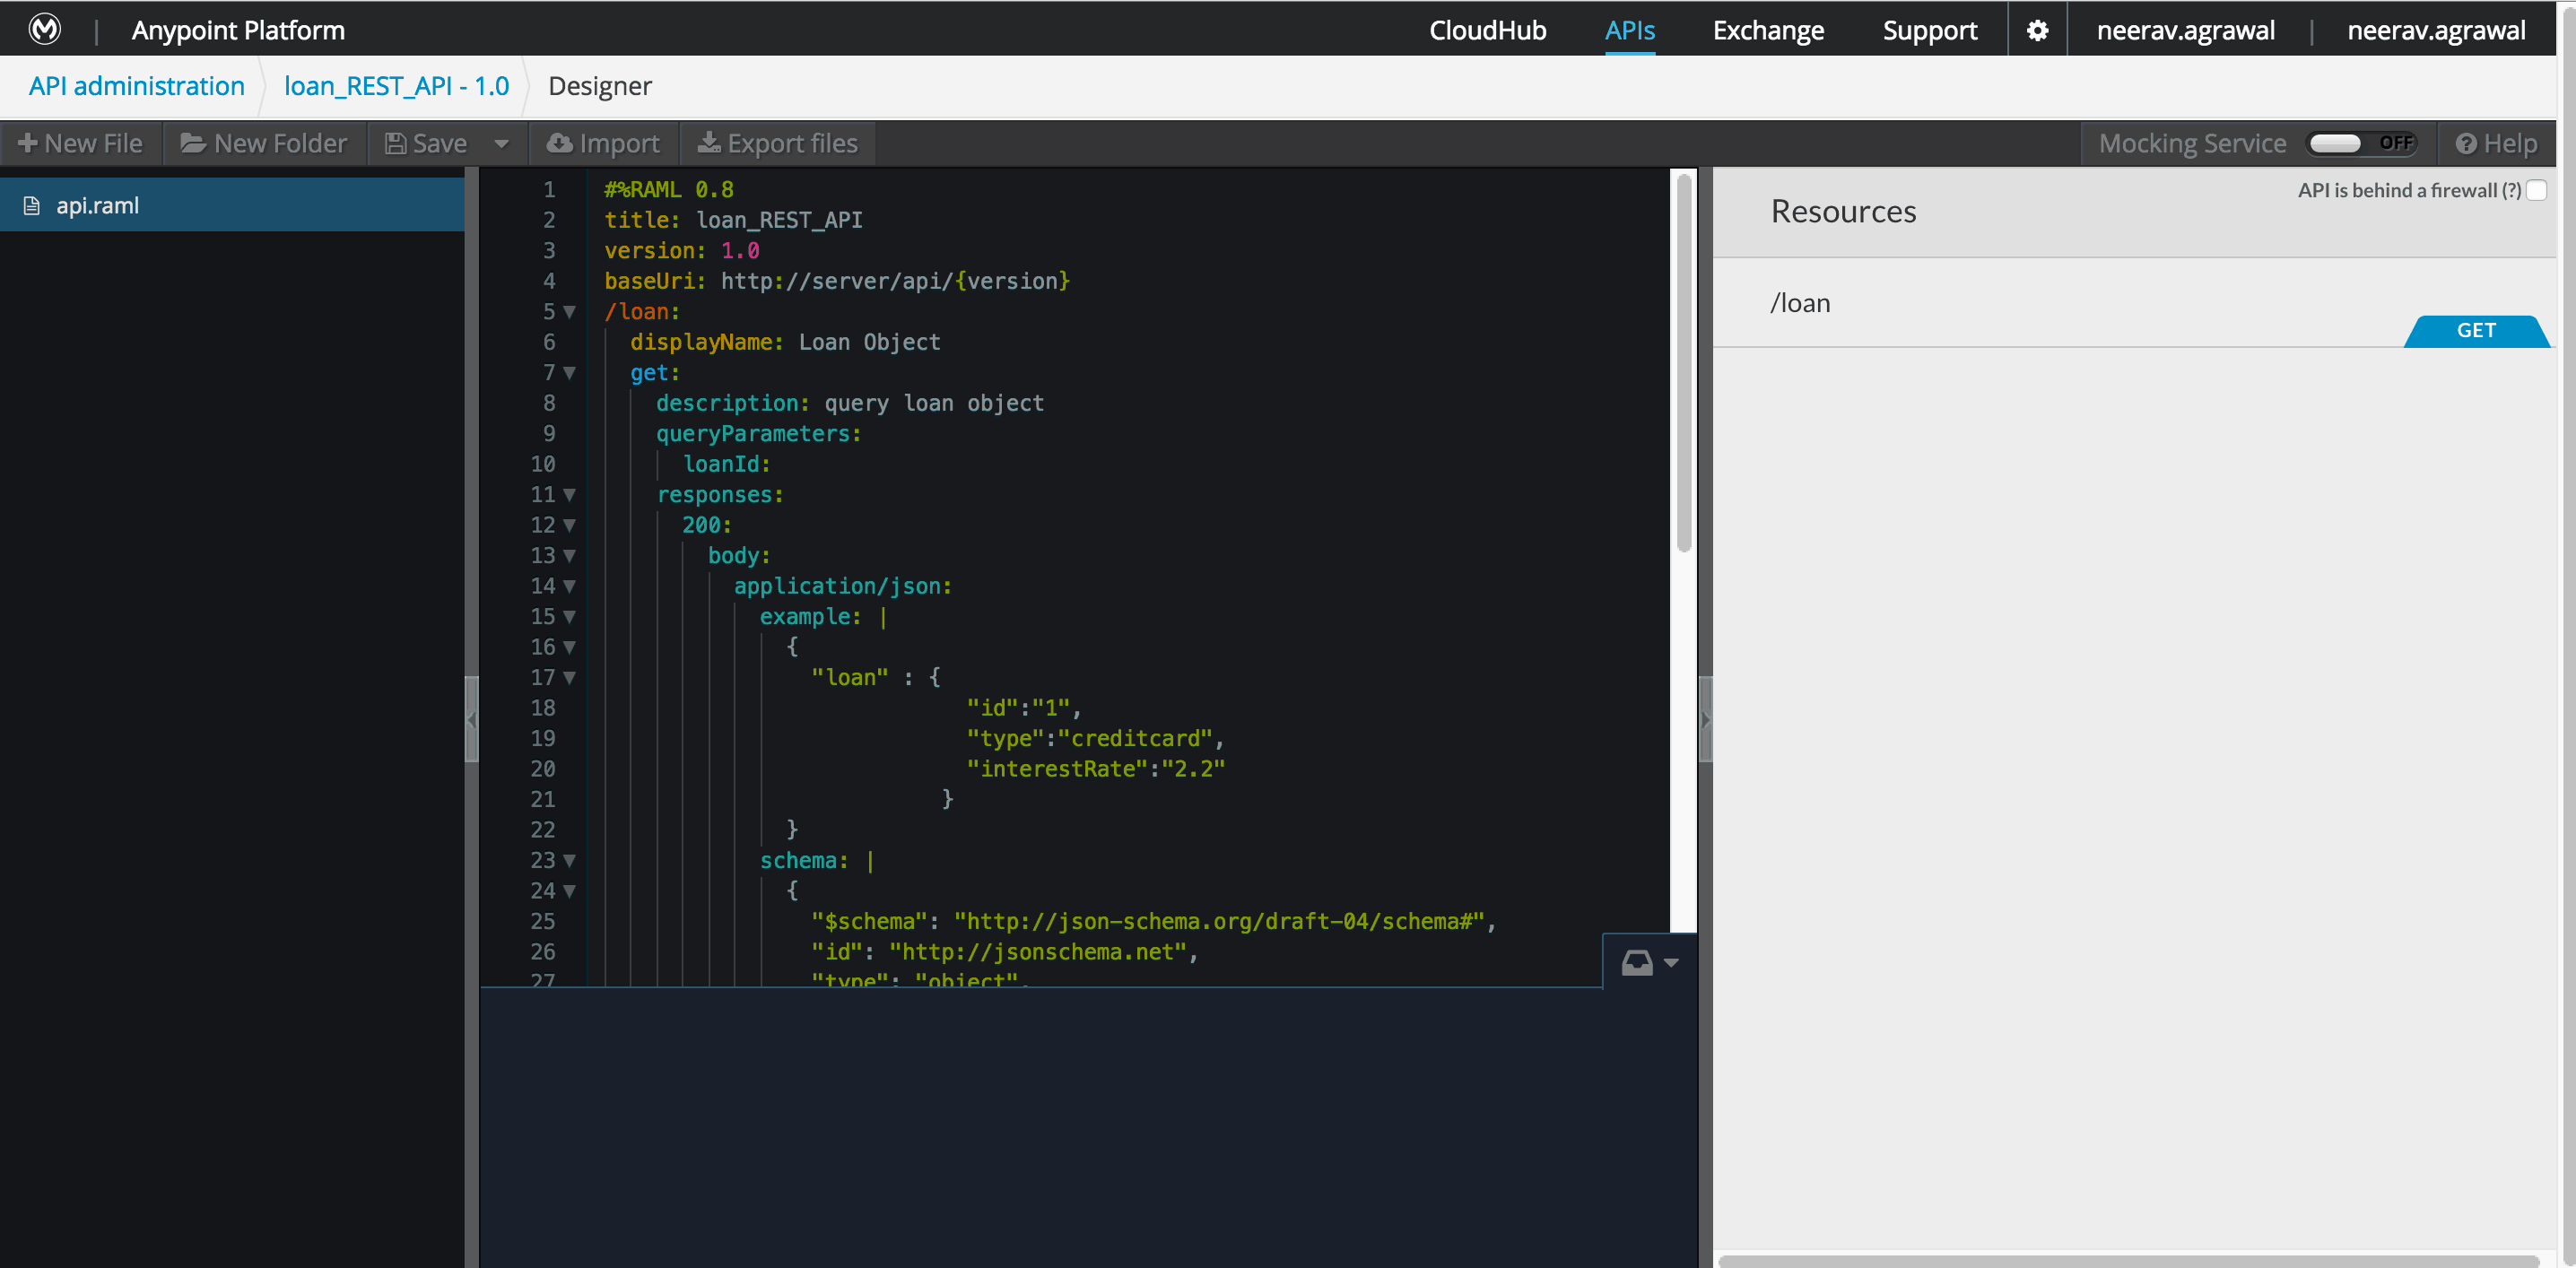
  4. Create a RAML file and document the interface as desired for the REST API
    http://raml.org/
    (Note: If you are using the sample web service from part 1 of this series then refer to the RAML file in attached project).
    Anypoint_Platform_for_APIs___API_administration___loan_REST_API_-_1_0___Designer
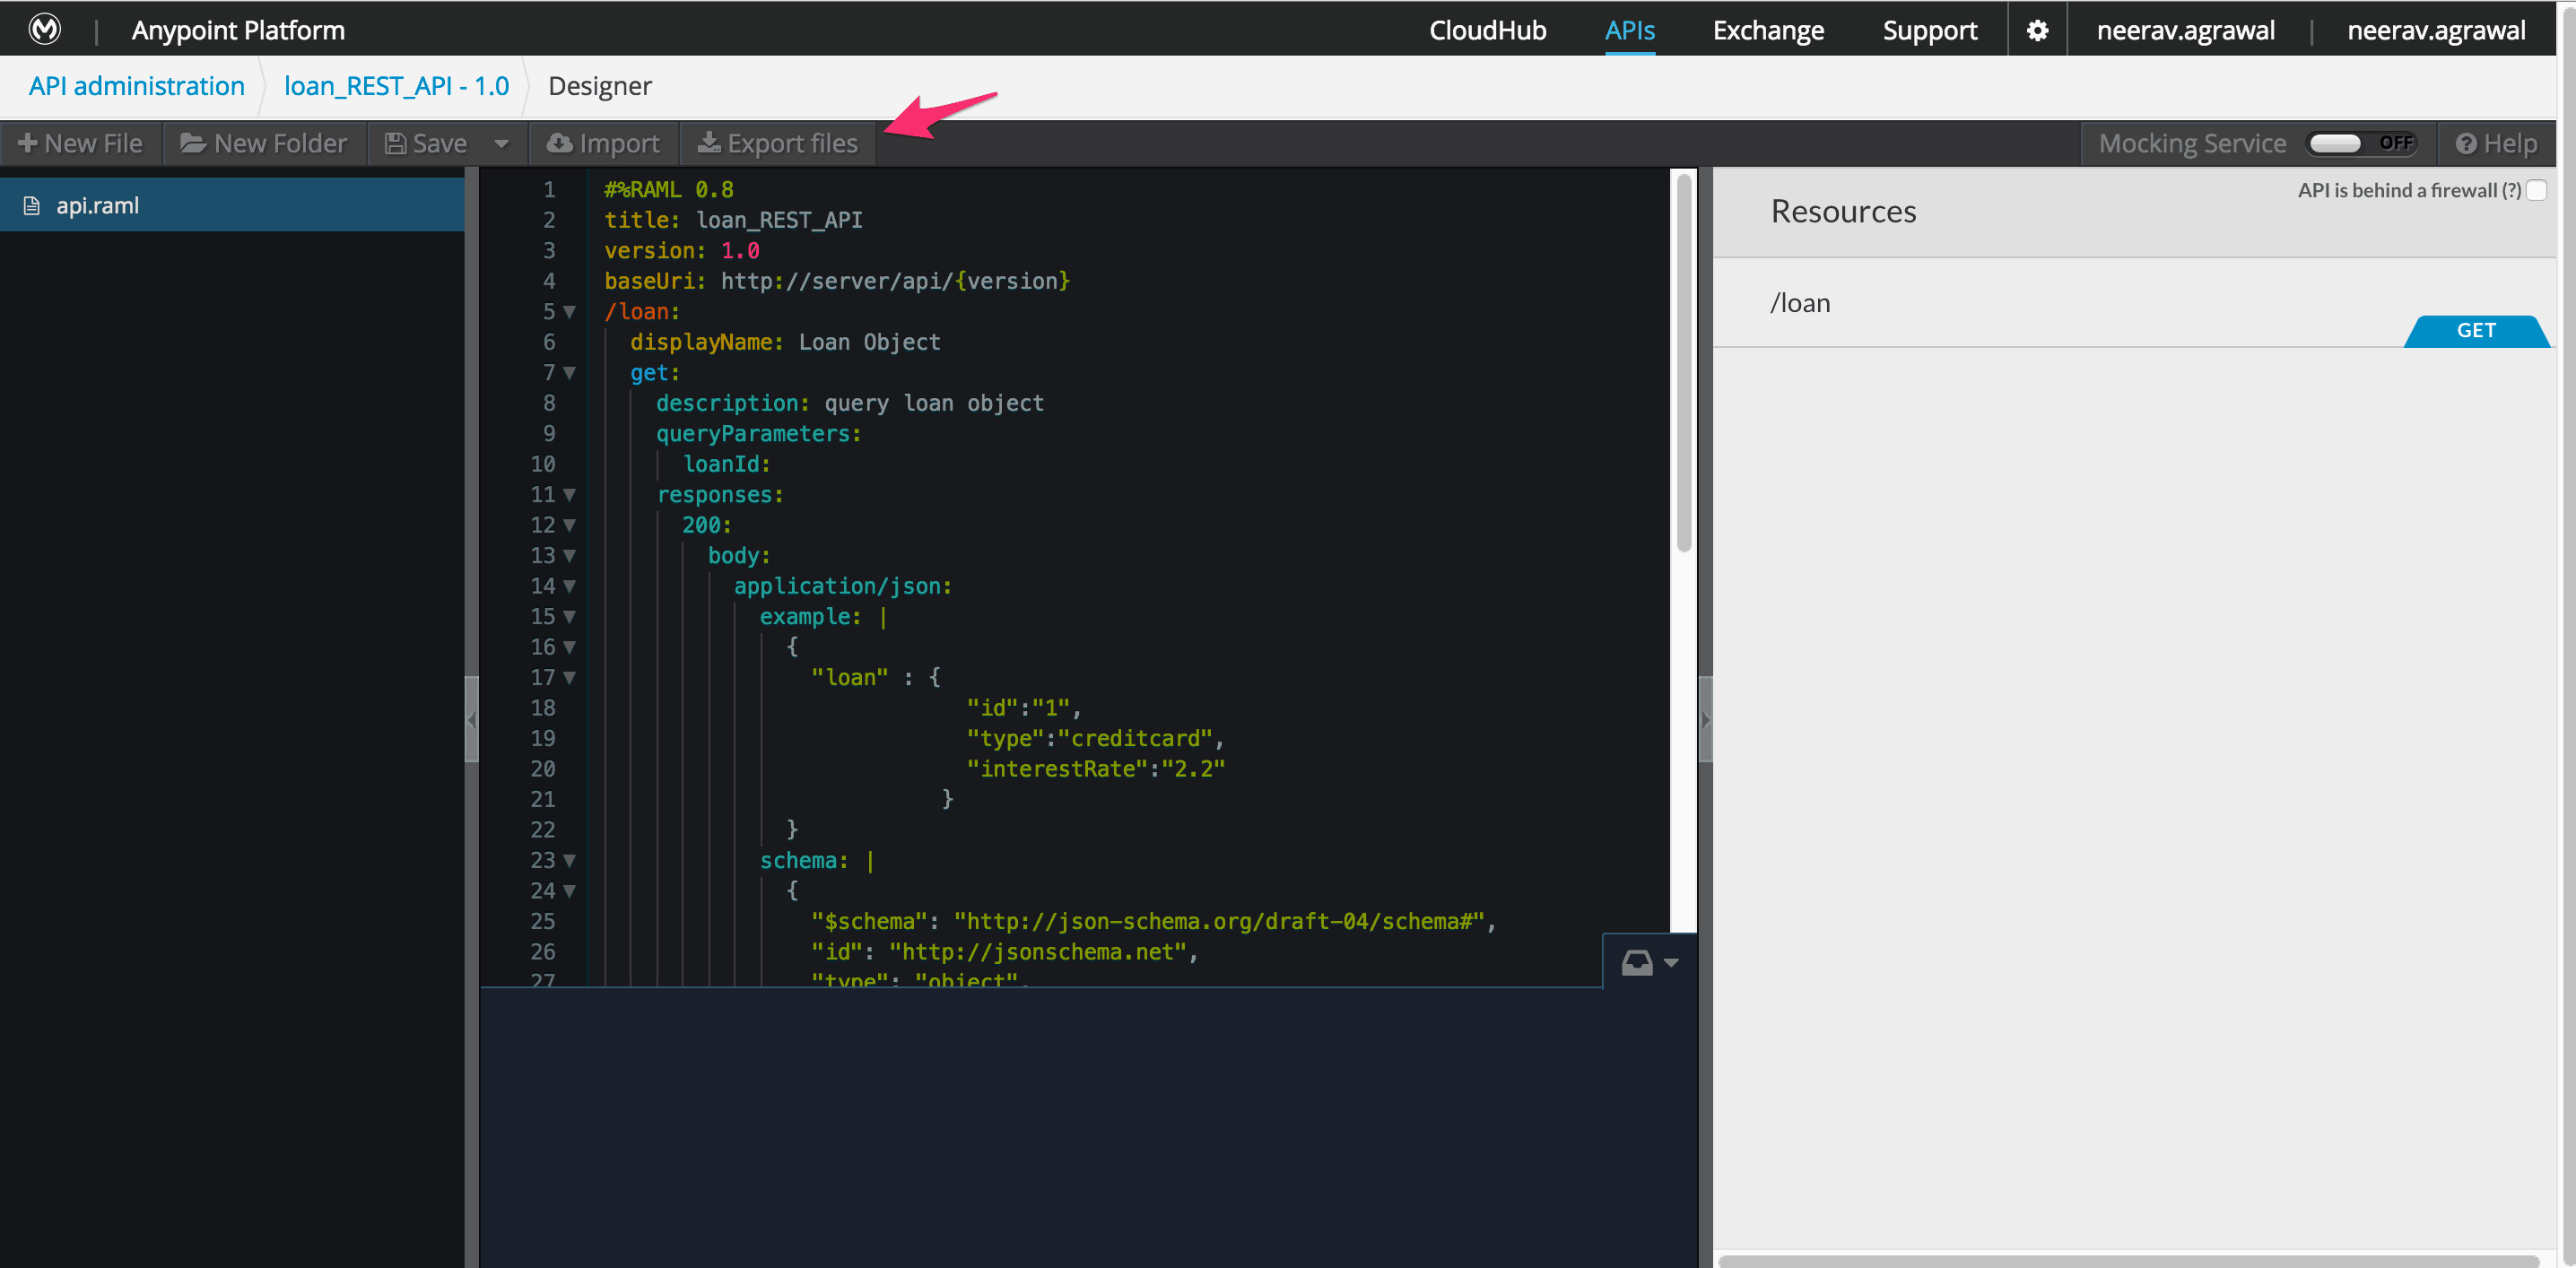
  5. Export the api.raml file. Anypoint_Platform_for_APIs___API_administration___loan_REST_API_-_1_0___DesignerExport
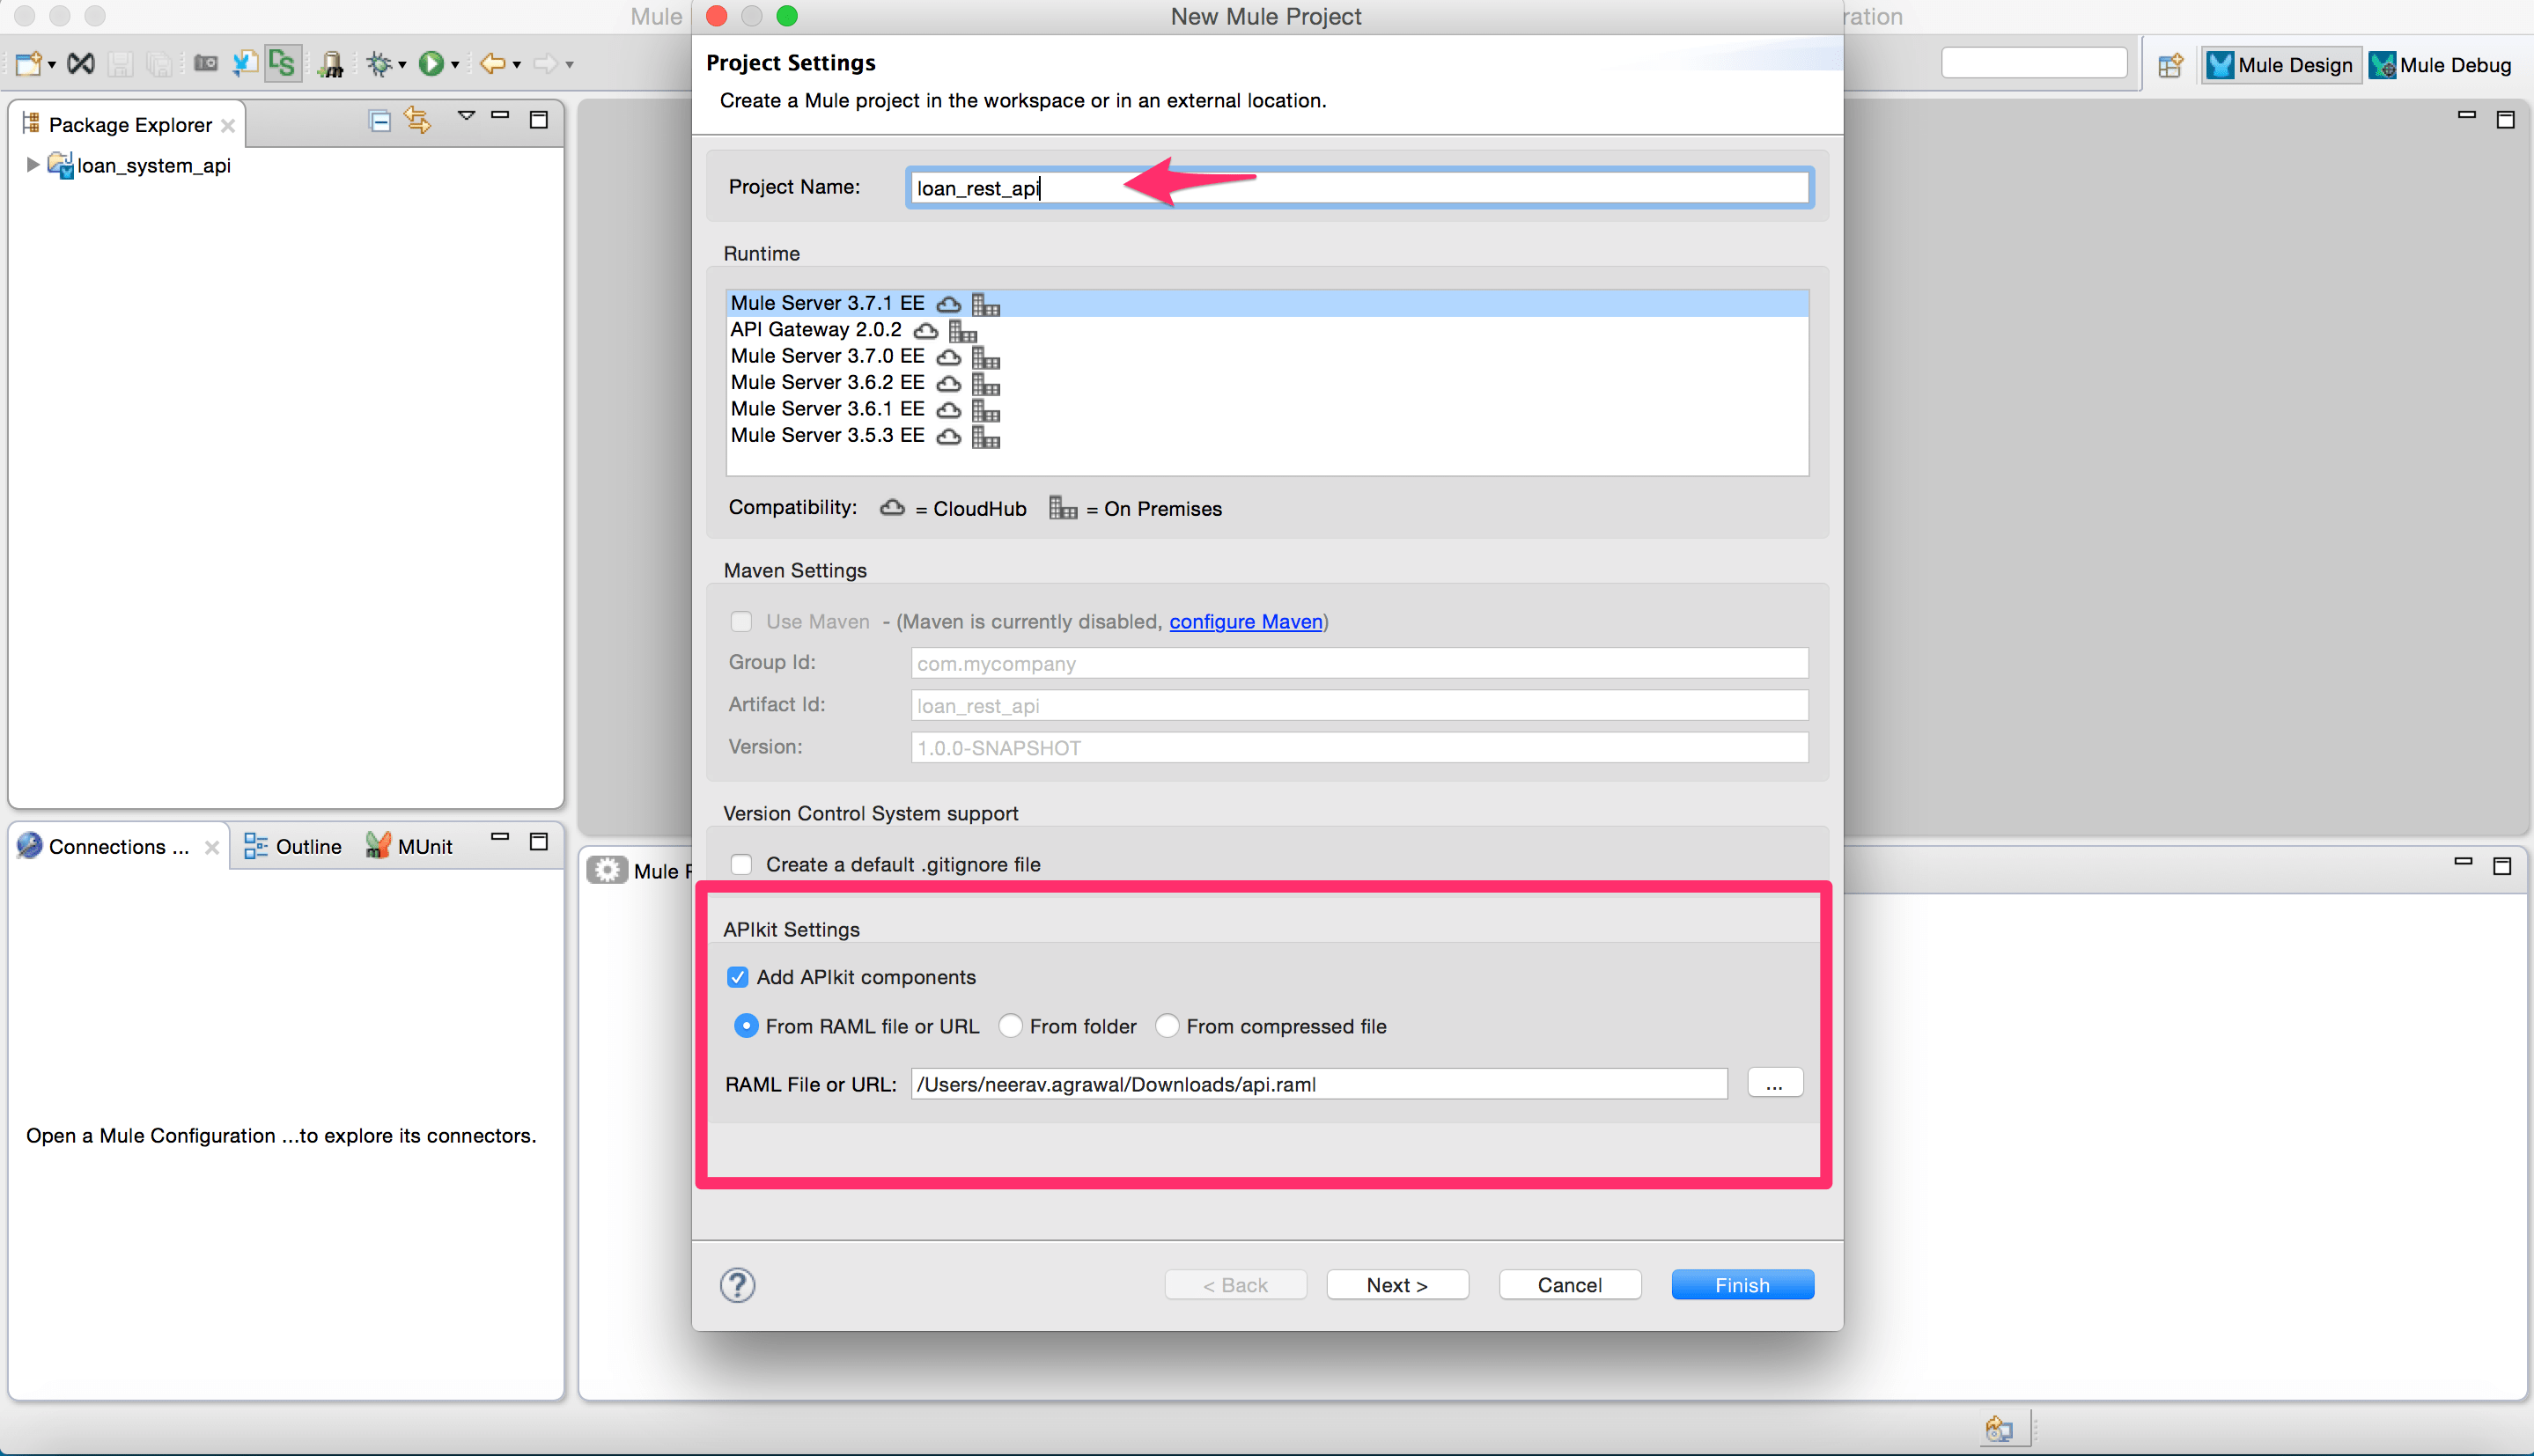
  6. Open Anypoint Studio and create a new project. Check “Add APIkit components” and select the RAML file created in step 4. Click Finish.New_Mule_Project_and_Mule_Design_-_Anypoint_Studio_-__Users_neerav_agrawal_Mule_Workspace_MuleWorkspace_Workspace_API_Integration_and_Downloads
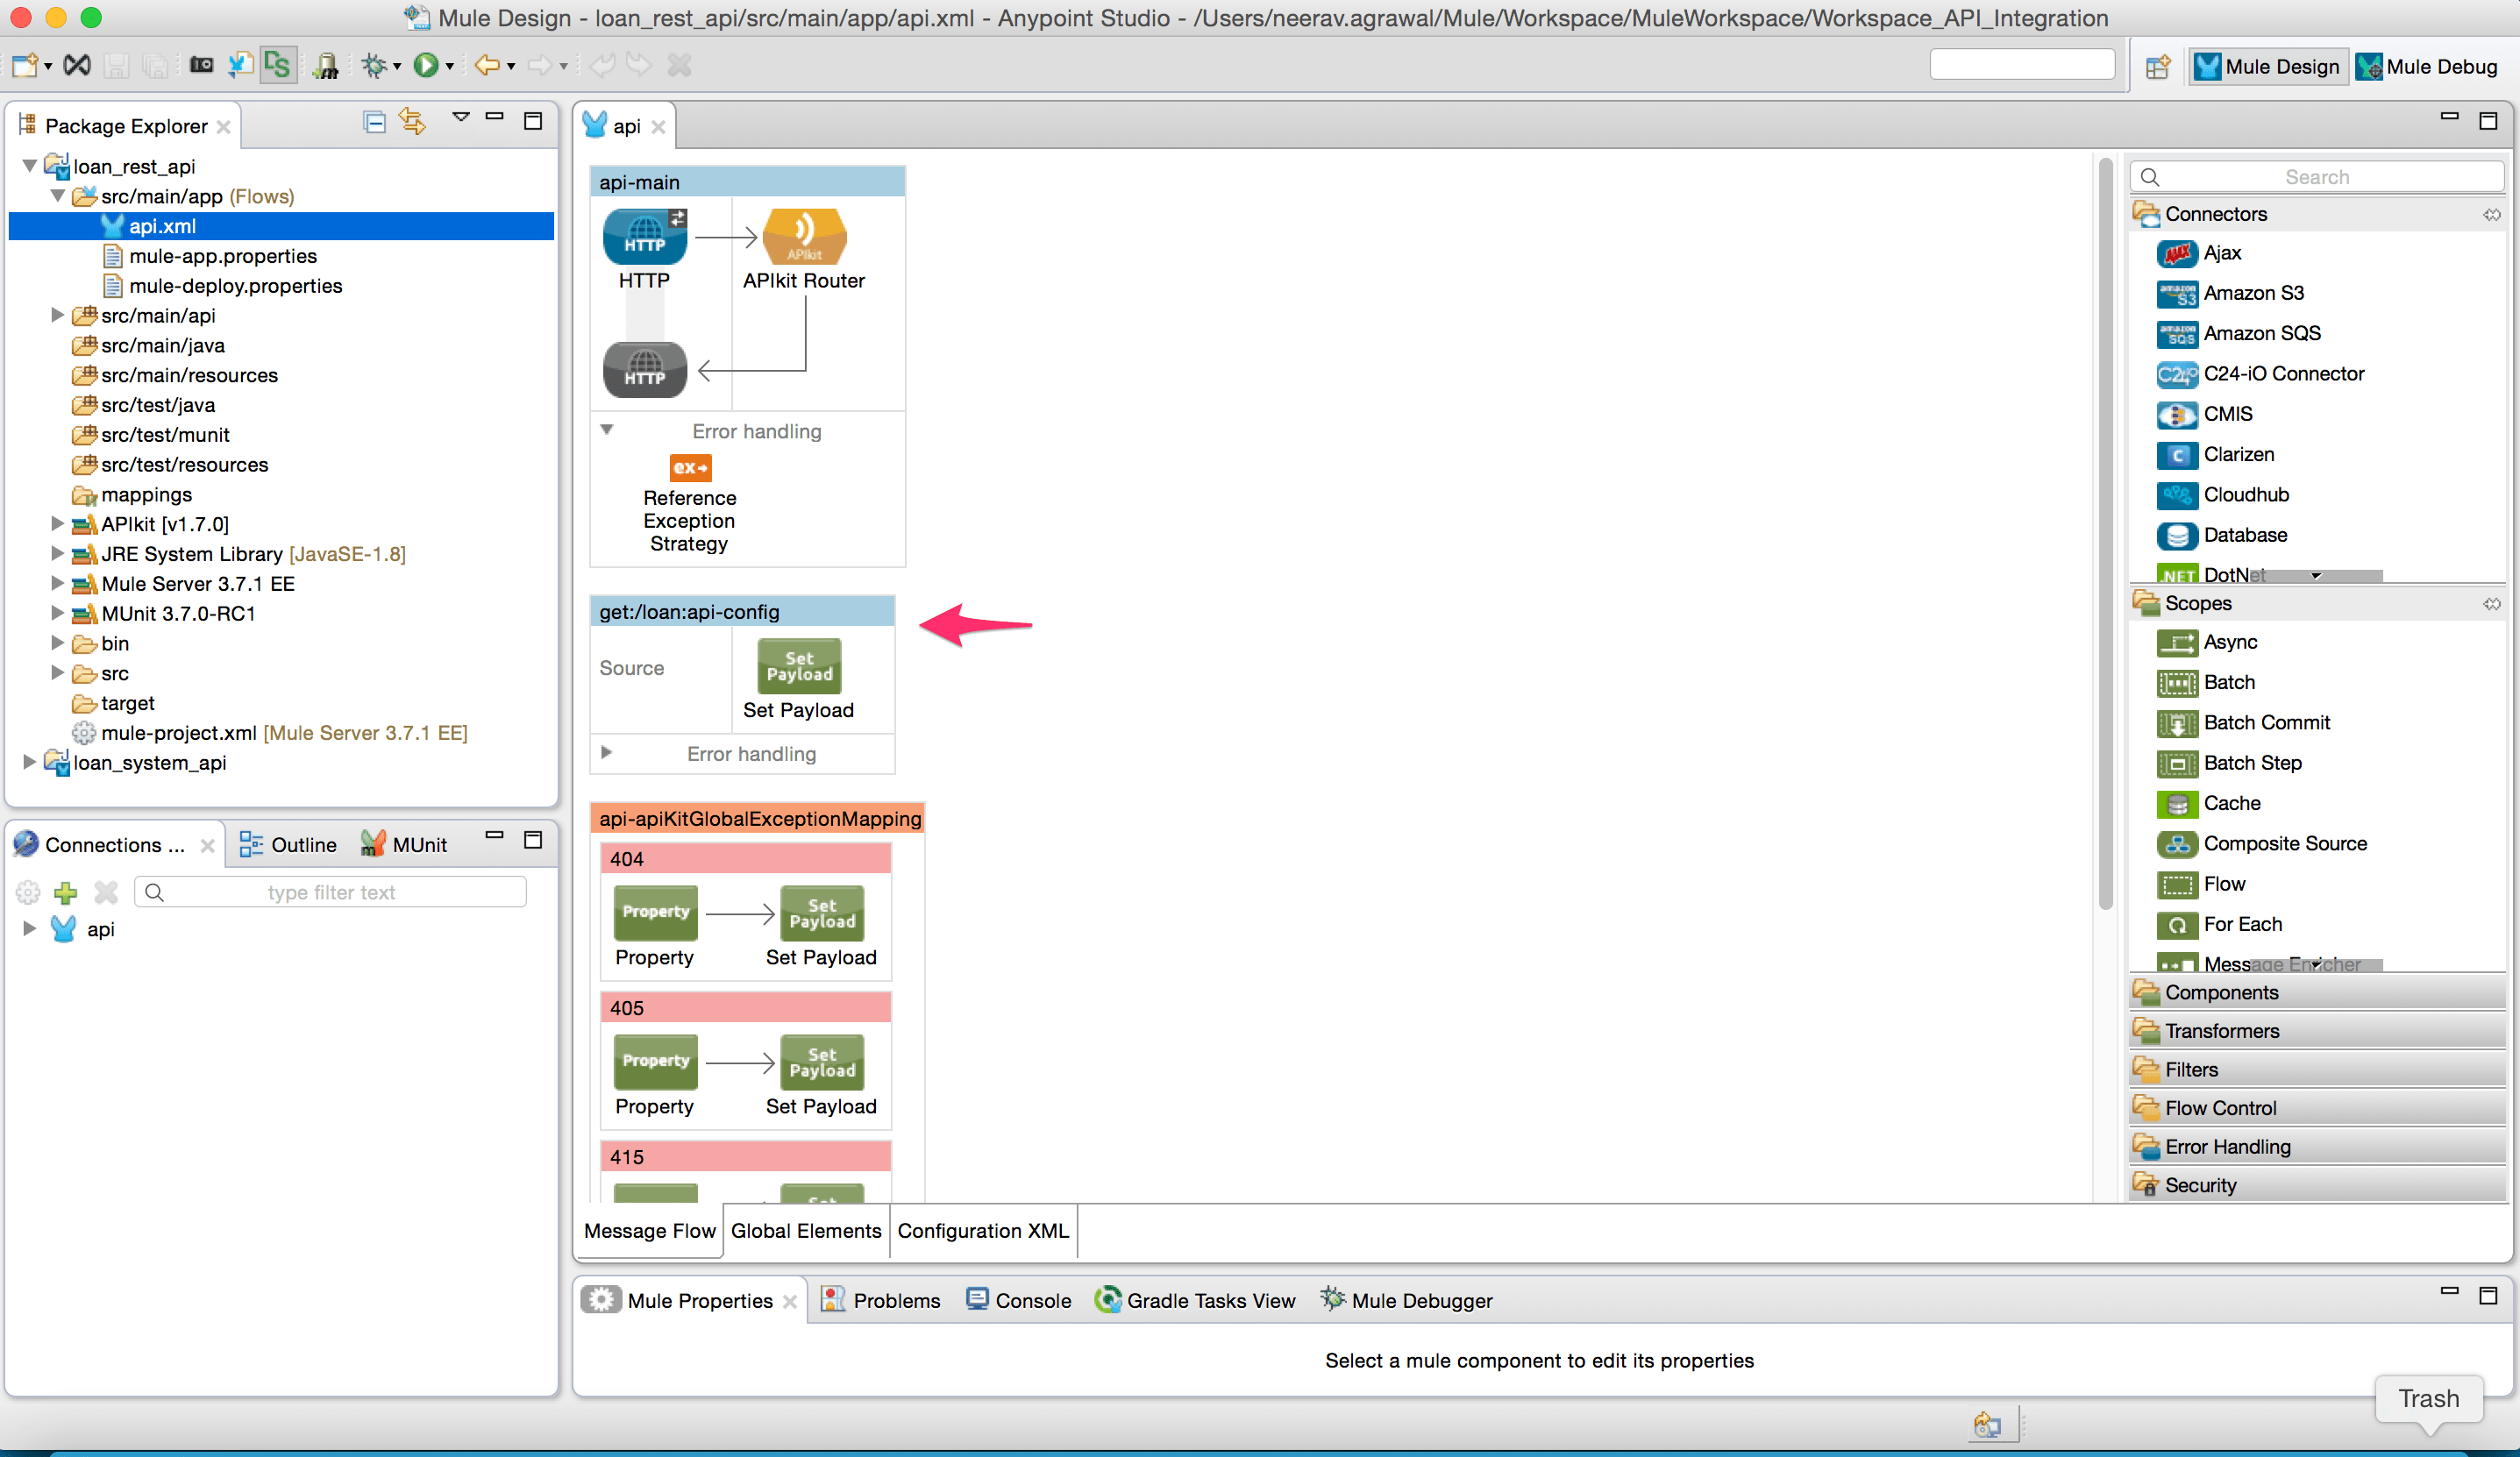
  7. When you create a new APIkit project and click Finish, Anypoint Studio uses the imported RAML file to generate skeletal backend flows, one for each resource-action pairing in the RAML file. Furthermore, Studio pre-populates each of the flows with one or more message processors that perform “mock” activities based on the content of the example response included with each resource-action pairing in the RAML file. Mule_Design_-_loan_rest_api_src_main_app_api_xml_-_Anypoint_Studio_-__Users_neerav_agrawal_Mule_Workspace_MuleWorkspace_Workspace_API_Integration_and_Downloads
  8. Delete the “Set Payload” activity from the flow “get:/loan:api-config.”
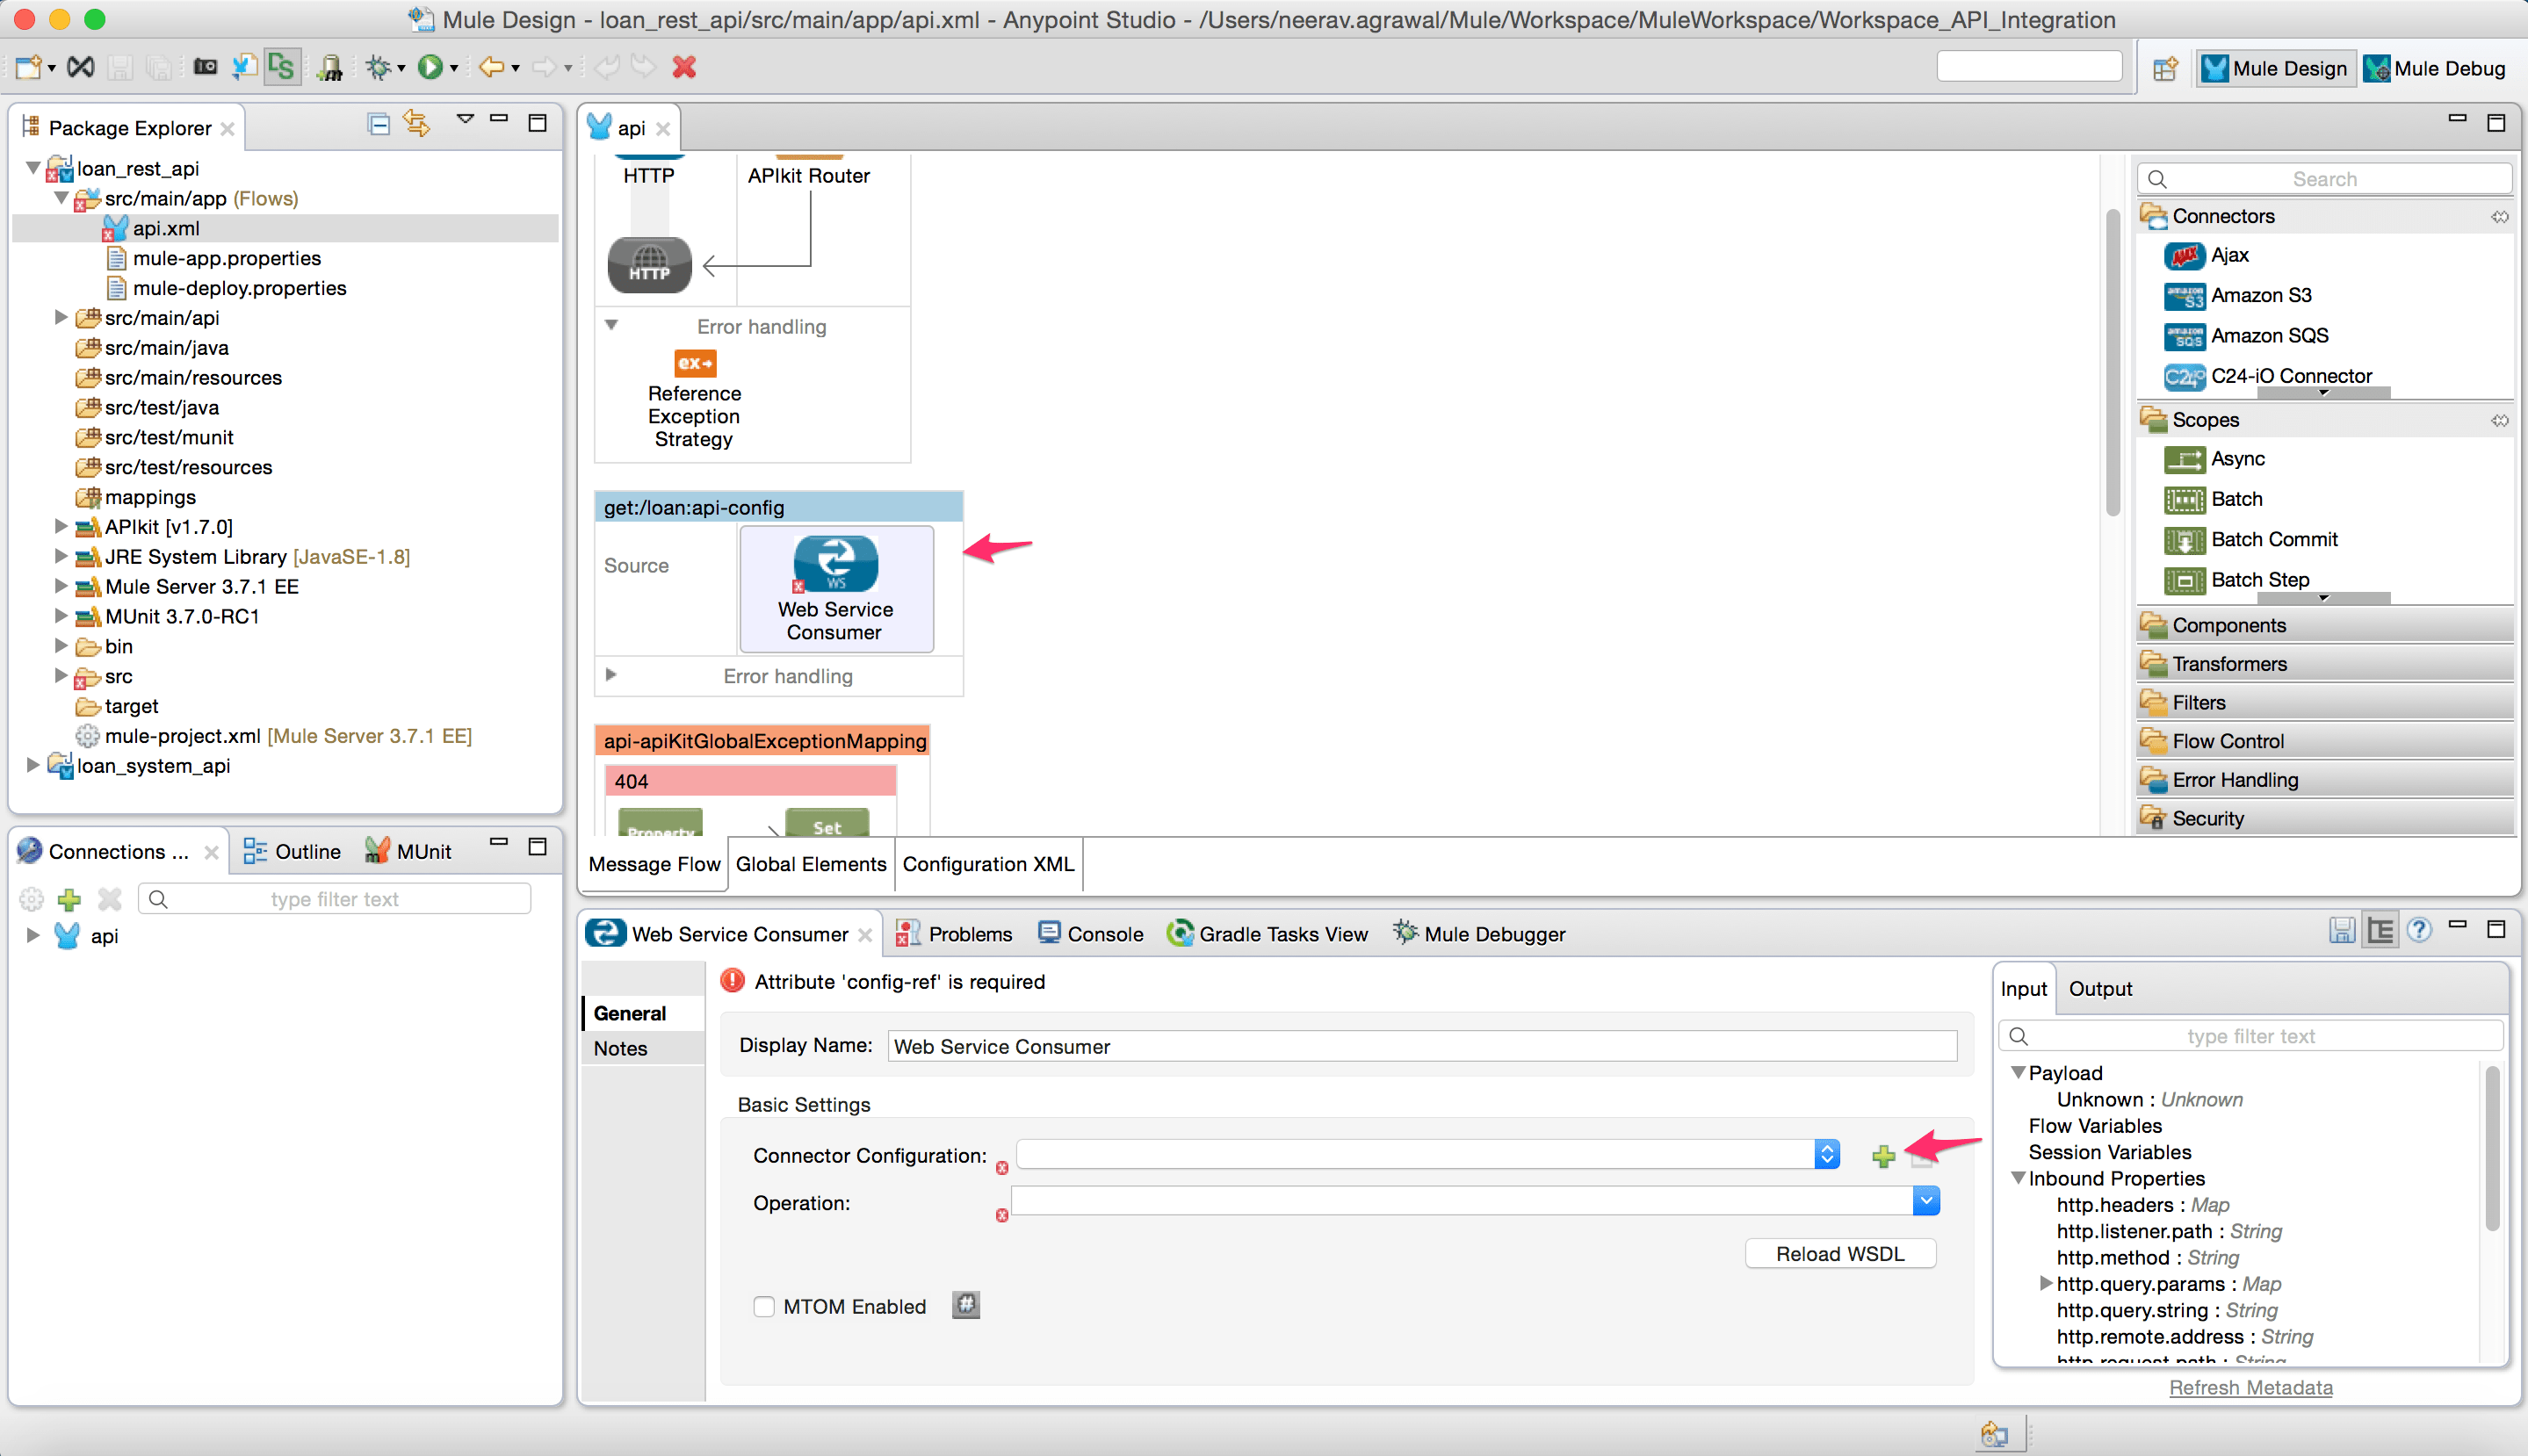
  9. Add a “Web Service Consumer” connector to the flow “get:/loan:api-config”. Click on connector configuration.Mule_Design_-_loan_rest_api_src_main_app_api_xml_-_Anypoint_Studio_-__Users_neerav_agrawal_Mule_Workspace_MuleWorkspace_Workspace_API_Integration
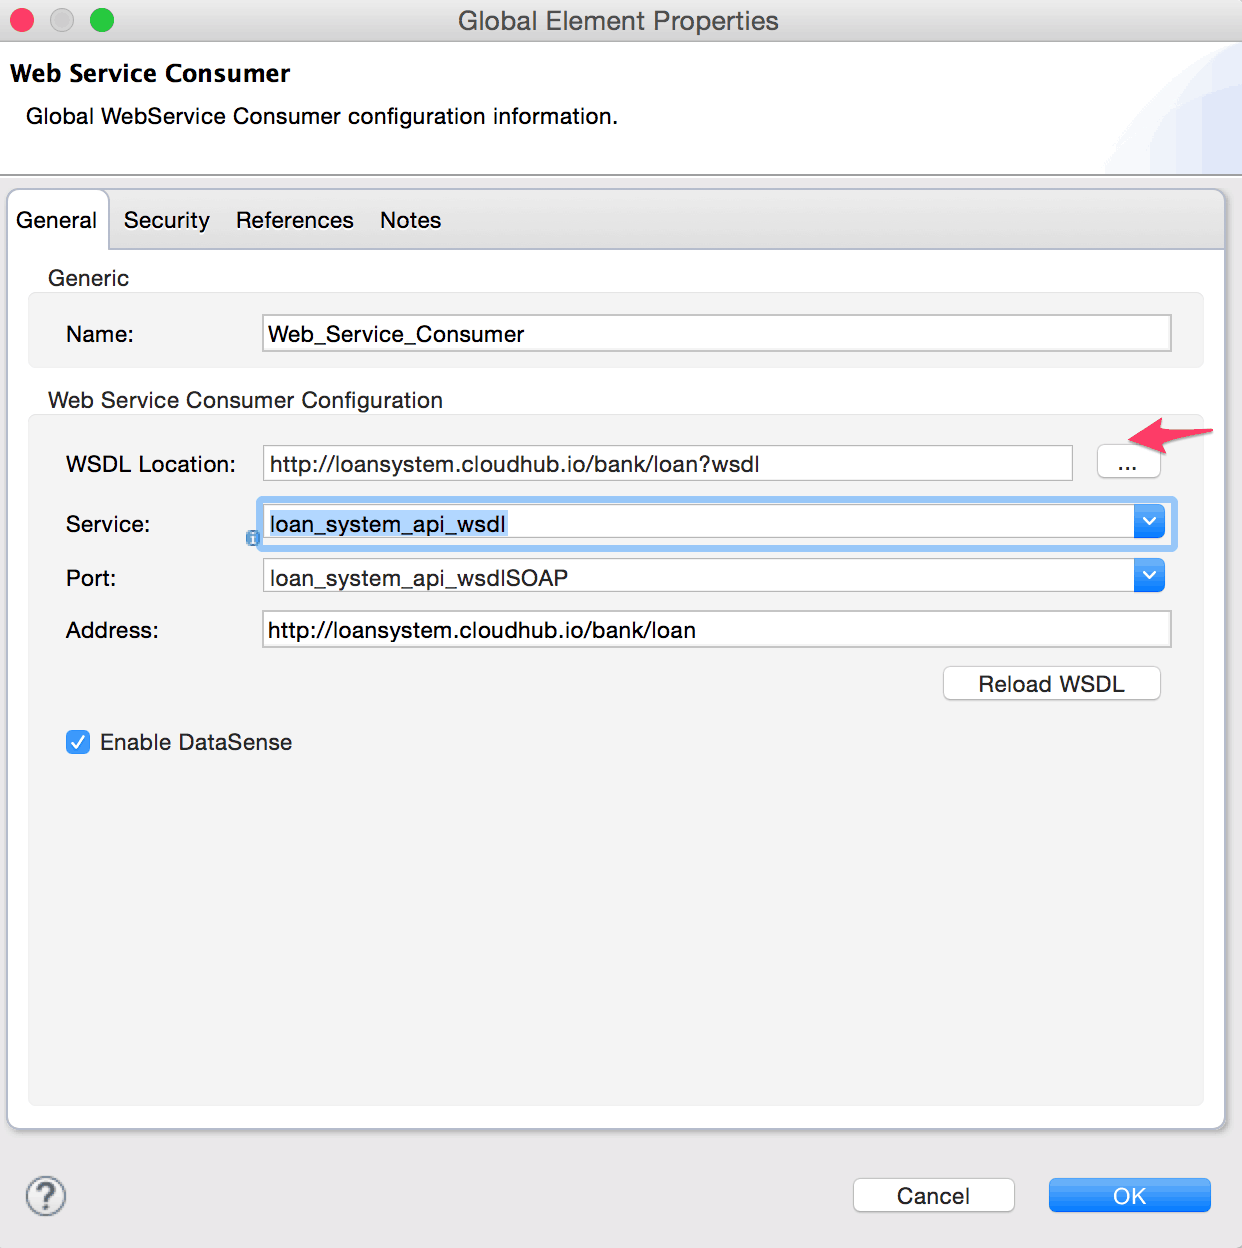
  10. In Connector configuration add the WSDL location for the SOAP web service. If the WSDL path is correctly configured it will automatically populate the remaining fields. Click Ok. (Note: Enter the WSDL URL of the web service you want to proxy to).Global_Element_Properties
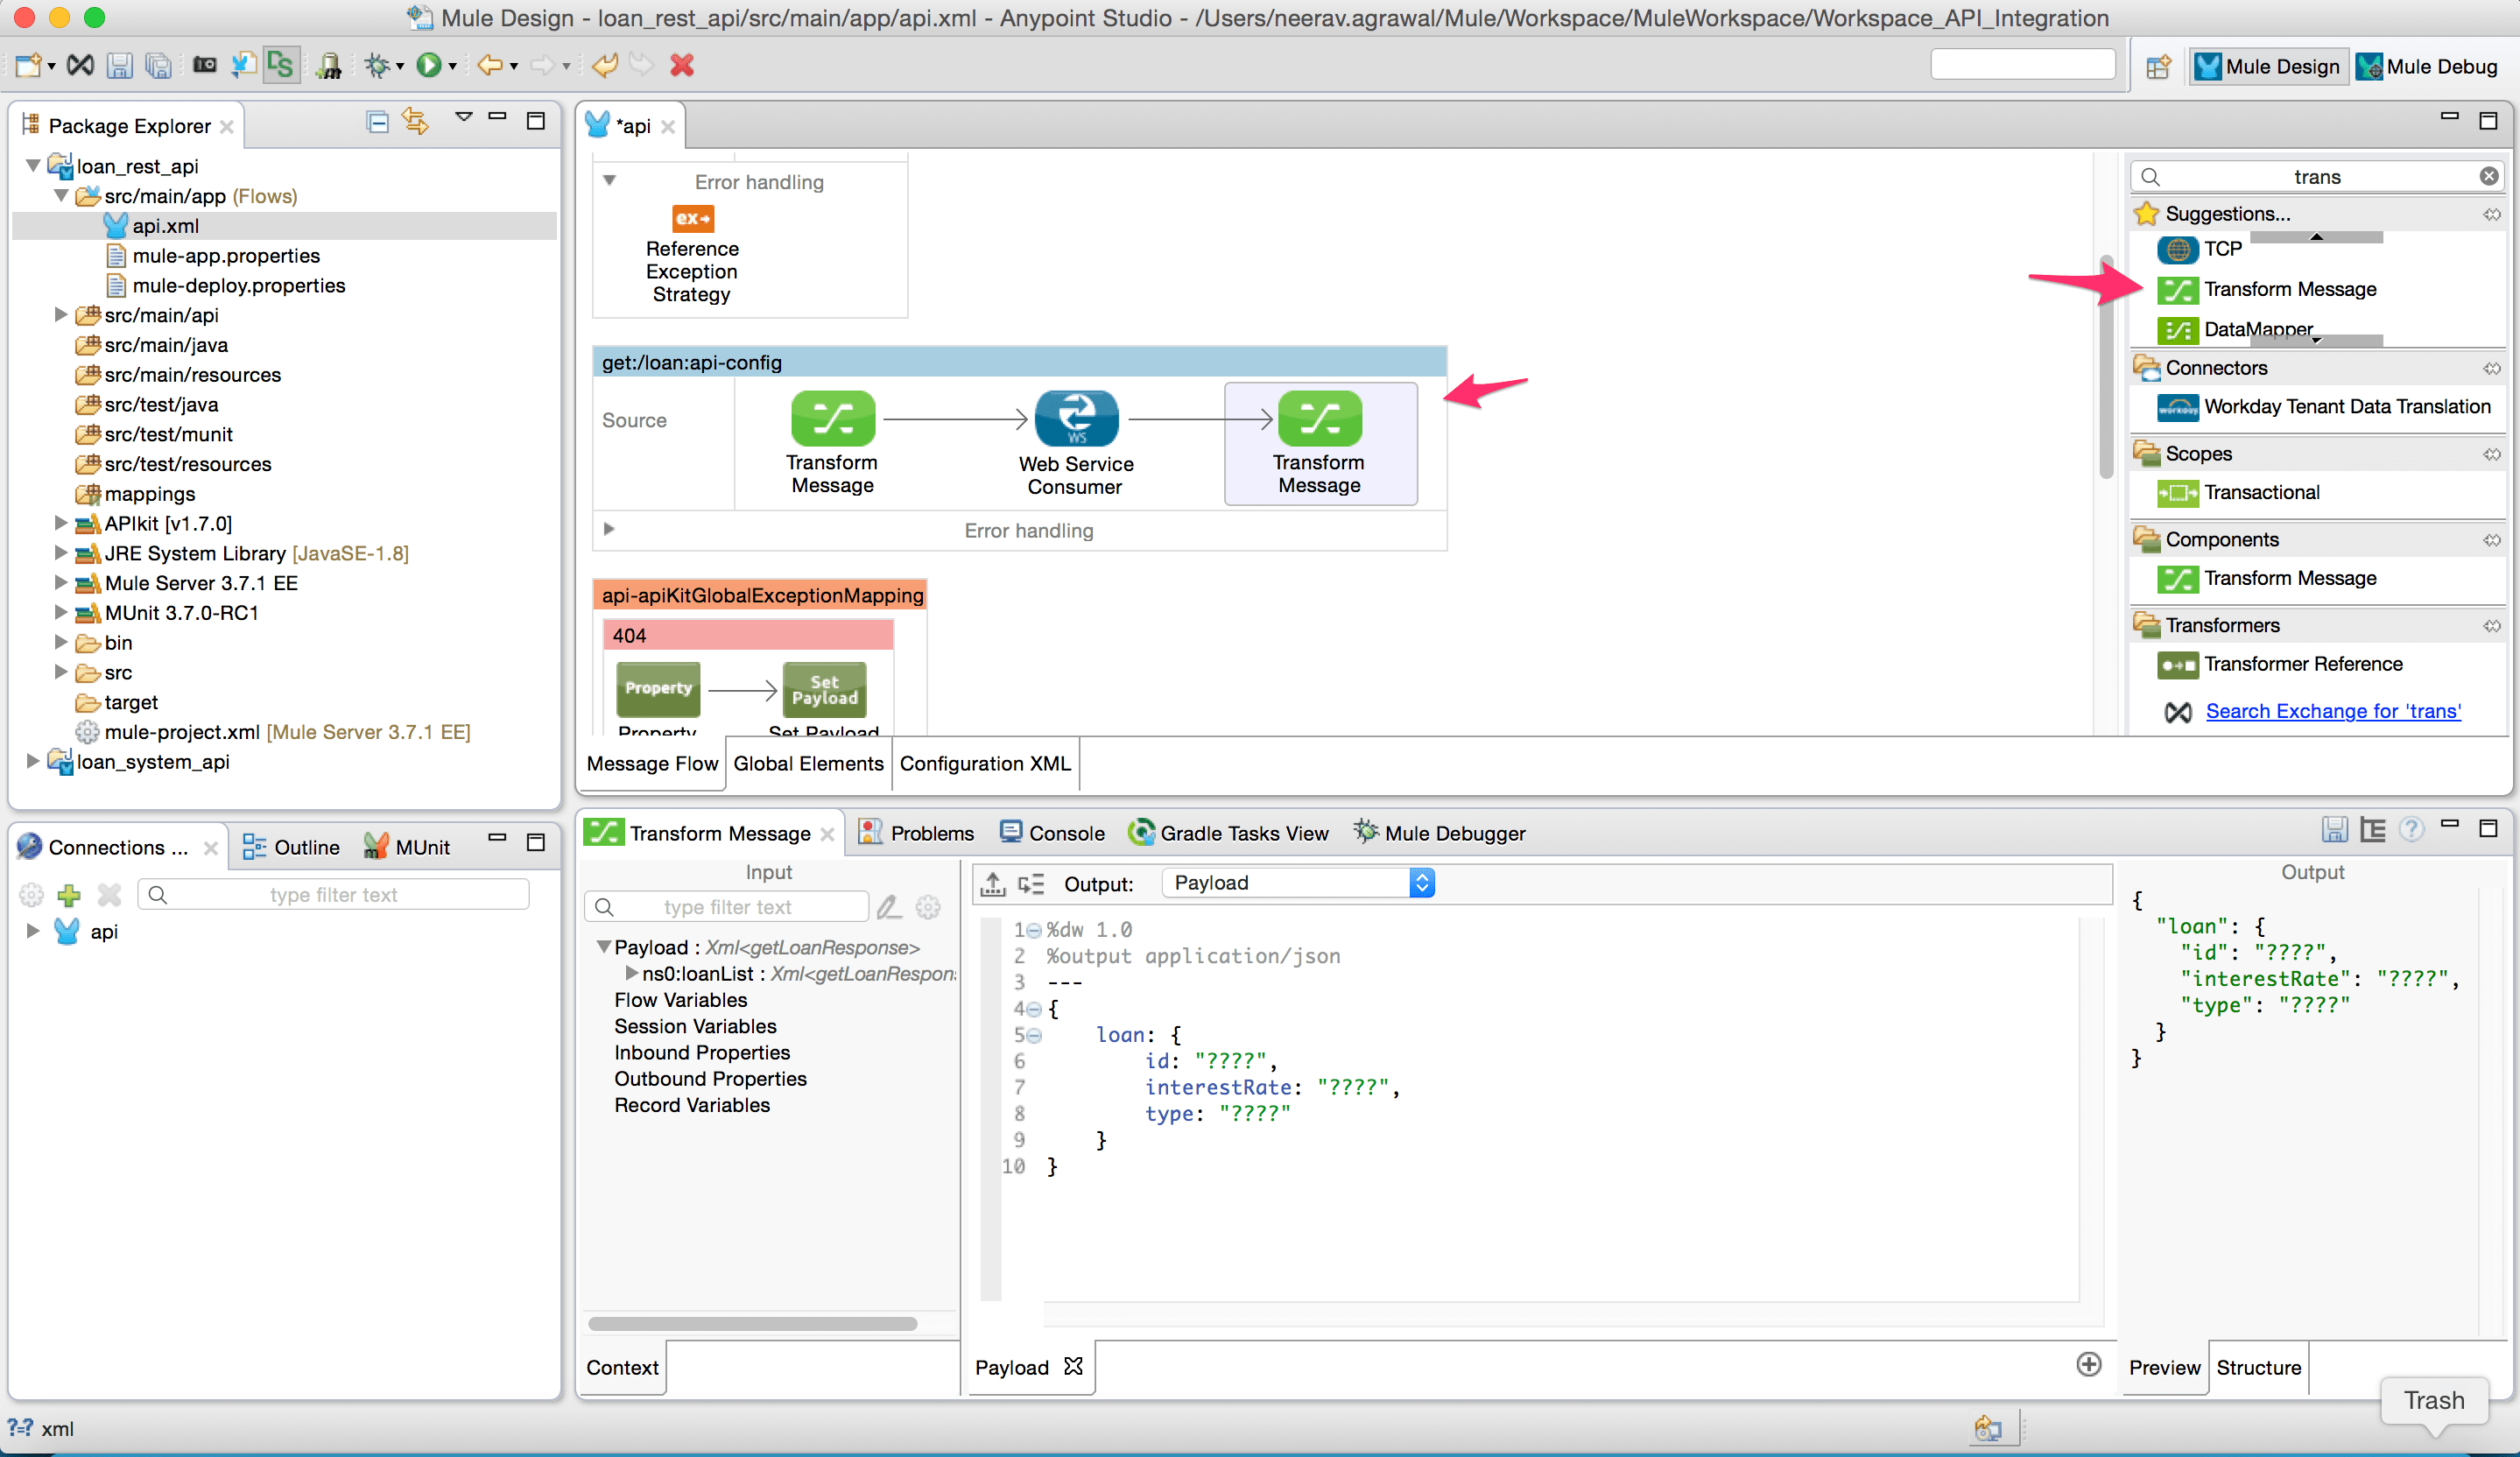
  11. Add a “Transform Message” component to the flow. Here we will configure the request message for the SOAP web service. Add the input parameters. In this case, we extract the value from the HTTP query param and assign it to the SOAP request(Note: Make sure the namespace is configured correctly as per the target web service requirement).MapperMule_Design_-_loan_rest_api_src_main_app_api_xml_-_Anypoint_Studio_-__Users_neerav_agrawal_Mule_Workspace_MuleWorkspace_Workspace_API_Integration
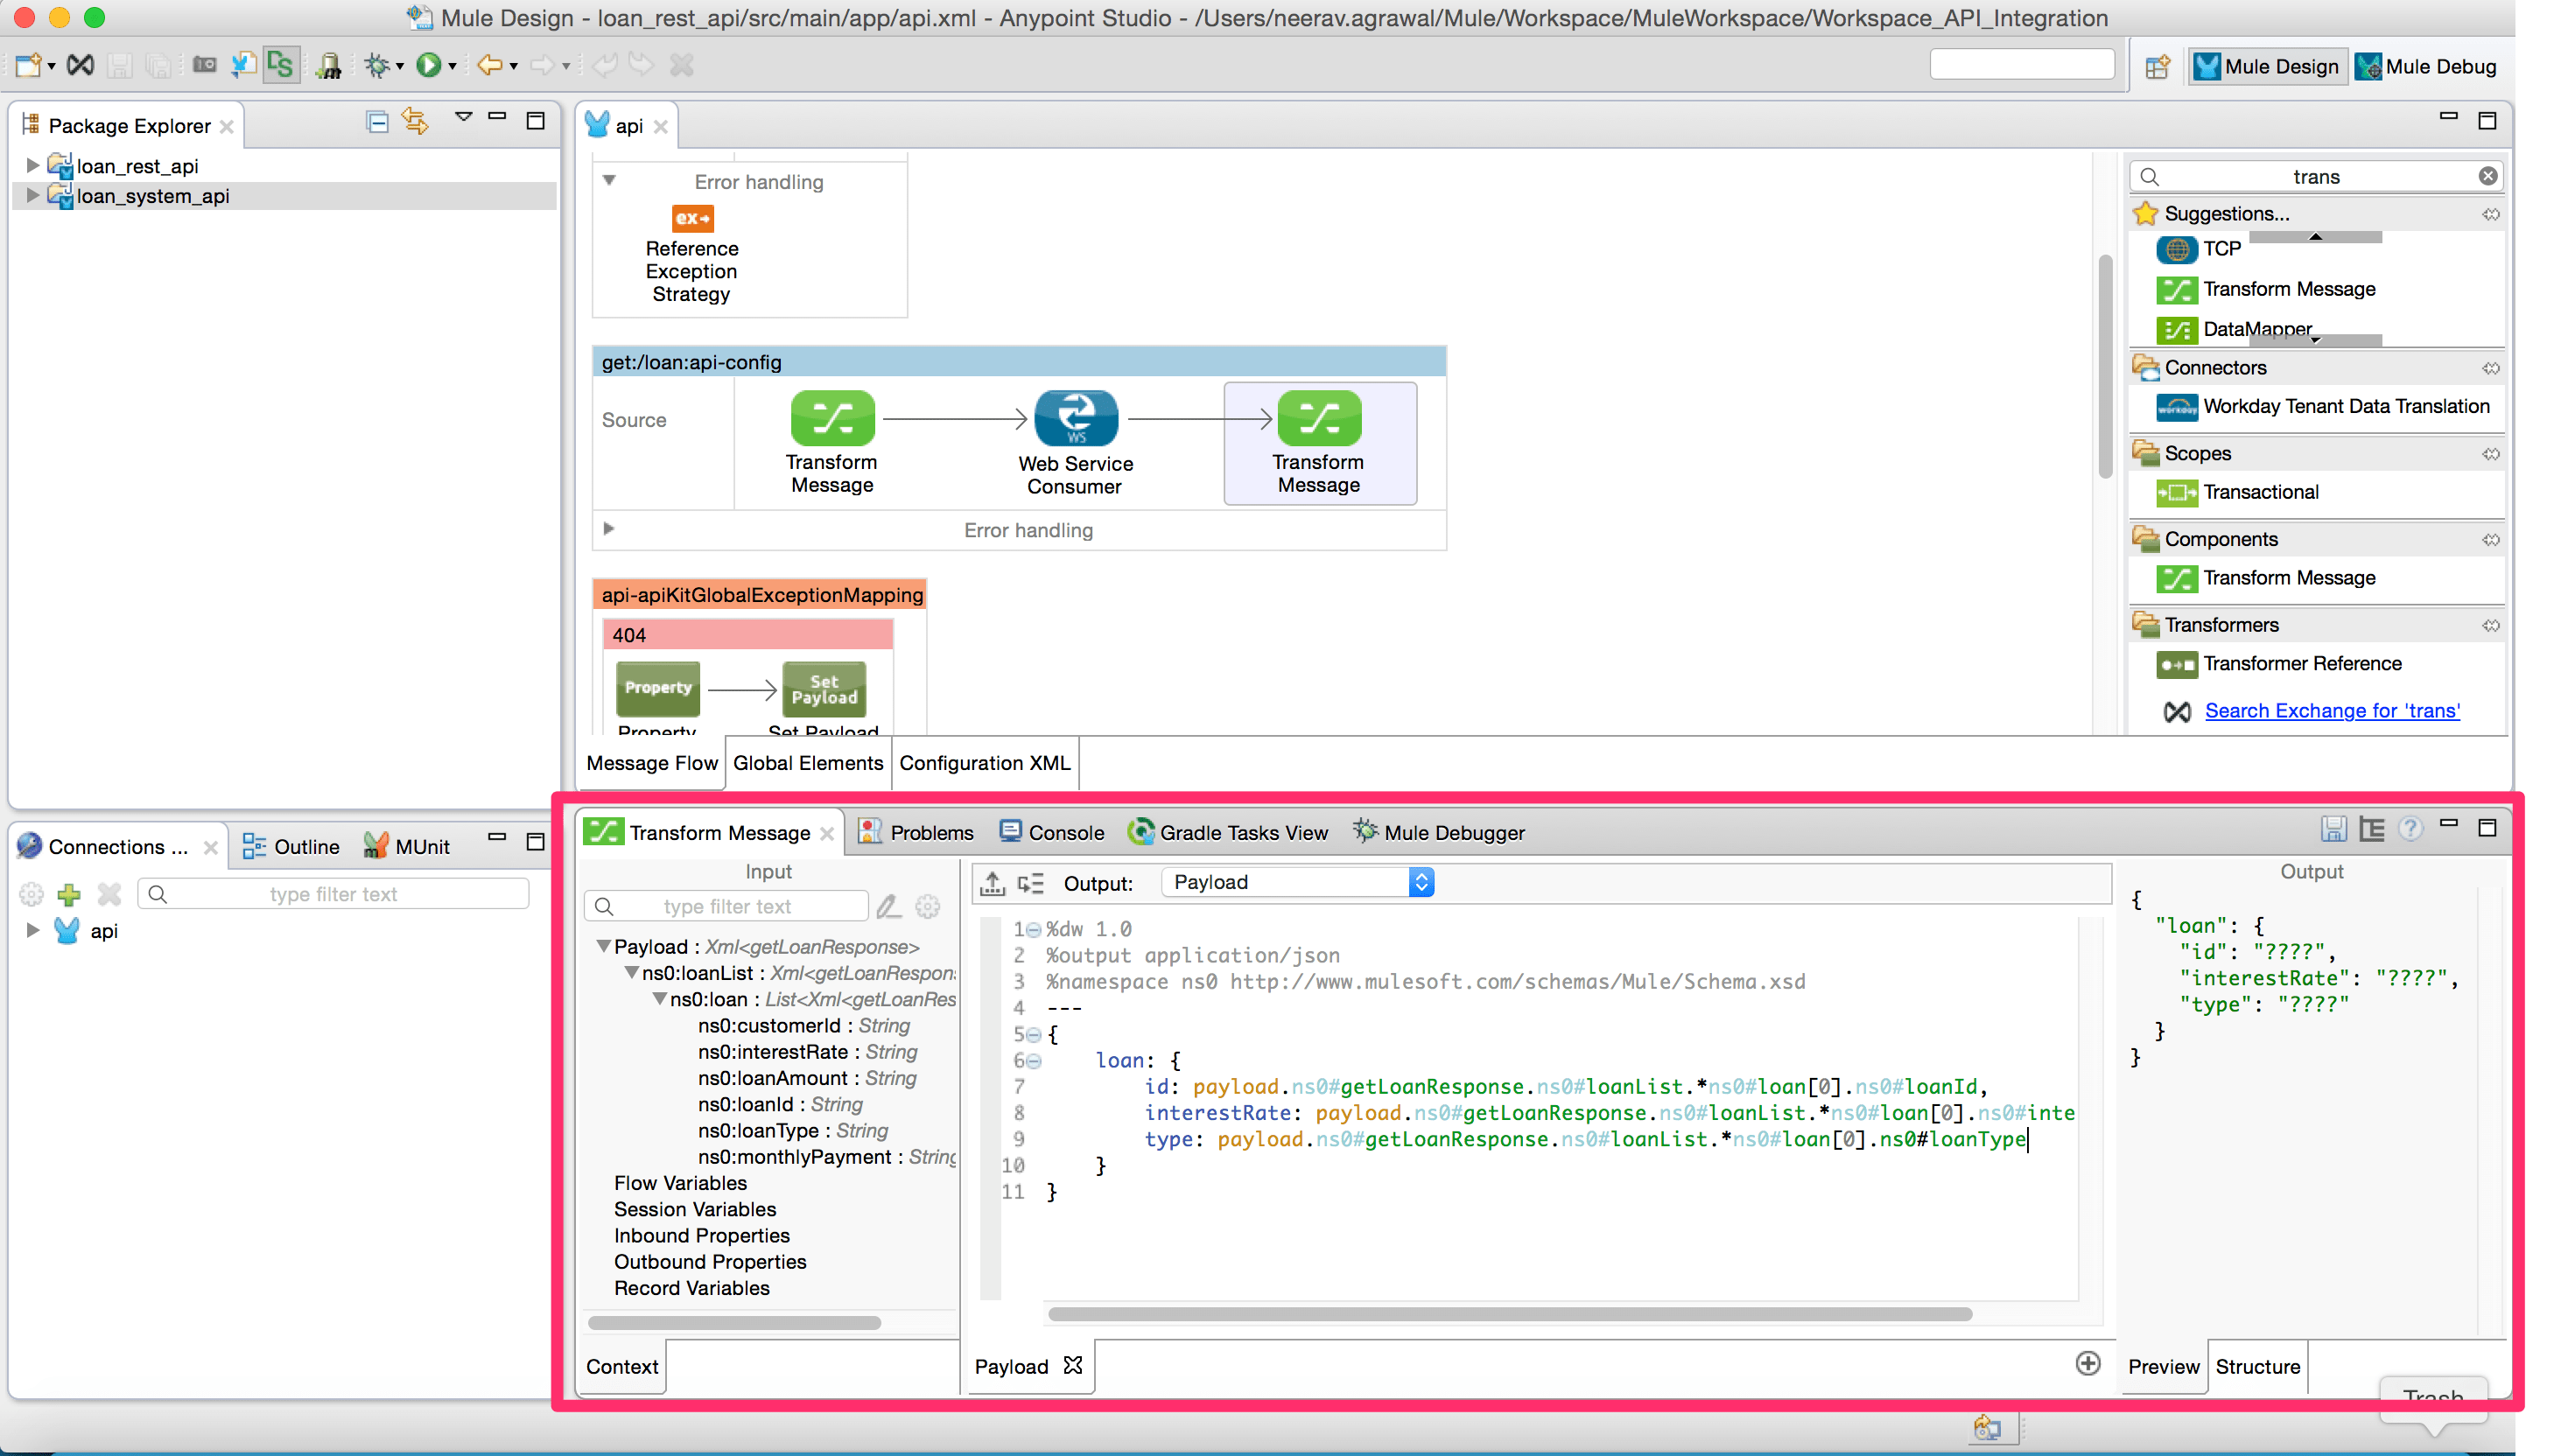
  12. Add another “Transform Message” component to the flow as shown below. Here we will setup the JSON response message for the REST service.dataWeave1
  13. The payload from the web service consumer is mapped to the JSON response using DataWeave expressions. dataWeave2
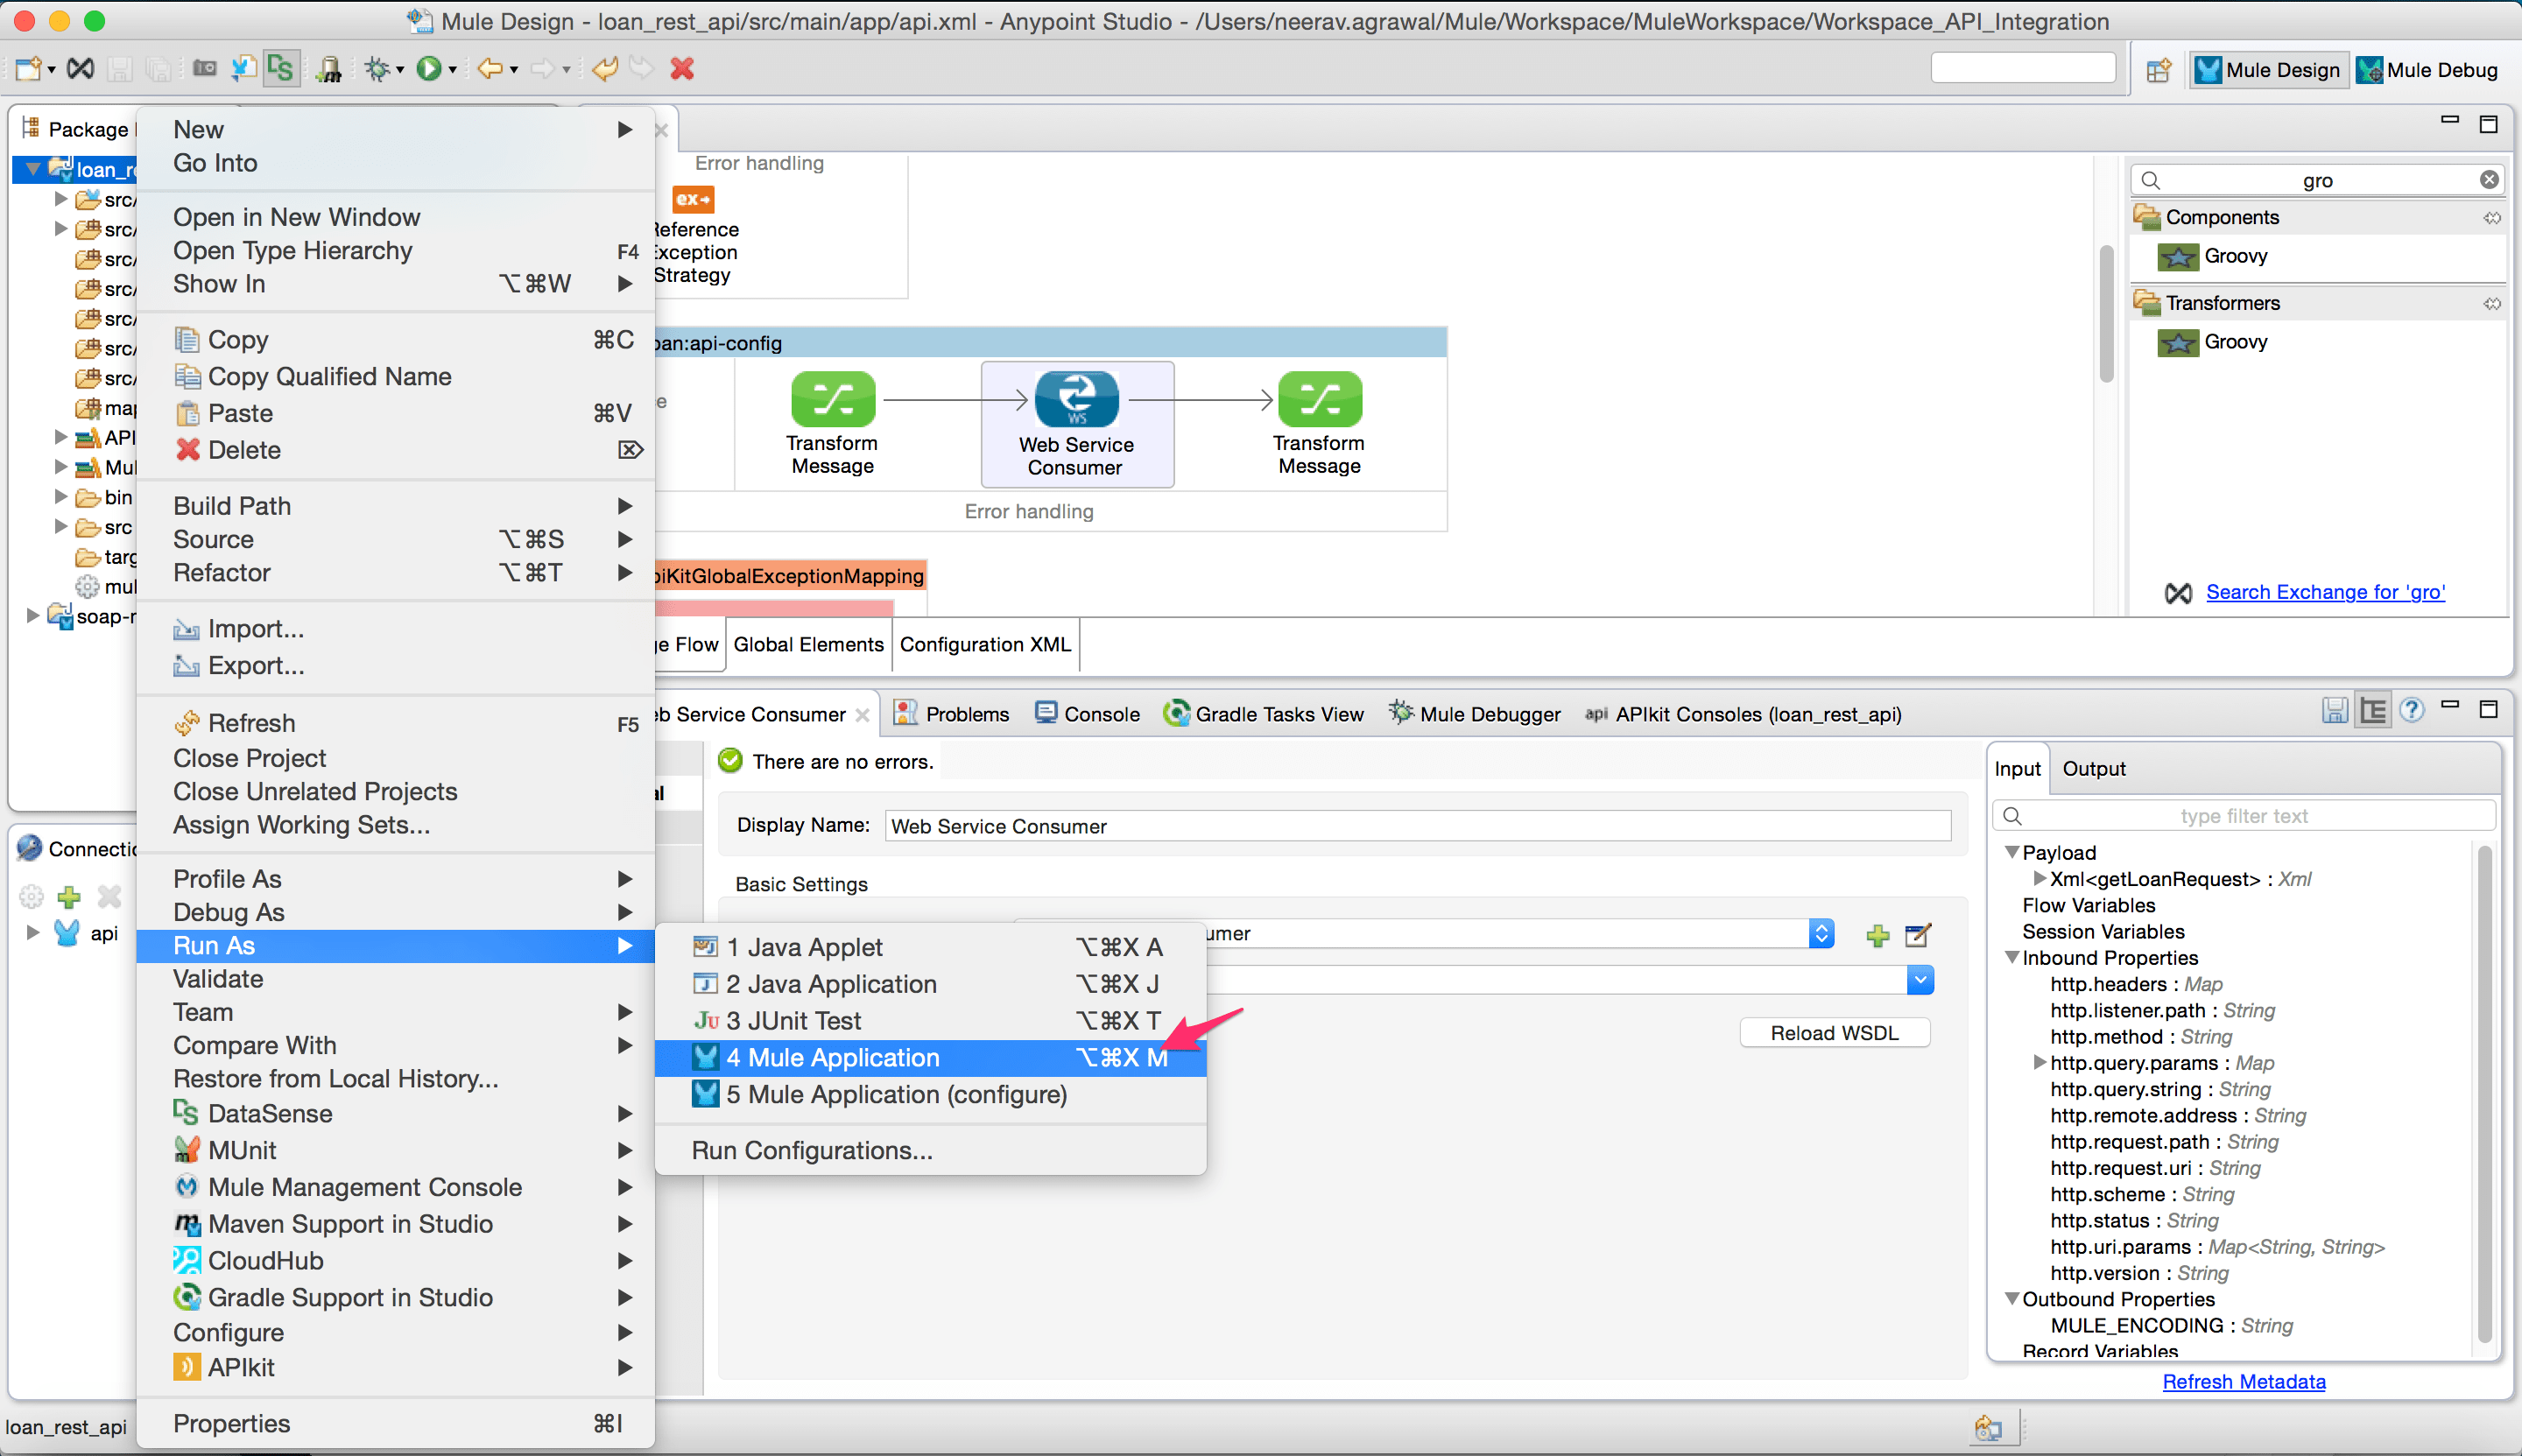
  14. Run the project as a Mule application.runCloudhub
  15. Once the application is running in the embedded runtime in Anypoint Studio, the APIkit console will come up. We can test the REST API through this console. Enter the query parameter loanId and click on “Get”. The response to the API will show up in the APIkit console.
    apiConsole
  16. Scroll down and we will see the response to REST API.
    apiConsole2

We just implemented a REST API interface to a back-end service. We can import this project as an Anypoint Studio generated Deployable Archive and deploy it to a mule runtime on-premise or cloud.
This blog is a follow-up to part 1 of the series “Create APIs on top of an integration”.

To create a REST API we leveraged the following features of Anypoint Platform:

  • Adopted a design-first approach and use Mulesoft’s Anypoint Platform for APIs to get one unified user experience across the API lifecycle to streamline the creation, management and consumption of APIs.
  • Utilized RAML, which is the first standard facilitating the design-first approach to APIs.
  • Web-service consumer along with DataWeave & DataSense to help consume the SOAP web-service with very less effort.
  • Out of the box platform capabilities like auto-generation of implementation and mock service that are available in the platform that helps to design an API.

Next Step:

Taking advantage of the unified Anypoint Platform for APIs, we can now manage our API with various runtime policies. In Part 3 we’ll show you how to apply OAuth policy on this REST proxy.

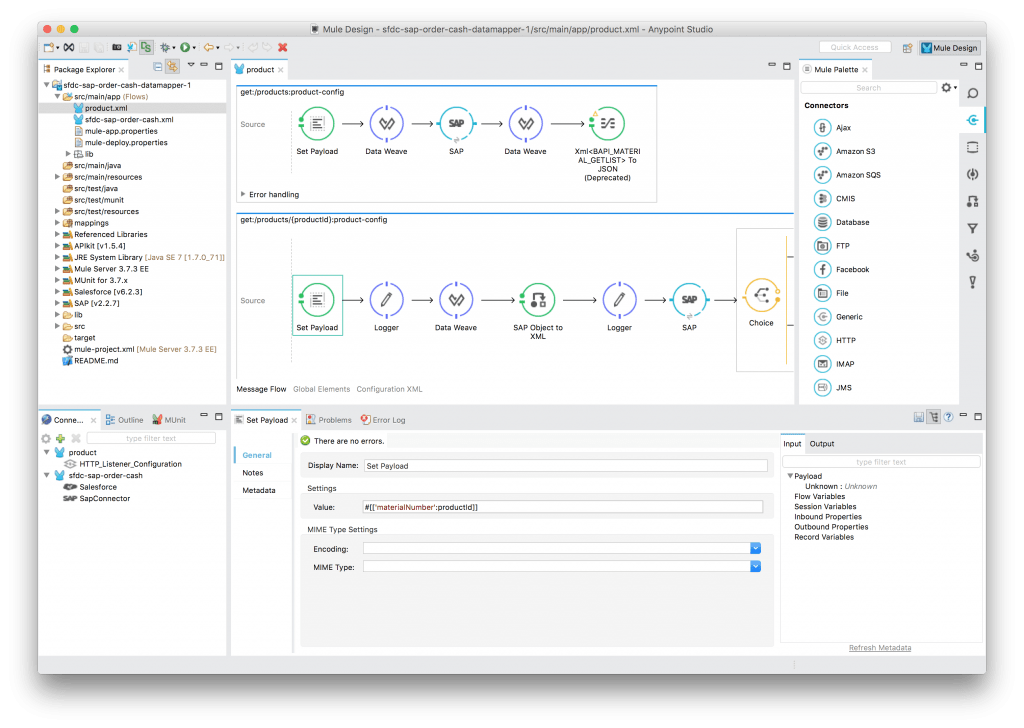
Anypoint Studio 5.4 with Mule 3.7.3 released!

Reading Time: 4 minutes

I’m pleased to announce the next release of our development tools, Anypoint Studio 5.4, as well as the next version of our runtime, Mule 3.7.3. This release includes a number of great new productivity improvements for Mule developers, including a new graphical mapping tool for DataWeave, a migration assistant for DataMapper, a new, more modern look and feel, bundles MUnit 1.1, and an improved palette.

Graphical mapping meets DataWeave

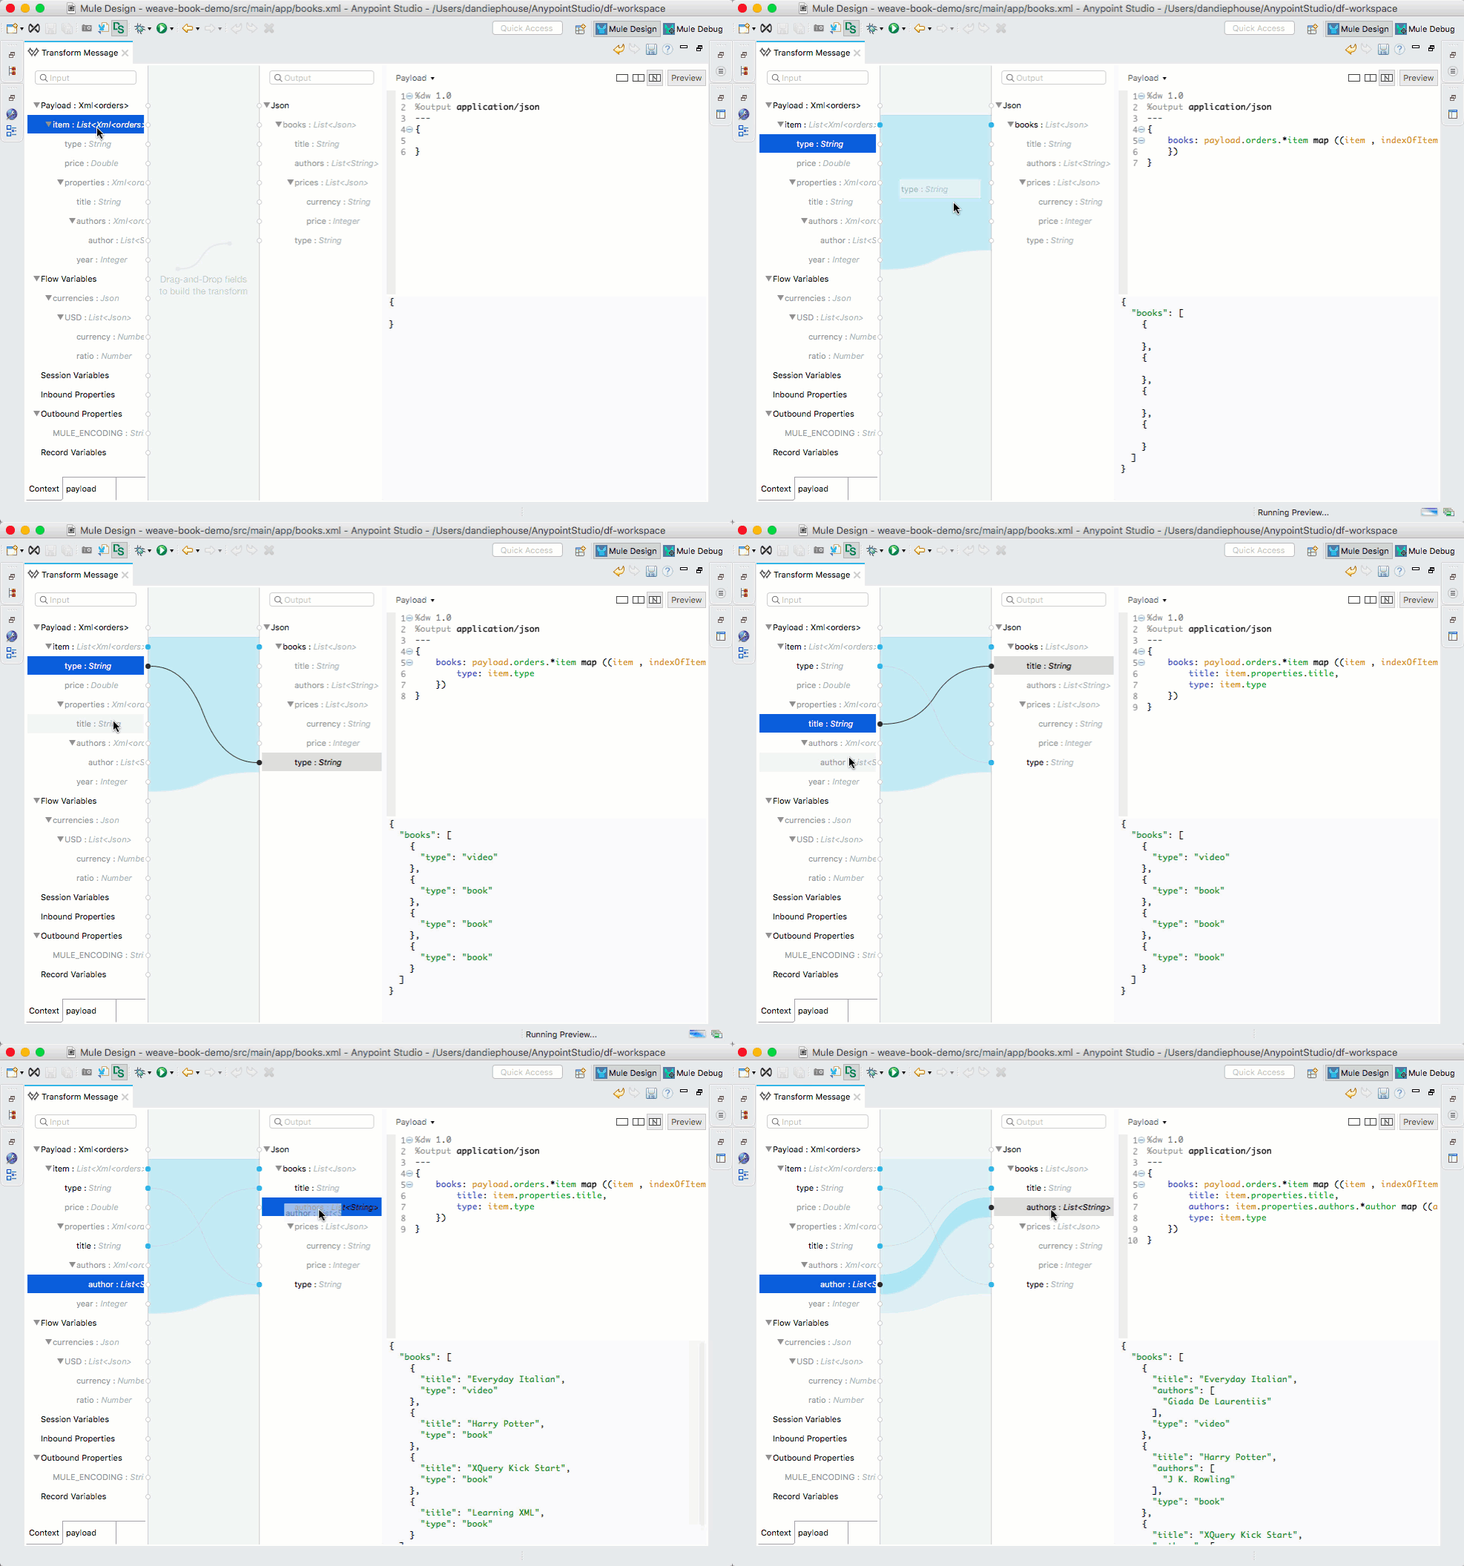
Studio now includes graphical mapping capabilities for DataWeave, allowing you to easily perform drag and drop mappings, with all the power of the DataWeave runtime. As you construct the mapping, the DataWeave code and your output preview will be dynamically built, allowing you to see the results as you progress.

DataWeave GUI

Screen Shot 2015-11-25 at 2.51.46 PMDataMapper to DataWeave migration assistant

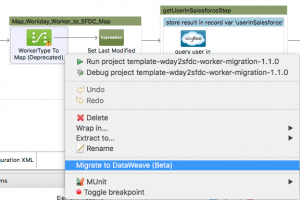
For DataMapper users, a migration tool is now included in Studio, which will assist users in converting their maps to DataWeave scripts. Users can right click on DataMapper, select Migrate to DataWeave, and follow the instructions.

New modern theme

New Studio Theme

Studio now includes a new theme that has been designed from the ground up to offer a more modern look and better experience.

You can opt into this theme by going at any time to Preferences, Appearance, and selecting the Studio Light Theme.

Redesigned and configurable palette


The palette has been redesigned to improve usability and configurability. You can now create custom palette profiles in the preferences, allowing you to configure which items you see. You can also now configure the size and location of the palette.

MUnit included

The latest MUnit 1.1 release is now included out of the box in Studio, making it easier to get started testing your Mule applications.

Other improvements

There are several other improvements in this release as well:

  • The Mule project menus have been reorganized to provide improved usability.
  • Improved performance in the rendering of editors and flows.
  • Many bug fixes

Get Started

To get started:

We look forward to your feedback in this post’s comments and in our forum. Happy connecting!