
Apache Kafka is used for building real-time data pipelines and streaming apps. It is horizontally scalable, fault-tolerant, and incredibly fast. And when coupled with Heroku and MuleSoft, developers can easily publish and consume data without writing any code.
In this article, we’ll walk-through the process of configuring the MuleSoft Kafka connector to connect to Apache Kafka on Heroku through SSL. Using the MuleSoft Kafka Connector, developers can streamline business processes and move data between Kafka and enterprise applications and services.
This article assumes you have a Heroku account with the Apache Kafka on Heroku add-on already added and configured. This article also assumes that you have Anypoint Studio 7.x installed on your local machine and have some experience creating flows.
To start, we’ll need to setup Apache Kafka on Heroku so we have a topic we can publish and consume from within our Mule flow. We also need to generate the keystore files to connect to Kafka over SSL.
1. Setting up Apache Kafka on Heroku
Assuming you’ve already added the add-on to your app in Heroku, you should have Apache Kafka on Heroku under your list of add-ons under the Resources section.
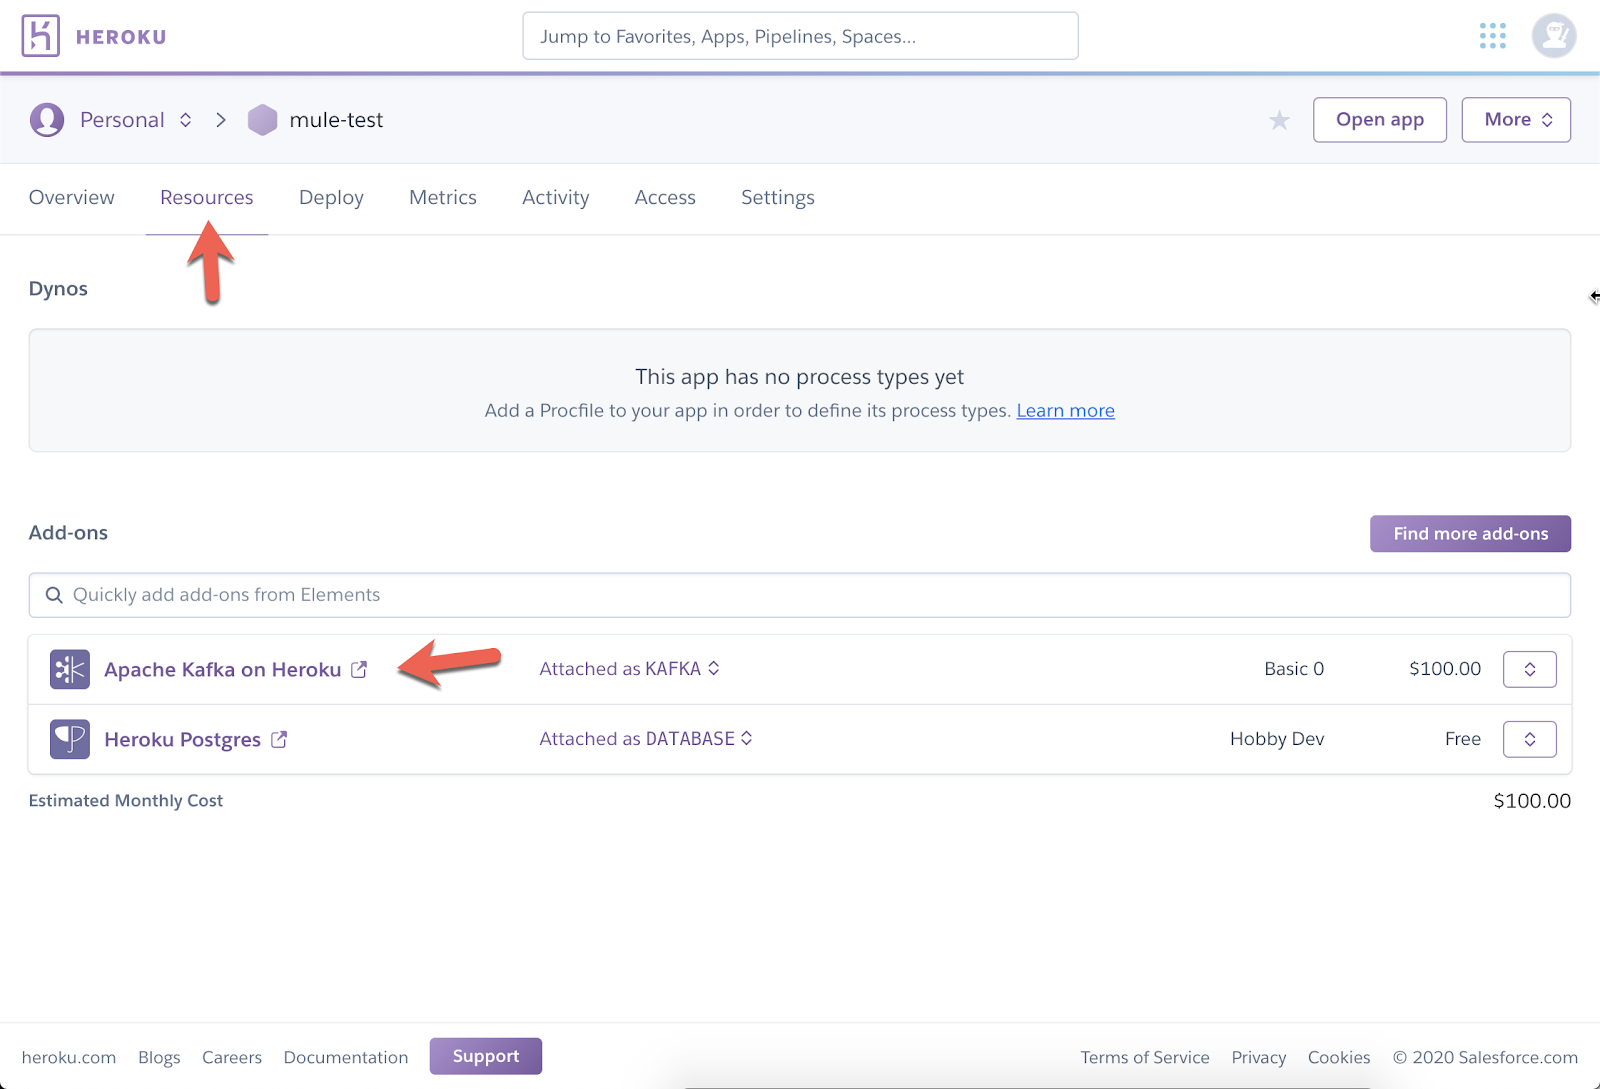
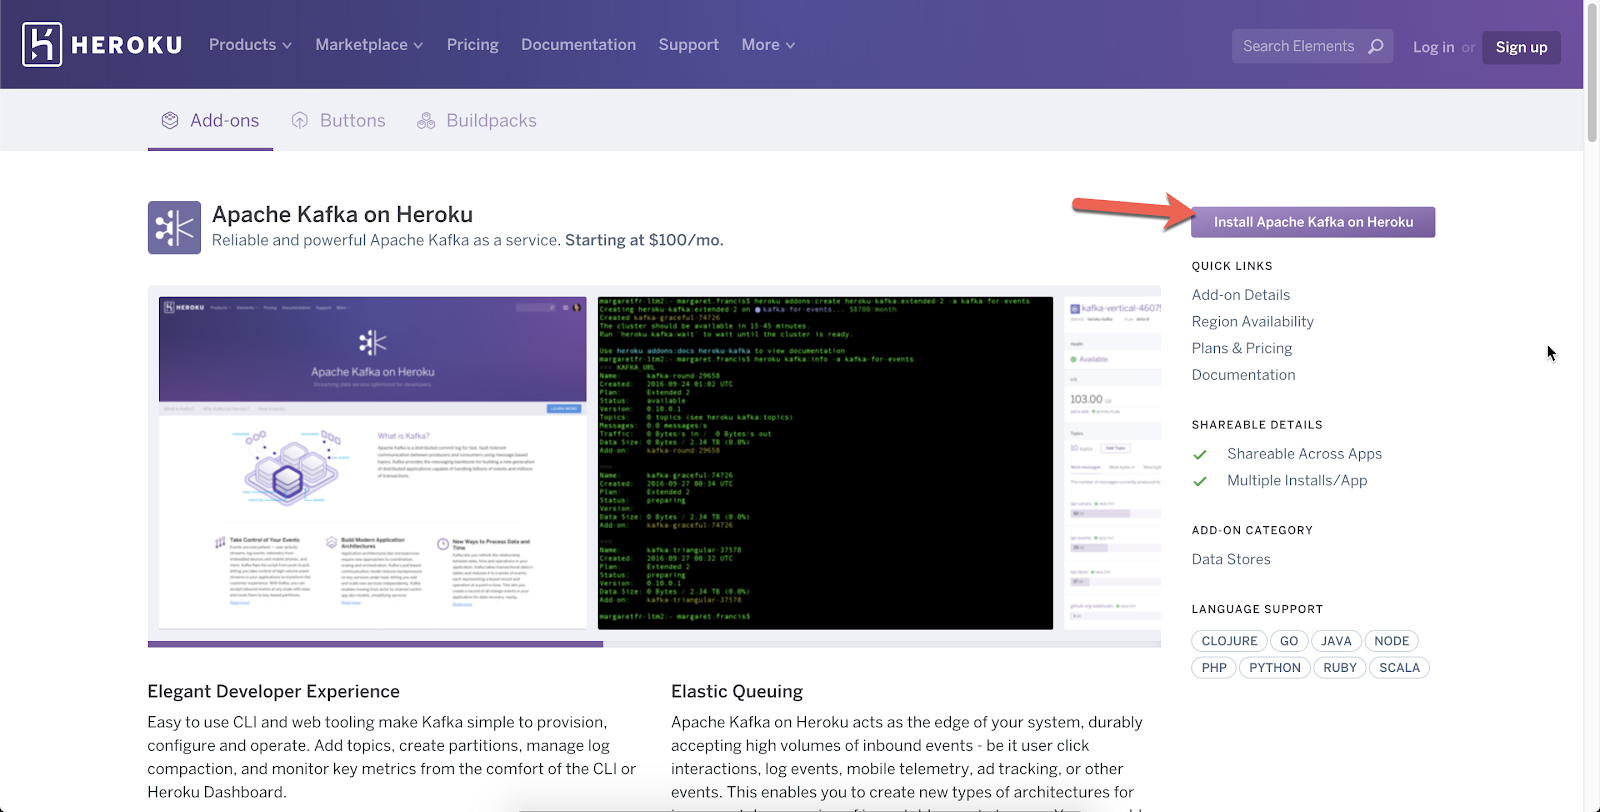
If not, follow this link and click on the install button on the top right in order to provision an instance to your Heroku app.
Once Kafka is provisioned, click on the add-on name to open the console in a new browser tab. If you already have a topic, you can skip this section and jump to section 2. Otherwise, scroll down and click on Add Topic.

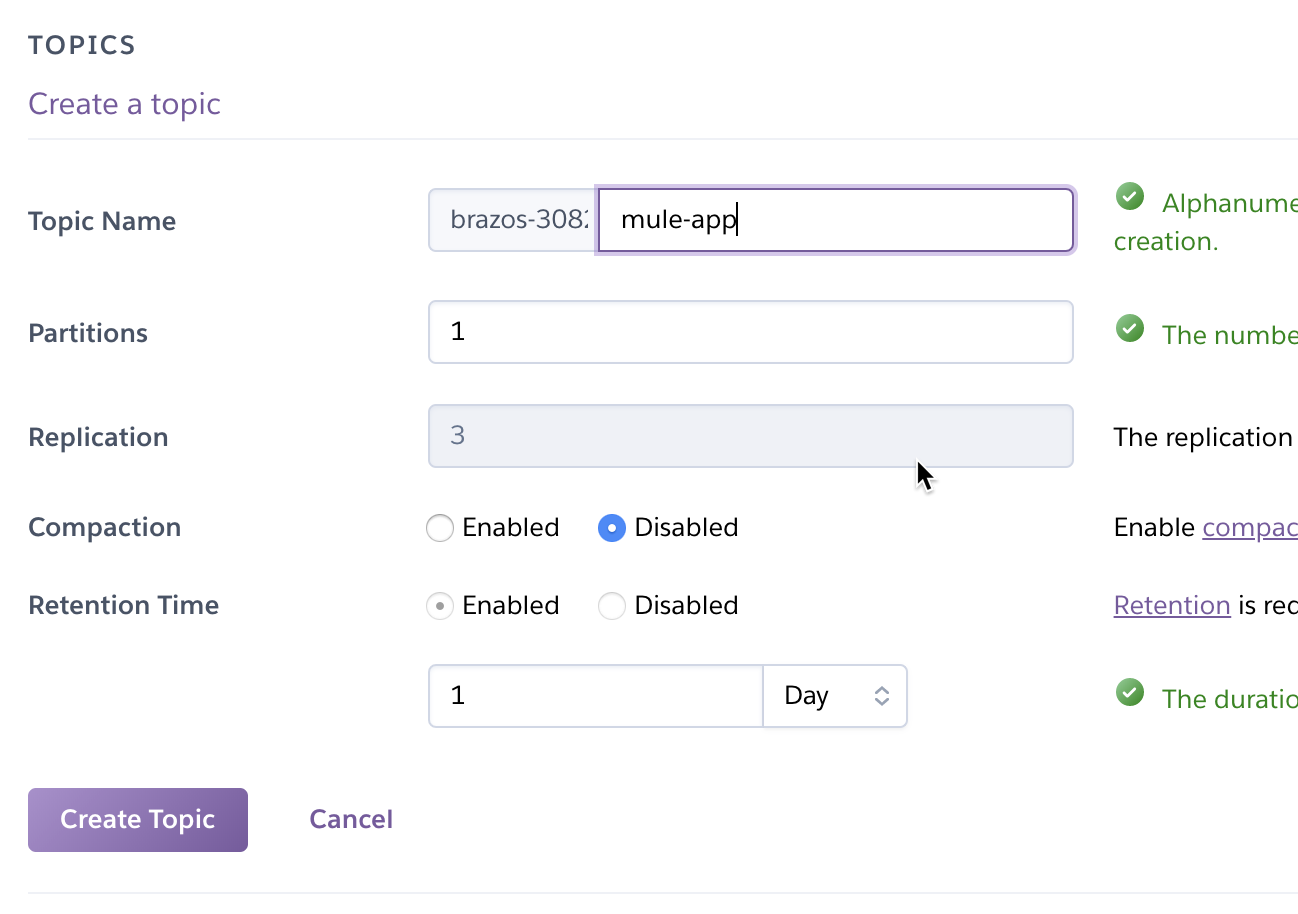
Give your topic a name (e.g. “mule-app”) and set the Partitions field. I just set it to 1 for my project, but you can set this however you need. I left all the other fields with their default values and clicked on Create Topic.
With the topic created, we need to setup a consumer group in Kafka. Unfortunately, I haven’t found a way to set that up from the web console interface. You’ll need to install the Heroku CLI and run the Kafka add-on command to add a consumer group. You can find out how to setup the Heroku CLI here. Once you setup the Heroku CLI, you need to install the plugin for Kafka. You can follow those instructions here on how to setup the plugin.
Because we provisioned Kafka already, you don’t need to provision it from the CLI. But we still need to setup the consumer group for Kafka. Run the following command to set that up with the items highlighted in red with your own names:
| heroku kafka:consumer-groups:create <group name> -a <heroku app name> |

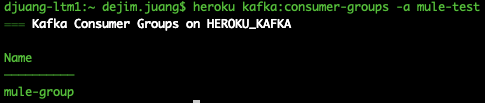
Running the following command will show you the list of groups on your Kafka instance
| heroku kafka:consumer-groups -a <heroku app name> |
Now that is setup, the next section will show you how to gather the SSL URLs and the certificates. It will also show you how to convert the PEM certificates provided in Heroku to JKS which are needed for the MuleSoft Kafka Connector.
2. Converting PEM certificates and private keys to JKS
Kafka on Heroku supports SSL to encrypt and authenticate connections, and this is the only connection mode supported in the Common Runtime. In Private Spaces, plaintext connections may optionally be used, but this article will only cover SSL connections.
Heroku provides the certificates to connect to Kafka in PEM format. The MuleSoft Kafka Connector requires the certificates to be in JKS format. Therefore, we need to convert the PEM certificates and keys to a PKCS12 file first before we convert them to JKS. We’ll use openssl for that. But first, let’s walk through the process of where to get those certificates and private key.
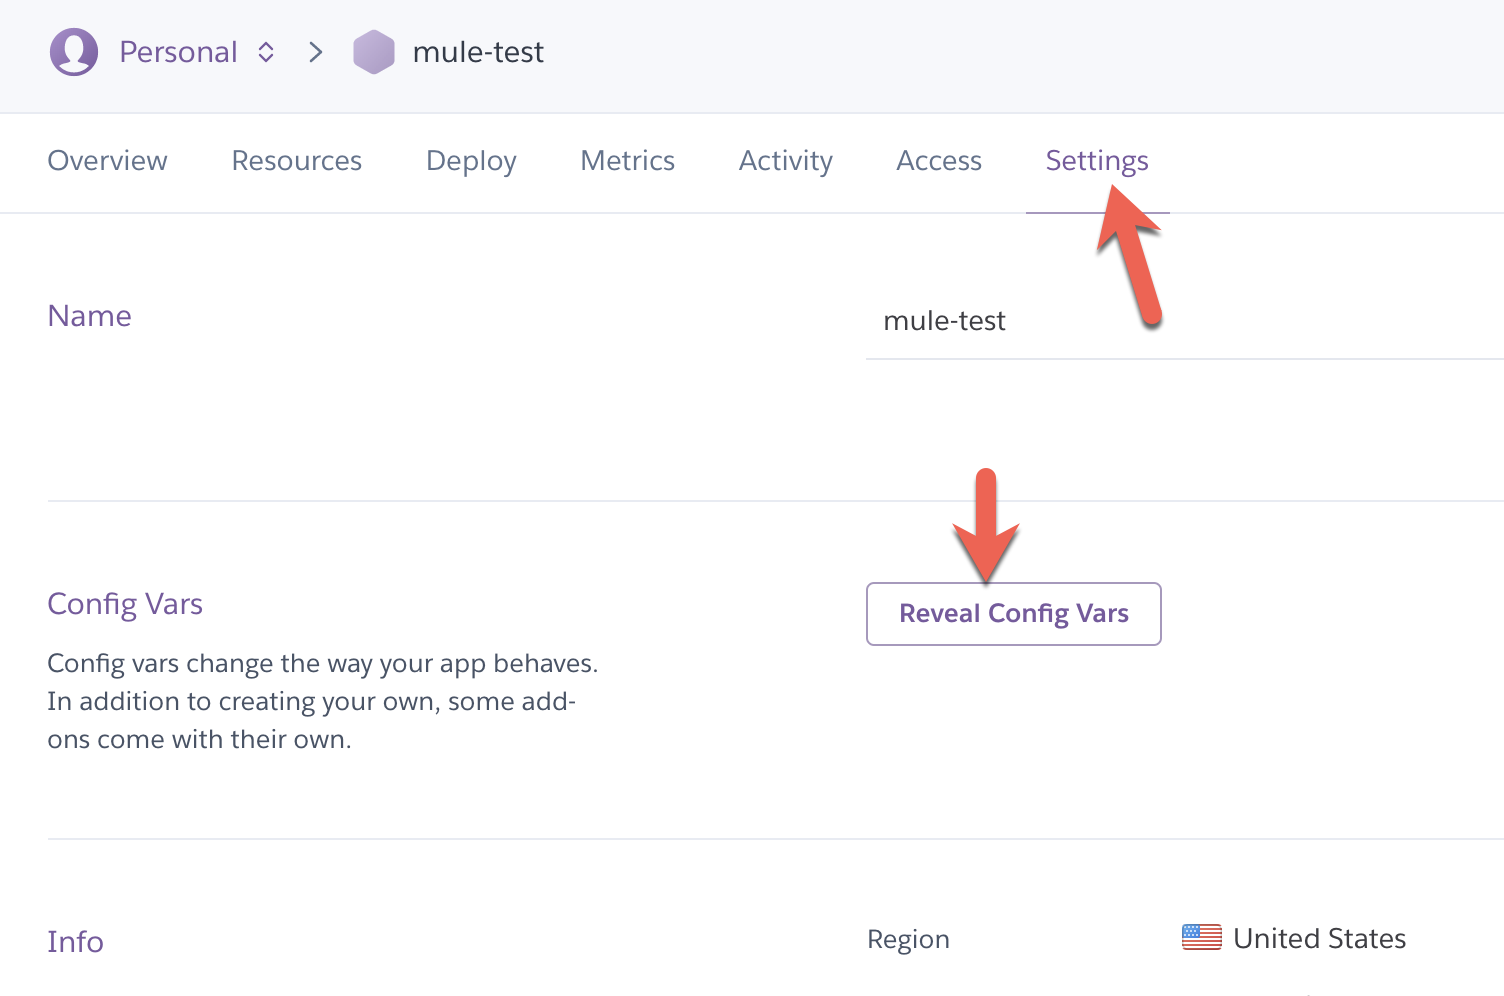
Back in the Heroku console for your application, click on the Settings section. Once there, click on the Reveal Config Vars in the Config Vars section.
The Config Vars section will expand and show you various configuration strings for the add-ons of your Heroku app. We need to collect the following configuration variables.
- KAFKA_PREFIX
- Needed for the Group ID.
- KAFKA_URL
- A comma separated list of SSL URLs to the Kafka brokers making up the cluster. You’ll need this string for the Bootstrap Servers field in the Kafka Connector.
The following properties in the table below contain the certificates and keys for authentication. Copy and paste them into files with the names listed next to them. You should save them into the same folder.
- KAFKA_CLIENT_CERT – cert.pem
- KAFKA_CLIENT_CERT_KEY – key.pem
- KAFKA_TRUSTED_CERT – trusted_cert.pem

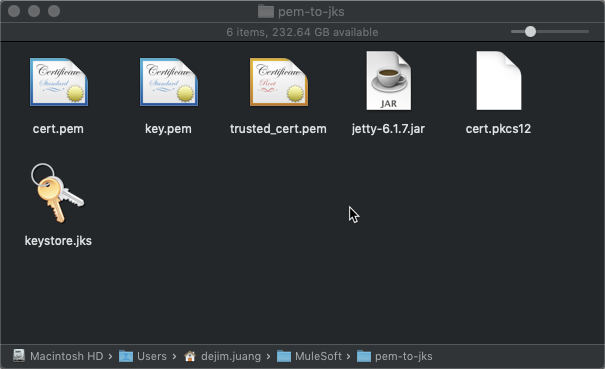
Next, open up a terminal window and navigate to that folder. Run the following command to generate a pkcs12 file from the cert.pem and key.pem file.
| openssl pkcs12 -export -out cert.pkcs12 -in cert.pem -inkey key.pem |
The command will ask you for an export password. Don’t forget to write that down. You’ll need it for the next step as well as for the configuration of the Kafka Connector.

Once that’s done, you need to convert the pkcs12 file to a JKS. Jetty comes with a utility called PKCS12Import that will do this for you. You can download that jar file (jetty-6.1.7.jar) from here. Copy that file into the same folder where you created the pkcs12 file and run the following command.
| java -cp jetty-6.1.7.jar org.mortbay.jetty.security.PKCS12Import cert.pkcs12 keystore.jks |

The command will ask for the export password you used previously. Once the command is done, you should have the following files in that folder.
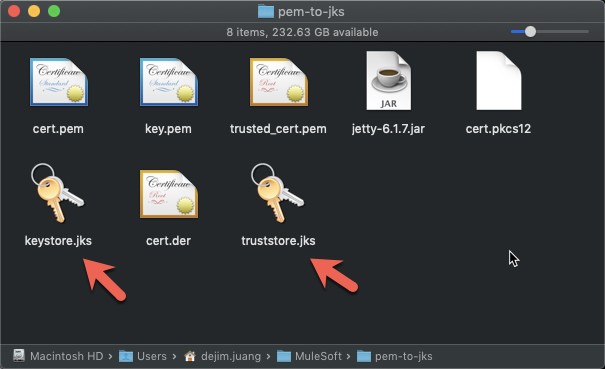
Next, you’ll need to import the certificate into your truststore. We need the trusted_cert.pem file for that. Export the certificate as a DER using the following command:
| openssl x509 -in trusted_cert.pem -out cert.der -outform der |

Then import it into the truststore using the following command. Be sure to keep a note of the password. You’ll need this when you setup the Kafka Connector:
| keytool -importcert -alias mule -file cert.der -keystore truststore.jks -storepass password |
When the command asks you to trust this certificate, type in ‘yes.’ You should see the following output:

In the folder, you should now have the following files.
The keystore.jks and the truststore.jks files are what we need for the next section.
3. Create Mule application
I will assume you’re familiar with Anypoint Studio already, so I’ll leave the steps out on how to build the following flow below. There are two flows to this simple application. One flow publishes a message to the topic. The other listens to the topic and writes the message to the console log.
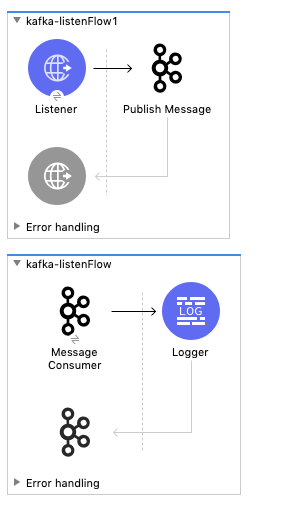
Here is the Mule Configuration XML for the flows:
| <flow name=”kafka-listenFlow1″ doc:id=”eb58bb83-4657-4f13-bb23-7895eac0e027″ > <http:listener doc:name=”Listener” doc:id=”5e32feca-f633-4590-bed9-69fc90e95953″ config-ref=”HTTP_Listener_config” path=”/publish”/> <kafka:producer doc:name=”Publish Message” doc:id=”0f53de10-0f8a-4690-8216-f111631db0a4″ config-ref=”Apache_Kafka_Producer_configuration” topic=”${kafka.topic}” key=”test”> <kafka:message ><![CDATA[#[“Hello World!”]]]></kafka:message> </kafka:producer></flow> <flow name=”kafka-listenFlow” doc:id=”708f4b7f-0c62-4164-bfbb-9285f30d362f” > <kafka:consumer doc:name=”Message Consumer” doc:id=”8a6d4725-589b-4804-a734-deedf4105c4d” config-ref=”Apache_Kafka_Consumer_configuration” topic=”${kafka.topic}”/> <logger level=”INFO” doc:name=”Logger” doc:id=”5faf9b43-827a-41ea-8973-9db986e6a417″ message=”#[payload]”/></flow> |
The following subsections provide details on the configurations for the project components.
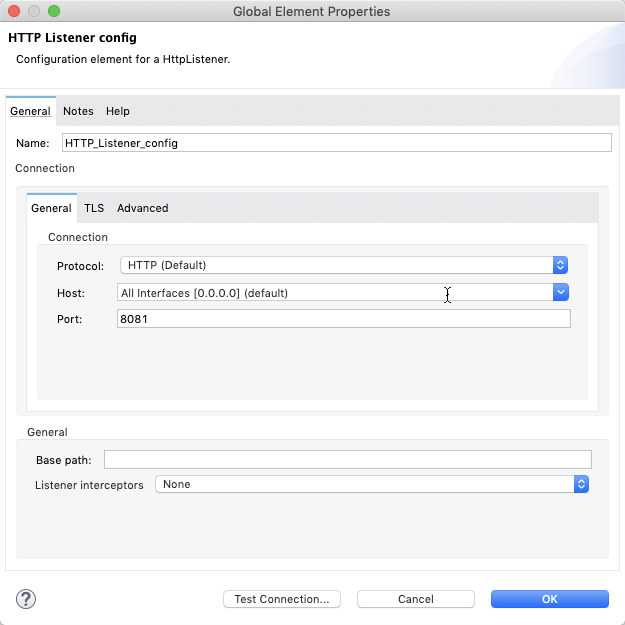
HTTP listener config element
I kept the HTTP listener configuration with the default values.
Configuration properties element
When you create your project, you also need to create a configuration file with the following variables. You can copy and paste in the following content:
| kafka: ssl.endpoint.identification.algorithm: ” ” topic: “<KAFKA_PREFIX>.<topic name>” groupId: “<KAFKA_PREFIX>.<group name>” |
The KAFKA_PREFIX is from Section 1 and is set when you provisioned the Kafka in Heroku. The topic name was also setup in Section 1. You can see an example from my instance in the screenshot below.
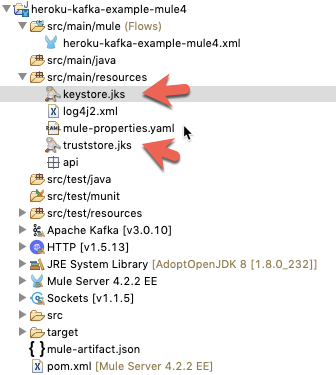
And from Section 2, copy and paste the keystore.jks and truststore.jks files into the src/main/resources folder of your project. These will be referenced from the consumer and producer configuration elements.
Kafka producer configuration
This section will walk you through the settings for the producer configuration.

- Change the dropdown value to Kafka SSL Producer Connection.
- From Section 2, copy and paste the KAFKA_URL string into the Bootstrap servers field. It’s a comma separated list of URLs pointing to the servers (e.g. kafka+ssl://ec2-35-173-52-55.compute-1.amazonaws.com:9096,kafka+ssl://ec2-34-234-254-237.compute-1.amazonaws.com:9096…)
- Change the Additional Properties drop down to Edit Inline and add the following key/value pairs:
- security.protocol – SSL
- ssl.endpoint.identification.algorithm – ${kafka.ssl.endpoint.identification.algorithm}
- Set the Key store location and Trust store location to the jks files that we created in Section 2 and pasted into the project. Also fill in the passwords for the Key store password and Trust store password.
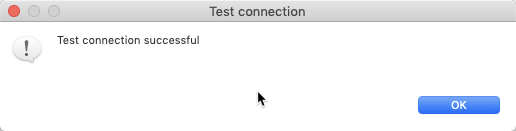
Once everything is filled in, click on Test Connection. You should see the following window.
Kafka consumer configuration
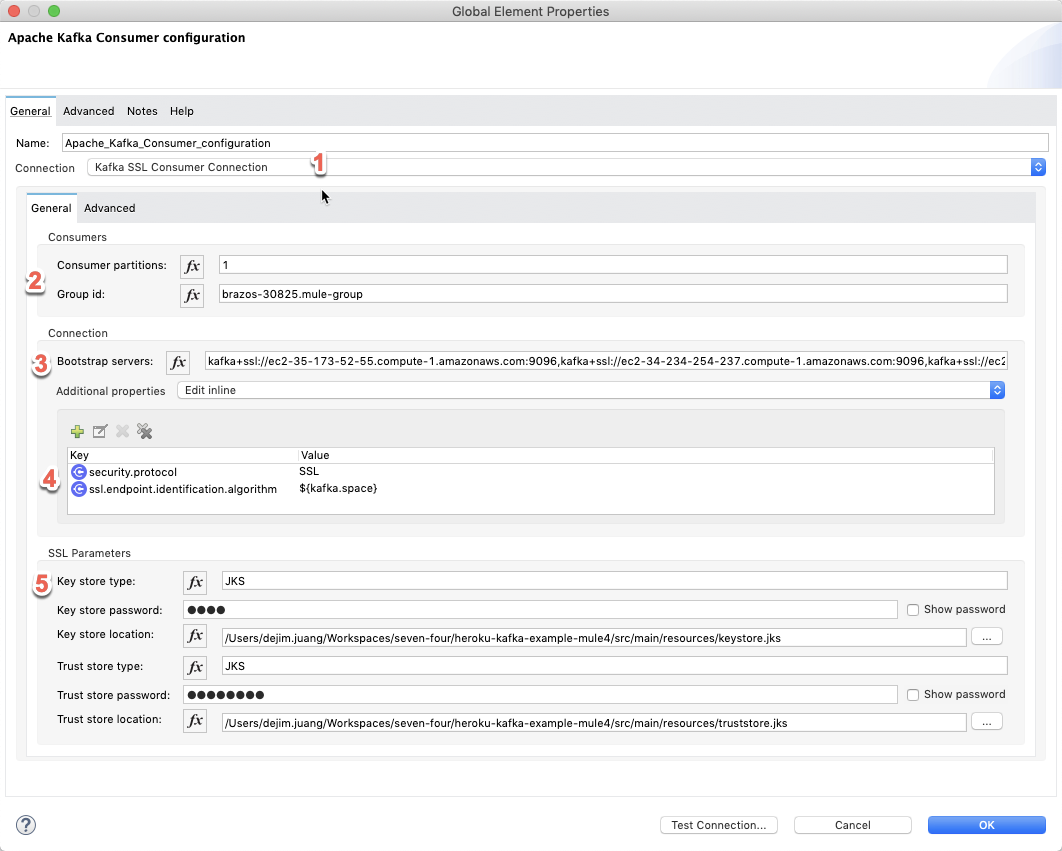
- Change the dropdown value to Kafka SSL Consumer Connection.
- Set this to <KAFKA_PREFIX>.<group name>. The group name is what you setup in the Heroku CLI in Section 1.
- From Section 2, copy and paste the KAFKA_URL string into the Bootstrap servers field. This is the same list from the Producer configuration. It’s a comma separated list of URLs pointing to the servers. (e.g. kafka+ssl://ec2-35-173-52-55.compute-1.amazonaws.com:9096,kafka+ssl://ec2-34-234-254-237.compute-1.amazonaws.com:9096…)
- Change the Additional Properties drop down to Edit Inline and add the following key/value pairs:
- security.protocol – SSL
- ssl.endpoint.identification.algorithm – ${kafka.ssl.endpoint.identification.algorithm}
- Set the Key store location and Trust store location to the jks files that we created in Section 2 and pasted into the project. Also fill in the passwords for the Key store password and Trust store password.
Once everything is filled in, click on Test Connection. You should see the following window.
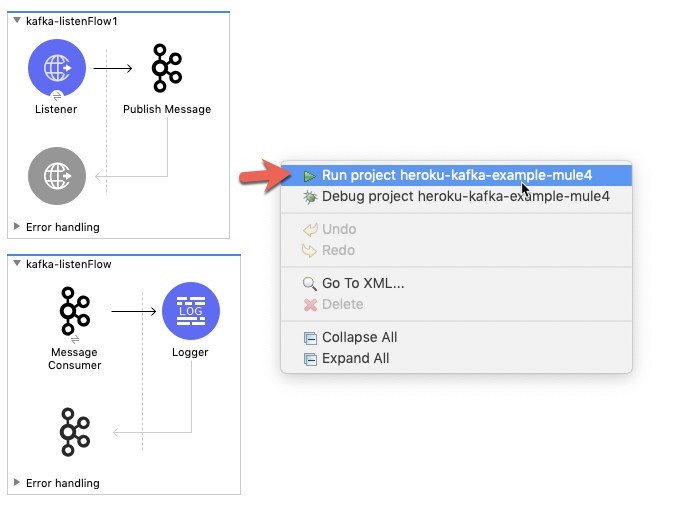
4. Run the application
With everything configured, right-click on the canvas and click on Run project…
The console log will look like the following:

Open a browser window and navigate to http://localhost:8081/publish.
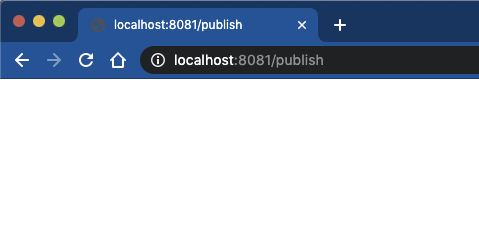
The project doesn’t output anything to the browser, but when you switch back to Anypoint Studio, you’ll see the following message in the Console logs. This shows that the message was written to the topic and then the Consumer flow picked the message off the topic and wrote it to the logs.

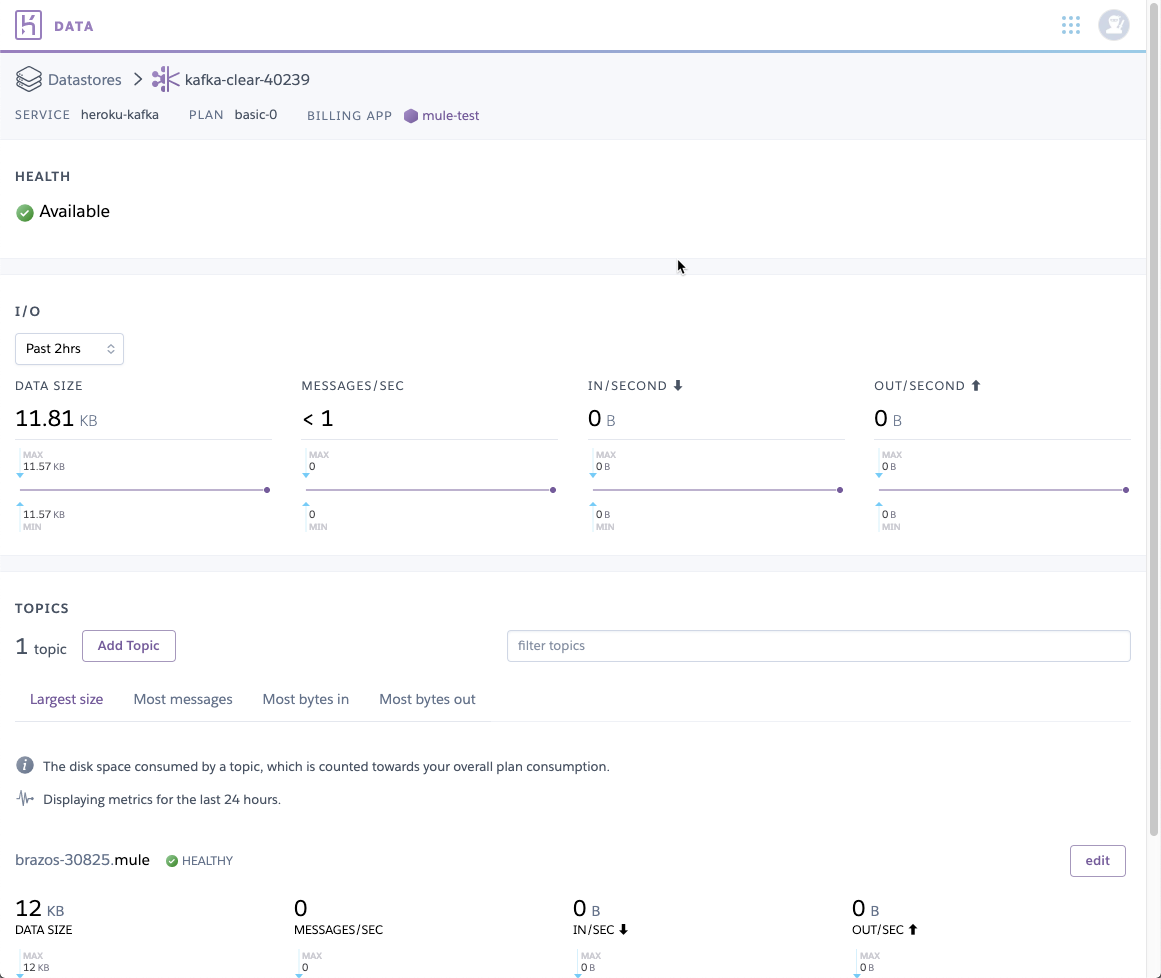
Lastly, if you switch back to the Apache Kafka on Heroku console, you’ll see the data showing that a message was received and consumed.
Summary
Using the MuleSoft Kafka Connector, and coupled with Apache Kafka on Heroku, developers can streamline business processes and move data between Kafka and enterprise applications and services quickly and easily.
Visit MuleSoft’s Anypoint Exchange to see even more connectors available on Anypoint Platform.