A brief introduction to JavaScript objects

Reading Time: 15 minutes

When you come from a class based programming language, doing objects in JavaScript feels weird: Where is the class keyword? How can I do inheritance?

As we are going to see, JavaScript is actually pretty simple. It supports class like definition of objects and single-inheritance out of the box.

But first, a small tip to change your reading experience. By using your browser JavaScript console, you can play with the examples without leaving this page:

  • Chrome: MacOSX Cmd-Alt-J / Windows Ctrl-Shift-J
  • Firefox: MacOSX Cmd-Alt-K / Windows Ctrl-Alt-K
  • Safari: Cmd-Alt-C (only if you enable the Develop menu on Advanced Settings)
  • IE8+: Press F12 and go to the console

The basics

Ok, all set. Now the first step, define an object:

var point = {x: 1, y: 2};

As you can see the syntax is pretty straight forward, and object members are accessed by the usual means:

point.x // gives 1

Also we can add properties at any time:

var point = {};
point.x = 1;
point.y = 2;

The elusive this keyword

Now lets move on to more interesting things. We have a function that calculates the distance of a point to the origin (0,0):

function distanceFromOrigin(x, y) {
    return Math.sqrt(Math.pow(x, 2) + Math.pow(y, 2));
}

The same function written as a method of point looks like this:

var point = {
    x:1, y:2,
    distanceFromOrigin: function () {
        return Math.sqrt(Math.pow(this.x, 2) + Math.pow(this.y, 2));
    }
};

If we evaluate: point.distanceFromOrigin(), the this keyword becomes point.
When you come from Java it may sound obvious, but as we go deep into the details of JavaScript, is not.

Functions in JavaScript are treated like any other value, it means that distanceFromOrigin doesn’t have anything special compared to the x and y fields. For example we can re-write the code like this:

var fn = function () {
    return Math.sqrt(Math.pow(this.x, 2) + Math.pow(this.y, 2));
};
var point = {x:1, y:2, distanceFromOrigin: fn };

How this is determined?

JavaScript knows how to assign this, because of how distanceFromOrigin is evaluated:

point.distanceFromOrigin();

But doing just fn() will not work as expected: it will return NaN, cause this.x and this.y are undefined.
Confused? Lets go back to our initial point definition:

var point = {
    x:1, y:2,
    distanceFromOrigin: function () {
        return Math.sqrt(Math.pow(this.x, 2) + Math.pow(this.y, 2));
    }
};

Since distanceFromOrigin is like any other value, we can get it and assign it to a variable:

var fn = point.distanceFromOrigin;

Again fn() returns NaN. As you can see from the two previous examples, when a function is defined there is no special binding with the object. The binding is done when the function is called: if the obj.method() syntax is used this is automatically set to the receiver.

It’s possible to explicitly set this?

JavaScript functions are objects, and like any object they have methods.
In particular a function has two methods apply and call, that executes the function but allows you to set the value for this:

point.distanceFromOrigin() // is equivalent to…
point.distanceFromOrigin.call(point);

For example:

function twoTimes() {
    return this * 2;
}
twoTimes.call(2); // returns 4

Defining common behavior

Now suppose that we have more points:

var point1 = {
    x:1, y:2,
    distanceFromOrigin: function () {
        return Math.sqrt(Math.pow(this.x, 2) + Math.pow(this.y, 2));
    }
};
var point2 = {
    x:3, y:4,
    distanceFromOrigin: function () {
        return Math.sqrt(Math.pow(this.x, 2) + Math.pow(this.y, 2));
    }
};

It makes no sense to copy & paste this snippet each time that you want to have a point, so a small refactoring helps:

function createPoint(x, y) {
    var fn = function () {
            return Math.sqrt(Math.pow(this.x, 2) + Math.pow(this.y, 2));
    }
    return {x: x, y:y, distanceFromOrigin:fn};
}
var point1 = createPoint(1, 2);
var point2 = createPoint(3, 4);

We can create lots of points in this way, but:

  • It makes an inefficient use of memory: fn is created for each point.
  • Since there is no relationship between each point object, the VM cannot make any dynamic optimization. (ok this is not obvious and depends on the VM, but it can impact on execution speed)

To fix these problems JavaScript has the ability to do a smart copy of an existing object:

var point1 = {
    x:1, y:2,
    distanceFromOrigin: function () { 
        return Math.sqrt(Math.pow(this.x, 2) + Math.pow(this.y, 2)); 
    }
};
var point2 = Object.create(point1);
point2.x = 2;
point2.y = 3;

Object.create(point1) uses point1 as a prototype to create a new object. If you inspect point2 it will look like this:

x: 2
y: 3
__proto__
    distanceFromOrigin: function () { /* … */ }
    x: 1
    y: 2

NOTE: __proto__ is a non-standard internal field, displayed by the debugger. The correct way to get the object prototype is with Object.getPrototypeOf, for example: Object.getPrototypeOf(point2) === point1

This way of handling objects as copies of other objects is called prototype-based programming, and conceptually is simpler than class based programming.

The ugly syntax part

So far I told you the nice part of the history.

Object.create was added in JavaScript 1.8.5 (aka ECMAScript 5th Edition or just ES5). So, how objects were cloned in previous versions of the language?

Here comes the ugly syntax part. Every function is an object, so we can add properties to functions dynamically:

fn.somevalue = 'hello';

Suppose for a minute that we have Object.create. So we can use function objects and Object.create to get all the information required to copy and initialize objects in a single step:

// we store the "prototype" in fn.prototype
function newObject(fn, args) {
    var obj = Object.create(fn.prototype);
    obj.constructor = fn; // we keep this reference... just because we can ;-)
    fn.apply(obj, args); // remember this will evaluate fn with obj as "this"
    return obj;
}

Ok, but I told you that we don’t have Object.create yet, what we do?
JavaScript has a keyword that does the same as the newObject function:

newObject(fn); // is equivalent to..
new fn()

NOTE: For explanation purposes I’ve shown how to implement new using Object.create. Take account that new is a language keyword, and even when it’s semantically equivalent to newObject, the implementation is different. In fact for some JavaScript engines creating objects with new is slightly faster than Object.create.
Also Object.create is a relative recent addition, in old engines like IE8, the usual trick is to implement it using new. I showed Object.create first because it makes things easy to understand.

Why JavaScript has this strange use of functions? I don’t know. My guess is that probably the language designers wanted to resemble Java in some way, so they added a new keyword to simulate classes and constructors.

By using new you can write the previous point example like this:

// the point constructor
function Point(x, y) {
    // "this" will be a copy of Point.prototype
    this.x = x;
    this.y = y;
}
// the prototype instance to copy
Point.prototype = {
    distanceFromOrigin: function () {
        return Math.sqrt(Math.pow(this.x, 2) + Math.pow(this.y, 2));
    }
};

Now each time that we do new Point(x, y) we get a new point:

var point1 = new Point(1, 2);
var point2 = new Point(2, 3);

Things to know about prototype and constructor

When you evaluate obj.x, the engine follows this logic:

  1. Does obj defines x? If the answer is yes, then x from obj is used.
  2. Otherwise search for x in the prototype.
  3. If not found yet, continue with the prototype of the prototype.

As you can see this is similar to the method lookup used in class based programming languages, just replace prototype with super class.

But since the prototype field is almost like any other field, we can do cool dynamic stuff like adding new methods to existing instances:

var hello = "Hello";
String.prototype.display = function () { console.log(this.toString()); }
hello.display()

And what about constructor?
Every object in JavaScript has a constructor property, even if you don’t define it. When the object created using new the constructor property points to the function used to create the object.

Single inheritance

We can apply what we learned to do single-inheritance:

// the "super class"
function Point(x, y) { this.x = x; this.y = y; }
Point.prototype = {
    distanceFromOrigin: function () {
        return Math.sqrt(Math.pow(this.x, 2) + Math.pow(this.y, 2));
    }
};

// the "sub class": ColoredPoint extends Point
function ColoredPoint(x, y, color) {
    // call the "super constructor"
    Point.call(this, x, y);
    this.color = color;
}
// We use a clone of Point.prototype as the extension prototype
ColoredPoint.prototype = Object.create(Point.prototype);
// we extend Point with the show method
ColoredPoint.prototype.show = function () {
    console.log('Point with color ' + this.color + ' at (' + this.x + ',' + this.y + ')');
}

// finally we can use colored points:
var p = new ColoredPoint(10, 20, 'red');
console.log(p.distanceFromOrigin());
p.show();

As you can see it’s possible to do single inheritance, but there are a lot of required steps. That’s why there are so many JavaScript libraries to simplify the definition of objects.

In a next post I’ll share my experiences on creating barman (one of the many JavaScript object definition libraries that are out there). And I’ll use that experience to discuss some “advanced” techniques to share behavior like mixins, and traits.

How to build a Processing Grid (An Example)

Reading Time: 8 minutes

In his “To ESB or not to ESB” series of post, Ross Mason has identified four common architectures for which Mule is a great fit: ESB, Hub’n’Spoke, API/Service Layer and Grid Processing. In this post we are going to detail an example for the latter architecture. We will use Mule to build a scalable image resizing service.

Here is the overall architecture of what we intend to build:

As you can see, we allow end users to upload images to a set of load balanced Mule instances. Behind the scene, we rely on Amazon S3 for storing images waiting to be resized and Amazon SQS as the queuing mechanism for the pending resizing jobs. We integrate with any SMTP server for sending the resized image back to the end user’s email box. As the number of users will grow, we will grow the processing grid simply by adding more and more Mule instances: indeed, each instance is configured exactly the same way so the solution can easily be scaled horizontally.

Read on to discover how easy Mule makes the construction of such a processing grid…

Continue reading

Lean Startup…meet Enterprise

Reading Time: 8 minutes

There is a lot of talk about the lean startup and whether it works or not. Some proclaim it is critical to the success of any startup and that it is even the DNA of any modern startup. Others claim that it’s unproven, unscientific and gets your product to market in a haphazard way that is ungrounded in quality.

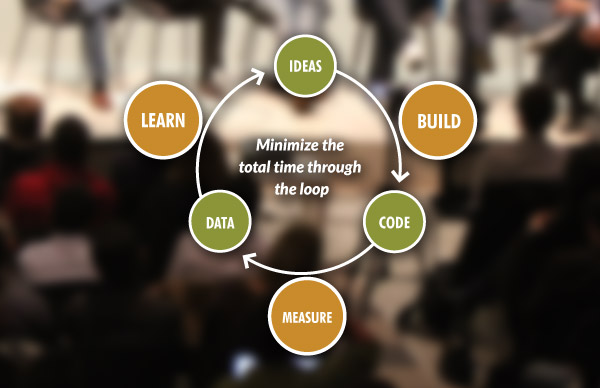
But the lean startup model, when you boil it down, simply says that when you launch any new business or product you do so based on validated learning, experimentation and frequent releases which allow you to measure and gain valuable customer feedback. In other words, build fast, release often, measure, learn and repeat.

Real World Example: WebVan vs Zappos

Sometimes the best way to look at the lean startup approach is through examples.

WebVan went bankrupt in 2001 after burning through $1 billion on warehouses, inventory systems and fleet delivery trucks. Why? They didn’t validate their business model before investing so much in it and under-estimated the “last mile” problem.

Contrast this to Zappos. Zappos could have gone off and built distribution centers and inventory systems for shipping shoes. But instead Zappos founder Nick Swinmurn first wanted to test the hypothesis that customers were ready and willing to buy shoes online. So instead of building a website and a large database of footwear, Swinmurn approached local shoe stores, took pictures of their inventory, posted the pictures online, bought the shoes from the stores at full price, and sold them directly to customers when purchased through his website. Swinmurn deduced that customer demand was present, and Zappos would eventually grow into a billion dollar business based on the model of selling shoes online.

Guess who took the lean startup approach? 

Lean Startup Principles

Lean Startup methodology is based on a few key simple principles and techniques:

  • Create a Minimum Viable Product (MVP) which is feature-rich enough to allow you to market test it. This doesn’t mean that the product is inadequate or of poor quality, it means that you launch with enough features that allow you to collect the maximum amount of data. 
  • Use a Continuous delivery model to release new features quickly with the least amount of friction and short cycles in between.
  • A/B test different versions of the same feature on different user segments to gain feedback on which is more valuable or easier to use.
  • Act on metrics meaning that if you can’t measure it you can’t act on it to ensure that you are always improving the product.

Lean Startup Engineering

Lean Startup engineering seems to work for consumer products. Facebook does it – they push new code to their platform at least twice a day and this includes changes to their API, which has over 40,000 developers using it for building apps. But what if I’m building an enterprise product or platform? Can I move at the same fast pace? Absolutely.
There are lots of product companies out there who have applied the lean startup model successfully including DropBox, IMVU and Etsy. I’ve also been involved in many startups and I’ve seen the lean startup model work. I think the engineering philosophy behind it makes total sense – move fast, build quickly, automate testing, validate your decisions through data, leverage open source when you can, build MVPs and get as close to continuous deployment as you can. Not only does it make sense, it’s also a fun and enjoyable way for engineers and product teams to work together.

How We Apply It At MuleSoft

MuleSoft is no longer a start up, but as high growth company, we’re releasing new software and features at a very fast pace. This stems from our open source foundation of releasing early and validating with our community.  Today we have kept that culture – all our teams use agile development, iterate quickly and make builds available every night for other teams to try out and provide feedback on. We beta test new features with early adopters and our community to gain valuable feedback before getting too far into development. When we launch a new product we define an MVP – focusing on a well-defined set of customer needs and expand the capabilities base on value to users without bloating a product with unnecessary features. We continually release products internally and then we release new versions to our customers every 1-2 months which is pretty much unheard of in the enterprise software space. Having a Cloud Platform also means we can push silent updates at a much faster pace. To do all of this you need to have a solid automated testing process in place and system health monitoring in order to roll back changes if any issues are identified. 

We think the approach we take is a win-win for us and our customers. Happy iterating…

Getting started with JPA and Mule

Reading Time: 6 minutes

Working with JPA managed entities in Mule applications can be difficult.  Since the JPA session is not propagated between message processors, transformers are typically needed to produce an entity from a message’s payload, pass it to a component for processing, then serialize it back to an un-proxied representation for further processing.

Transactions have been complicated too.  Its difficult to coordinate a transaction between multiple components that are operating with JPA entity payloads.  Finally the lack of support for JPA queries makes it difficult to  load objects without working with raw SQL and the JDBC transport.

Mule Support for JPA Entities

The JPA module aims to simplify working with JPA managed entities with Mule.  It provides message processors that map to an EntityManager’s methods.  The message processors participate in Mule transactions, making it easy to structure JPA transactions within Mule flows.  The JPA module also provides a @PersistenceContext implementation.  This allows Mule components to participate in JPA transactions.

Installing the JPA Module

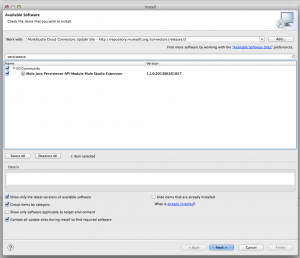
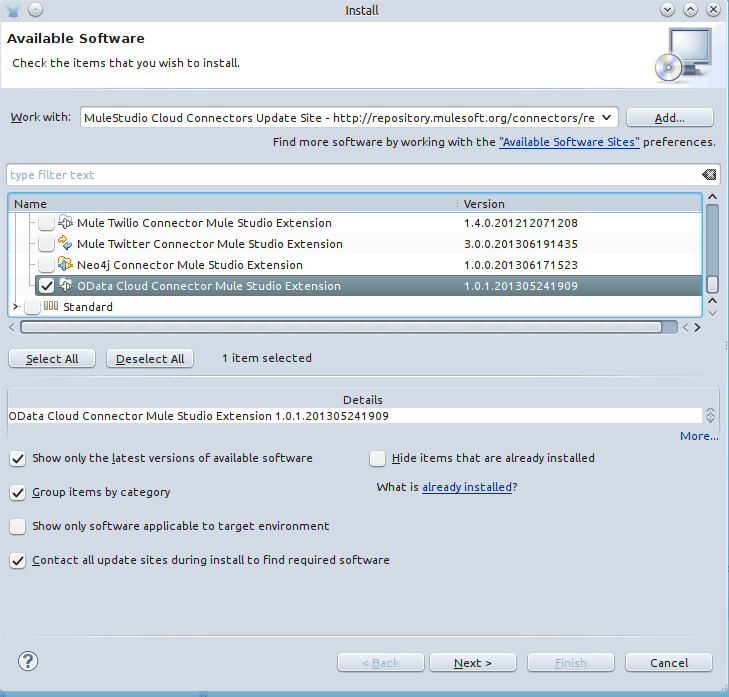
To install the JPA Module you need to click on “Help” followed by “Install New Software…” from Mule Studio.  Select the “MuleStudio Cloud Connectors Update Site” from the “Work With” drop-down list then find the “Mule Java Persistence API Module Mule Extension.”  This is illustrated below:

Installing the JPA Module in Mule Studio

Fetching JPA Entities

JPA query language or criteria queries can be executed using the “query” MP.  Supplying a statement to the query will execute the given query and return the results to the next message processor, as illustrated in the following Gist:

The queryParameters-ref defines the parameters.  In this case  the message’s payload as the parameters to the query.  The following query illustrates how a Map payload could be used to populate query parameters:

The query processor also supports criteria queries by setting the queryParameters-ref to an instance of a CriteriaQuery, as illustrated in the functional test snippet below.

You can use the  “find” MP to load a single object if you know its ID:

Transactions and Entity Operations

The default behavior of most JPA providers, like Hibernate, is to provide proxies on entity relationships to avoid loading full object graphs into memory.  When these objects are detached from the JPA session, however, attempts to access relations in the object will often fail because the proxied session is no longer available.  This complicates using JPA is Mule applications as JPA objects pass between message processors and inbetween flows and the session subsequently becomes unavailable.

The JPA module allows you to avoid this by wrapping your operations in a transactional block.  Let’s first look at how to persist an object then query it within a transaction.  The below assumes the message’s payload is an instance of the Dog domain class.

Now let’s see how we can use the merge processor to attach a JPA object to a new session.  This can be useful when passing a JPA entity from one flow to another.

Detaching an entity is just as simple:

Component Operations with JPA

The real power of using JPA with Mule is allowing your business services to participate in Mule managed JPA transactions.   A @PersistenceContext EntityManager reference in your component class will cause Mule to inject a reference to a transactional flow’s current EntityManager for that method, as illustrated in the following class:

We can now wire the component up in a flow:

Conclusion

JPA is an important  part of the JEE ecosystem and hopefully this module will simplify your use of JPA managed entities in Mule applications.

Installing Mule Studio 3.4 via Update Site or Eclipse Marketplace

Reading Time: 4 minutes

Eclipse users have always felt at home in Mule Studio, but users have often asked for Studio to “play well with others” — specifically, that it support plugin-style installation into existing Eclipse environments they already use every day.

With Mule Studio 3.4, we have delivered this wish list item. Specifically, users of Eclipse 3.8 can now install Mule Studio as plugins into their existing environments.

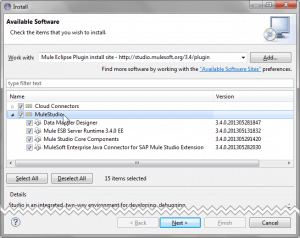
The old-fashioned way to do this is via the Eclipse Update Manager, using the update site http://studio.mulesoft.org/3.4/plugin:

Screenshot of Eclipse Update Manager with Mule Eclipse Plugin Install Site
Using the Mule Eclipse Plugin Install Site

There’s nothing unfamiliar about the install process– tick off all the options (you can omit connectors you don’t plan to use), accept the license and go. You will receive one warning about installing unsigned content:

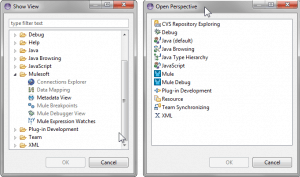
Click OK to accept the unsigned content. The plugins install, and once Eclipse restarts, you have Mule Studio via new Mule and Mule Debug perspectives, and all the usual views and menu commands available.

Mule Perspectives and Views in Eclipse 3.8

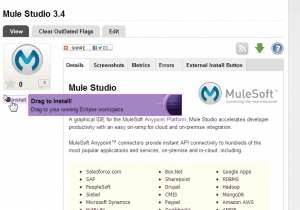
For a more app-store-like installation process, use the Eclipse Marketplace. Mule Studio is listed in the Marketplace here:

Eclipse Marketplace is a cool way to find lots of different plugins for your Eclipse environment, without chasing down details of update sites and managing plugin installation details manually.

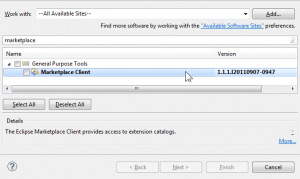
If you don’t already have the Eclipse Marketplace plugin, install it using Help->Install New Software:

Installing Eclipse Marketplace Client

Once you have Marketplace Client, the installation is simple:

  1. Visit the Mule Studio listing on marketplace.eclipse.org.
  2. Find the “Install” button on the page, to the left of the product description:
    Mule Studio in Eclipse Marketplace - Screenshot
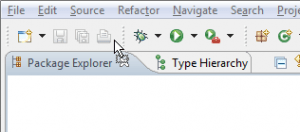
  3. Drag the “Install” button into an open Eclipse instance, and drop it on the toolbar (above any open tabs):
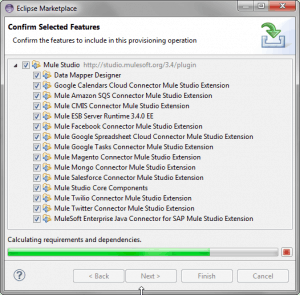
  4. The Marketplace window opens, and identifies the Mule plugins and their dependencies.When the process completes, click Next. Accept the license terms, and click Finish.
  5. As with the update site-based install, you will receive one warning about installing unsigned content.

    Click OK.
Once the installation completes, Eclipse will restart, and Mule Studio is there, mixed in with the rest of your Eclipse tools.
Happy Muling!

Using continuous deployment with CloudHub

Reading Time: 4 minutes

Introduction

After creating a basic Mule App, you might be wondering how to automate the process of deploying a Mule App to CloudHub. In this post, we are introducing a Maven plugin that enables that use case. As a result a Mule App will be deployed automatically to CloudHub after a Maven build. This is achieved using the goal cloudhub-deploy from the Mule AppKit Maven Plugin.

In a ideal development workflow, each time the project builds the Mule Application will be deployed to the cloud providing a cutting edge instance that can be used for QA of the latest snapshot. Both Bamboo or Jenkins can be configured in order to run Maven and deploy the Mule App to CloudHub.

Show me the code

Given an existing Mule App (created using the Mule Application Archetype), we have a Maven pom.xml file. Check that the project has as packaging type mule. Then, add the following to the build > plugins pom.xml section:

<plugin>
    <groupId>org.mule.tools.appkit</groupId>
    <artifactId>mule-appkit-maven-plugin</artifactId>
    <version>3.4</version>
    <extensions>true</extensions>
    <executions>
        <execution>
            <!-- This can be changed to any Maven phase -->
            <phase>deploy</phase>
            <goals>
                <goal>cloudhub-deploy</goal>
            </goals>
            <configuration>
                <!-- Where the app will be deployed -->
                <domain>${cloudhub.domain}</domain>
                <!-- Max wait time in millisecs before timeout -->
                <maxWaitTime>180000</maxWaitTime>
            </configuration>
        </execution>
    </executions>
</plugin>

The property cloudhub.domain must be set in the properties block. This is where the app is going to be deployed:

<properties>
    <!-- This is the domain where the app will be 
        deployed: i.e. mydomain.cloudhub.io -->
    <cloudhub.domain>mydomain</cloudhub.domain>
</properties>

And in the settings.xml file a server must be added together with some valid credentials for CloudHub so that the deploy can take place. This will be the credentials used for the deploy:

Include the plugin repository (where the AppKit Maven Plugin is hosted) in the pom.xml file:

<pluginRepositories>
  <pluginRepository>
    <id>mulesoft-releases</id>
    <name>MuleSoft Release Repository</name>
    <url>http://repository.mulesoft.org/releases/</url>
  </pluginRepository>
  <pluginRepository>
    <id>mulesoft-snapshots</id>
    <name>MuleSoft Snapshot Repository</name>
    <url>http://repository.mulesoft.org/snapshots/</url>
  </pluginRepository>
</pluginRepositories>

After that, run the deploy maven goal:

$ mvn clean deploy

and the app will be deployed to CloudHub.

Wait! I don’t want to deploy my artifacts yet!

As deploy Maven Phase is related also with Artifact Deployment, it can be better to change the plugin deployment phase to verify. On that way, and by doing mvn clean verify, it can achieve the same result without having to upload the resulting Maven artifact to a remote repository.

That’s great but where can I find some usage examples?

Some working examples can be found in Mule Appkit integration tests:here and here.

Happy Hacking!

Data as a Service: An OData Primer

Reading Time: 10 minutes

It’s pretty common to hear and read about how everything in the IT business is going “as a service…”. So you start hearing about Software as a Service (SaaS), Platform as a Serivce (PaaS) and even Integration Platform as a Service (iPaaS, which is where our very own CloudHub platform plays on). But what about data?

APIs, they’re everywhere

If you’re an avid reader of this blog, you probably read countless posts about how APIs are everywhere, making the integration of cloud services possible. Sometimes those APIs expose services and behavior, like when Facebook API let’s you change your status or when the Box API let’s you store a file. But what happens in the cases when I just plain and simply want to expose data? What if I don’t need to expose explicit behavior such as Facebook does when sending a friendship request? What if for me, allowing to query and optionally modify my data is enough?

For example, consider President’s Obama Open Data Policy. In case you’re not aware of it, President Obama ordered all government public information to be openly available in a machine readable format. That’s A LOT of data feeds to publish. Let’s make a quick list of things government’s IT officials would need to carry this out:

  • APIs: In order to consume these feeds, there has to be a way to connect to them. Just publishing government’s data bases out in the Internet wouldn’t work for many reasons (from security to scalability). Also, some level of communication/scalability/governance layer is necessary.
  • Standarization: With so many feeds to publish, a common stardard consumption is required. You don’t want to build and maintain a different infrastructure per each feed.
  • Compatible: It should be easy for existing systems to interact with these feeds

All of the above, is what OData stands for. Initially created by Microsoft but then opened to the public, OData is a REST based protocol that defines a standard way to expose/consume data feeds. Along its features we can mention:

  • REST based
  • Compatible with ATOM and JSON
  • Metadata support to discover data catalogs
  • Query language including aggregation functions
  • Full CRUD capabilities
  • Batch processing

Open Data Policy is just the tip of the iceberg. Many governments all around the world are taking on similar initiatives. In case you feel that government data is a little bit out of the ordinary compared to your average day at work, let’s take a look at other services that use OData:

  • Microsoft Dynamics CRM uses OData to expose its data catalog. You can query and modify its data and even execute some functionality using navigations.
  • Microsoft Azure uses OData to expose table information
  • Splunk: This Big Data company let’s you integrate through a OData API
  • Netflix & Ebay: Although recently deactivated, these two where using OData to allow remote queries to their databases.

Where does Mule fit in?

Well, as usually we have a connector for it. Since OData is a standard protocol, we were able to develop a OData connector that will let you into any service using it. As of today, the connector supports:

  • V1 and V2 protocol specifications
  • All CRUD set of operations, including search functions
  • ATOM and JSON feeds
  • Batch operations
  • Marshalling / Unmarshalling to your own Pojo model

A quick demo

Although the goal of this post is not to dive deep into the connector, let’s take a quick look at the connector’s demo app just to illustrate how it works. This app consumes the OData feed from the city of Medicine Hat in Alberta, Canada. It’s basically an OData API listing public information such a list of the city buildings. So, let’s see how to consume that!

First, open up Mule Studio and install it from the Cloud Connectors update site:

Then, let’s a start a flow with an http inbound endpoint. It’s configuration should look like this:

Then, drop the OData connector into the canvas. First, create the connector’s config:

Notice that the V1 and ATOM were selected as protocol version and format merely because that’s what the team at medicine hat used.

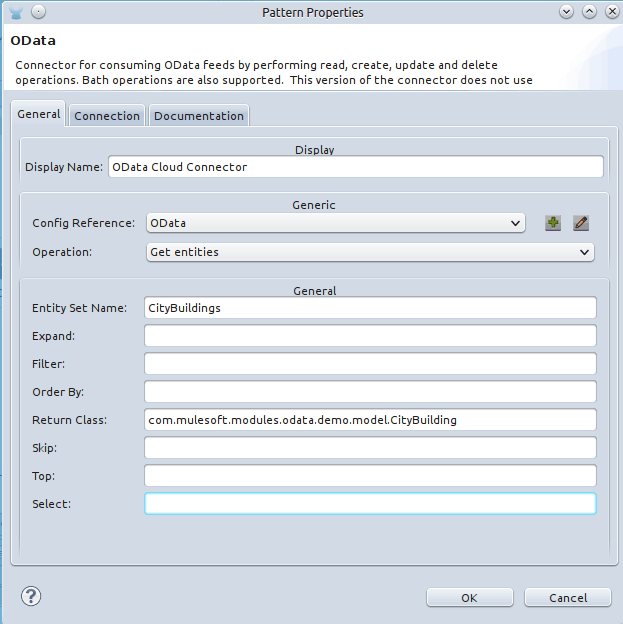
Once the config is created, use the Get Entities operation to retrieve all the buildings in the city:

In the screen above, you can see how the CityBuildings catalog was selected for querying and how you can add filters and projections to this query (although we won’t be showing that in this demo). Also, notice that we’re specifying a class as a return type. If not provided, then the connector will return an object model that represents the OData model. That is good but not really easy to work with. By being able to specify your own return type, you can easily make an object that carries the info you need and that is easier to integrate with other components such as DataMapper. In this case, our object looks like this:

Finally, we just add a Choice Router so that if no results came back we show a message saying so. If results were indeed found, then we transform the results to JSON format and print on the browser. This is how the final flow looks like:

And this is how the Mule XML config looks like:

That’s it! Try and enjoy!

Additional resources

Here’s a couple of helpful links:

  • The OData page
  • The Medicine Hat City feed
  • Source code for the OData connector and the sample app shown in this post
I hope you found this post helpful. As always, your comments are very welcome.
Thanks for reading!

PGP Encryption and SalesForce Integration using MuleSoft’s AnyPoint Platform

Reading Time: 11 minutes

On my previous 3-part blog, I showed how Mule ESB can be used to service-enable and orchestrate traditional on-premise technologies like an Oracle database and IBM Websphere MQ. Using Mule ESB, we created a service that accessed employee information from an Oracle database table and transmitted this to IBM WebSphere MQ. An observant customer I was showing this to noticed a security flaw with how sensitive employee information was being transmitted in plain text and also asked how the employee record can be sent to SalesForce.com. This blog will show how these can be easily addressed using MuleSoft’s AnyPoint Platform. We’ll make use of the PGP encryption features from AnyPoint Enterprise Security to encrypt the data before sending it to WebSphere MQ. Then, we’ll create another message flow to retrieve this message, decrypt it and send it to SalesForce.com using the AnyPoint Connector for SalesForce.com.

Part 1: PGP Encryption with AnyPoint Enterprise Security

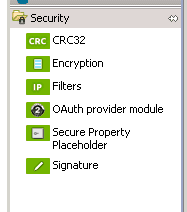
First thing we’ll need to do is install the AnyPoint Enterprise Security module in Mule Studio by following the instructions here. After applying this update, you should see the security modules in your palette.

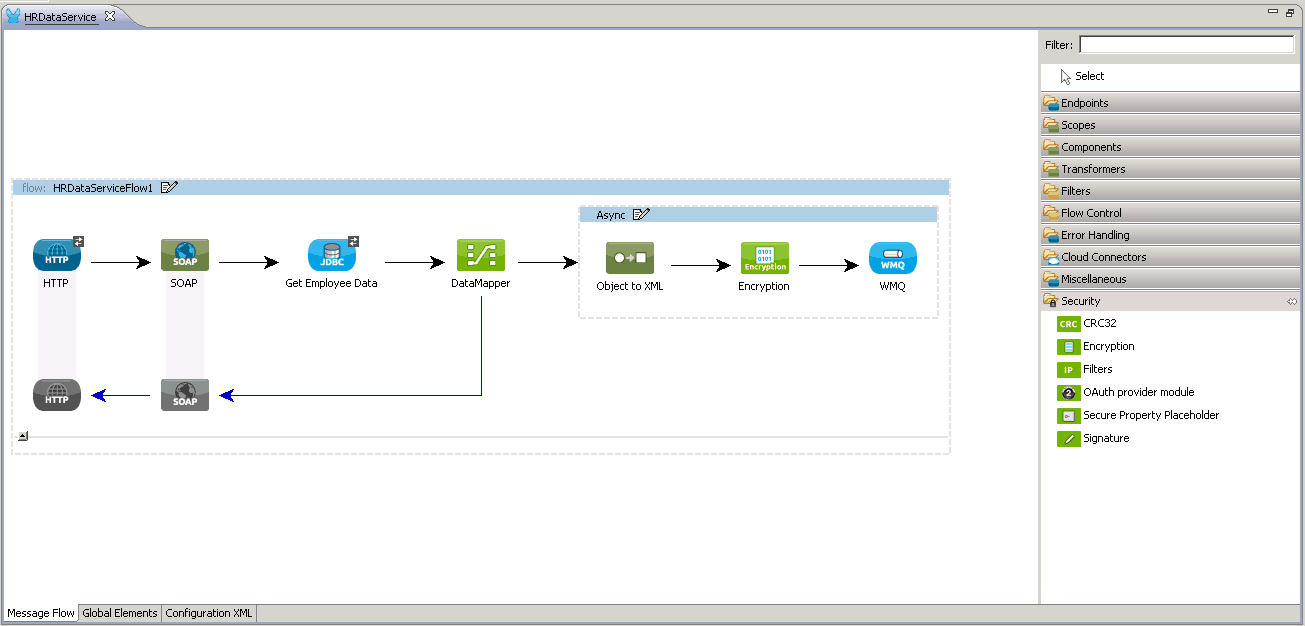
If you recall from my previous blog, the employee information was transmitted to WebSphere MQ in XML with plain text which we will now encrypt using PGP encryption.

In your flow, add the Encryption module from the Security group just before the WMQ endpoint.

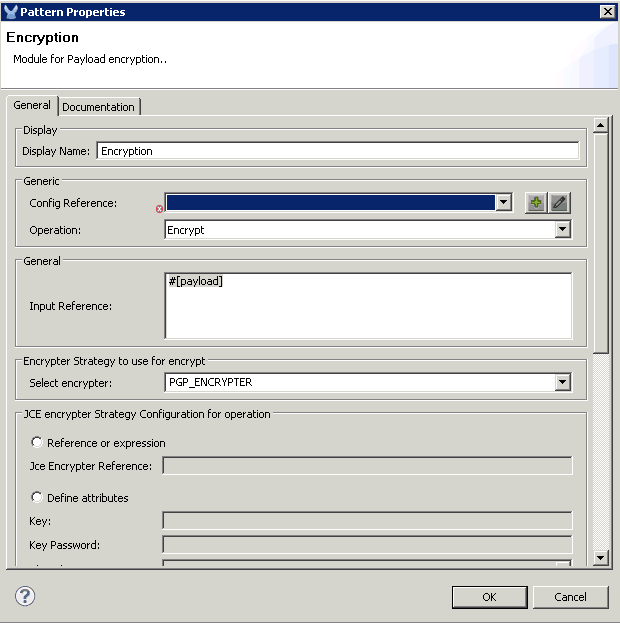
Configure the Encryption module to use the PGP_ENCRYPTER as shown. Note that you can also choose other types of encryption strategies like JCE or XML Encryption.

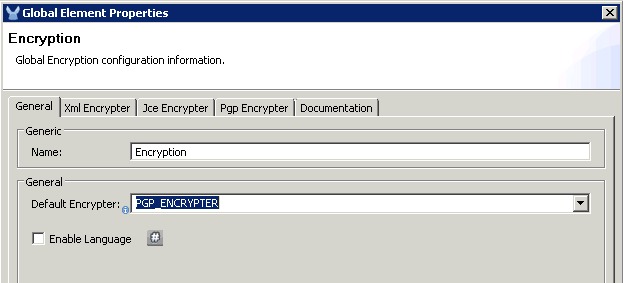
Click the Config Reference + icon to add a Global Encryption configuration and set it to use the PGP_ENCRYPTER.

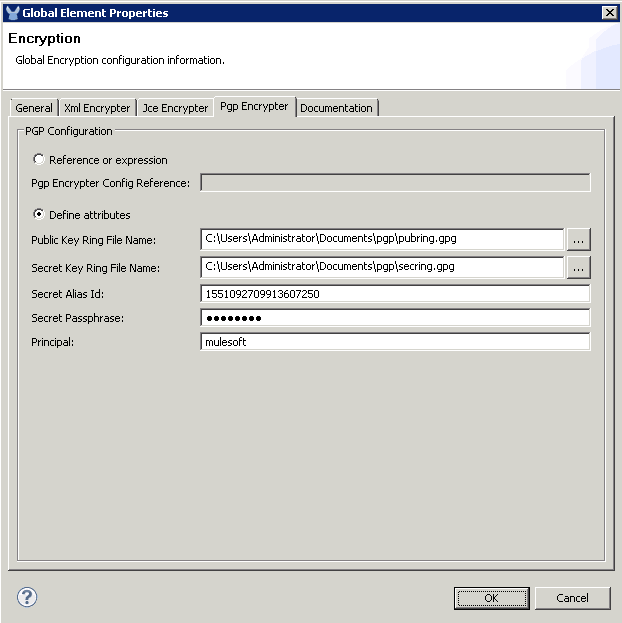
Click the Pgp Encrypter tag and define the attributes. You can download my pubring.gpg and secring.gpg files and use these for the Public Key Ring File Name and Secret Key Ring File Name. If you choose to do this, set the following:

  • Set the Secret Alias Id to: 1551092709913607250
  • Set the Secret Passphrase to: mulesoft
  • Set the Principal to: mulesoft.

If you prefer to generate your own keys, you can use the gpg command-line utility which is available in Linux operating systems, as part of the GPG Keychain Access tool for Mac OS, or for Gpg4win for Windows. This screenshot shows how my keys were generated using the gpg command from a Mac OS. Note that the pubring.gpg and secring.gpg key files will be created in a hidden directory called .gnupg under the user home directory. For Windows, this will be in C:/Users/myuser/AppData/Roaming/gnupg directory.

The Principal will be the USER-ID which is a combination of the Real Name,Email Address and Comment in the format: Real Name (Comment) <Email Address>. To keep it simple, you can just use choose a simple Real Name and leave Email and Comment blank. In my example, I simply set the Real Name to mulesoft. I also set the Secret Passphrase to mulesoft.

Determining the numeric value for the Secret Alias Id is not obvious. The GPG utility does not show this numeric value. The best way to derive this is by letting Mule give you some clues. Put any random number initially for the Secret Alias Id and run it to let Mule throw an error on purpose. In the exception thrown from the Console output, you will see a message showing the keys you can use. (Thanks to this blog from Mariano Gonzales for these tips).

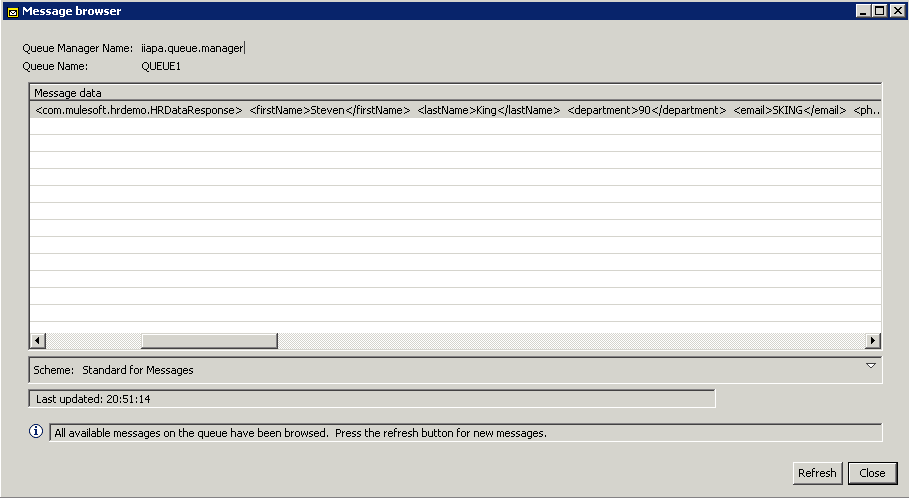
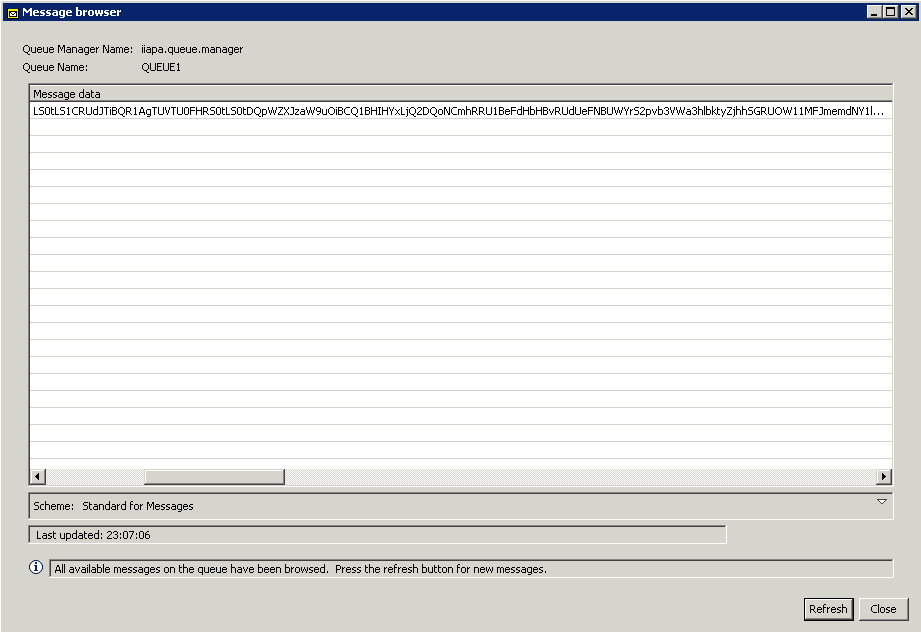
Save the flow. Clear the queue and run the flow again using SOAP UI the same way we tested from my previous 3-part blog. Now the data in the queue is encrypted as shown:

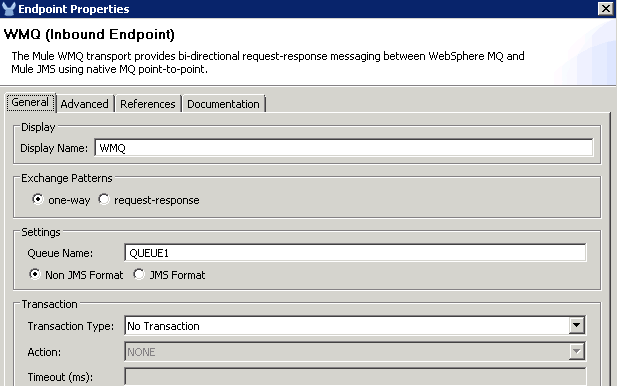
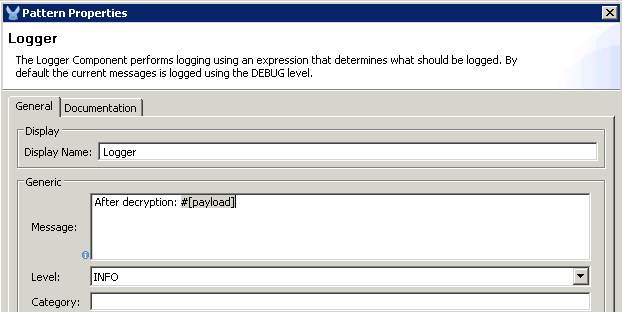
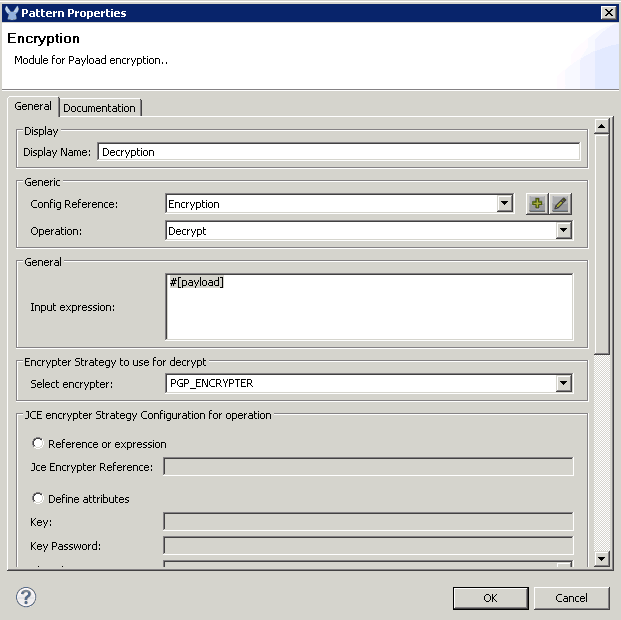
Let’s add a new flow that consumes the message from the queue and decrypts it. Drag the WMQ Endpoint under the previous flow to create a new one. Add an Encryption module (rename it to Decryption) to decrypt the message. Let’s also add a couple of Logger components to log the payload before and after the decryption.

For the WMQ endpoint, use the same queue name (QUEUE1) and WMQ connector used in the previous flow’s WMQ endpoint.

Log the message Before decryption: #[payload] on the first Logger andAfter decryption: #[payload]” on the second Logger.


Use the same Encryption Global Element and PGP_ENCRYPTER for the Encryption component, but this time, choose the Decrypt operation:

Save it and Run the Flow as a Mule Application (if it is not yet running). The flow should immediately pick up the encrypted message from the queue and then decrypt it. The console should show the log messages:

Part 2: SalesForce.com integration with the AnyPoint Connector for SalesForce

Now, let’s transmit the data to SalesForce.com to create a SalesForce Contact. Drag the SalesForce connector from the group of Cloud Connectors to the end of your flow.

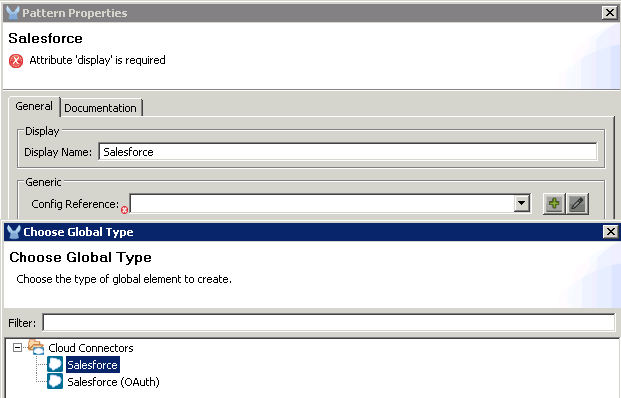
Add a Salesforce Global Element in the Config Reference.

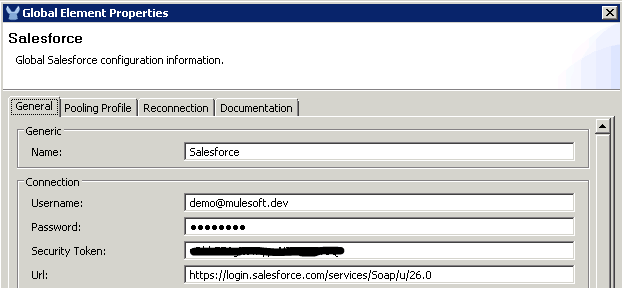
You should have a SalesForce.com developer account with a Security Token. You can follow the instructions for registration and getting your security token here. Add your SalesForce.com username, password and security token in the Sales Force connection configuration.

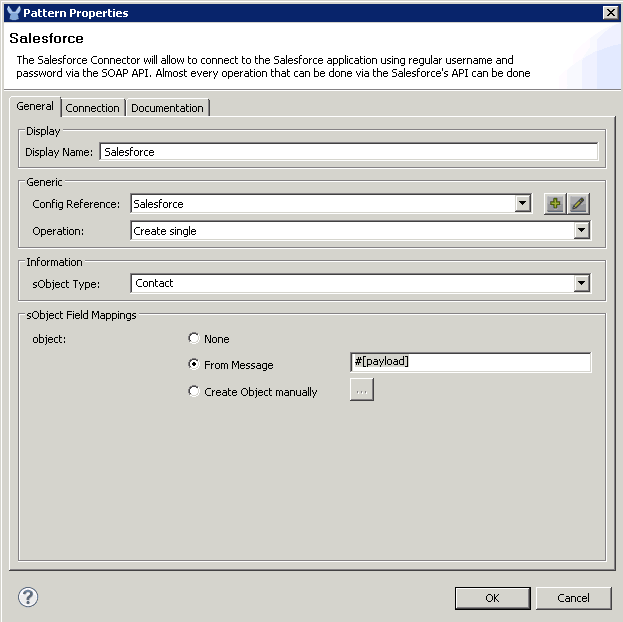
Choose the Create single operation and the Contact sObject Type. Set the sObject Field Mappings to From Message: #[payload] as shown:

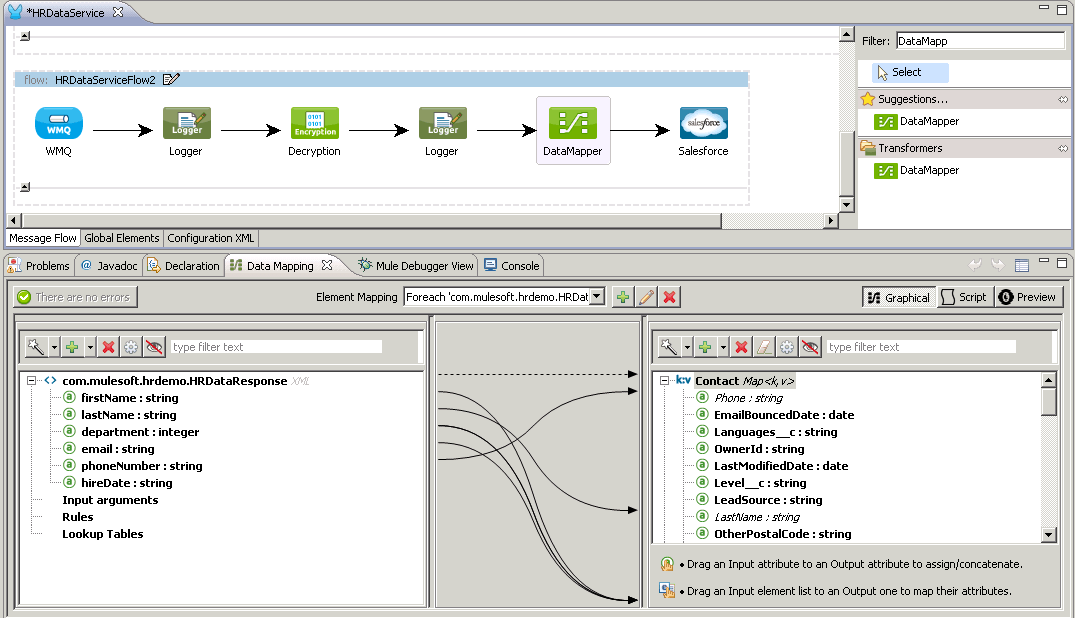
Add a DataMapper component before the Salesforce connector to transform the decrypted XML employee record to a SalesForce.com contact.

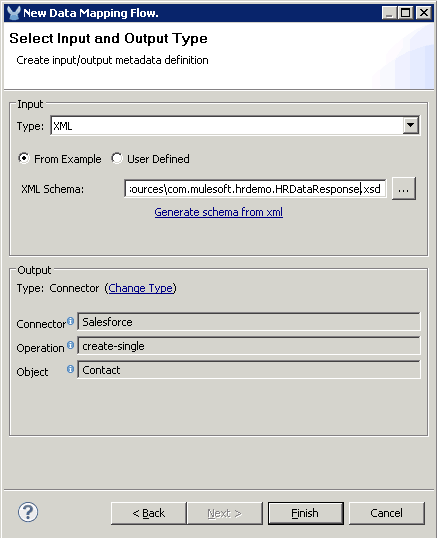
Notice that the Output has been automatically identified for the Salesforce Contact object thanks to Data Sense.

For the Input, choose XML. You can either use the XML you got from the Logger output to generate your XML schema by saving it in a file then clicking the Generate schema from xml link. Or, you can download the generated XSD from here.

Most of the fields should be automatically mapped. Just add a mapping from phoneNumber to Phone.

Also append + “@mulesoft.com”; to the email mapping as shown below since the data only has the email alias.

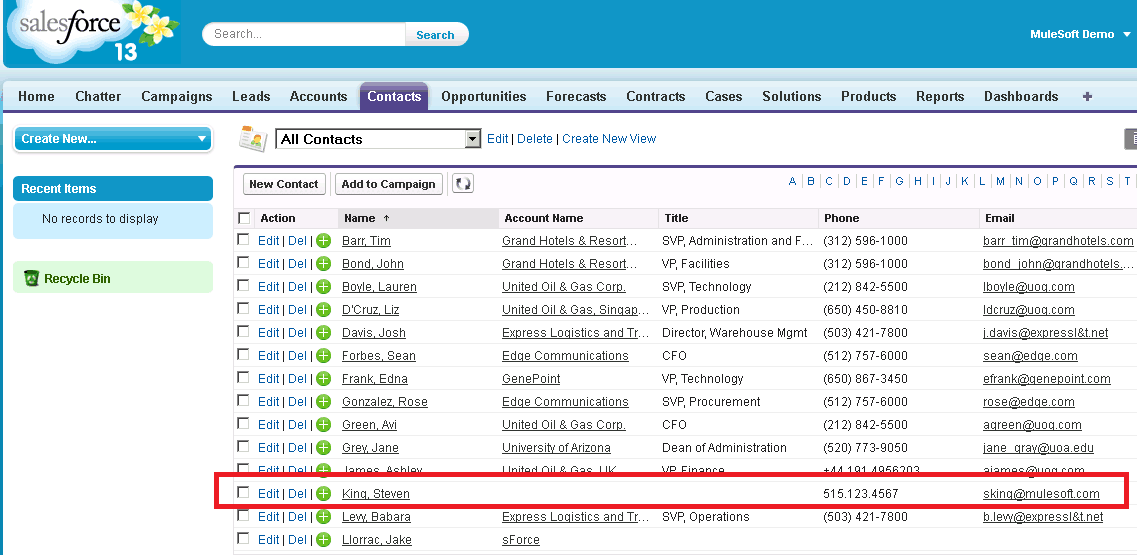
Save it and run the test again using SOAP UI (same test from the previous 3-part blog). You should now see Steven King as a contact in SalesForce.com.

Summary

Using MuleSoft’s AnyPoint Enterprise Security, we are able to easily utilize encryption and decryption modules using industry standard approaches such as PGP to ensure that messages are protected as it gets transmitted across systems. Using MuleSoft’s AnyPoint Connectors and Data Mapper, we are able to easily transform and send the employee information to SaaS applications such as SalesForce.com. For more on MuleSoft’s AnyPoint Platform, check out: http://www.mulesoft.com/enterprise-integration-platform.

Mule Studio Visual Flow Debugger Walk-through

Reading Time: 4 minutes

Have you already tried the Visual Flow Debugger? It’s one of the new shiny features that comes with Mule Studio Enterprise 3.4. Well, if you haven’t used it yet, this post is for you:

1. Message BrowsingAll the information you ever wanted, now at a click’s distance.

Before Visual Debugger, if you wanted to see the contents of the payload at each point you had to clutter your mule configuration with loggers all over the place, well, those days are over. Just put in a breakpoint et voilà!

You can also edit most values dynamically at runtime by clicking them.

Note: Be careful, what you put in there is not a string, but a Mule expression. Therefore string literals go with quotes (e.g. “a string”)

Tip: If you are looking for the complete message, it’s located in the Variables tab (on the right side). The things we show on the left are the most commonly used elements, the payload and some IDs.

2. Exception breakpointsStop browsing huge logs to find the error source.

This functionality is enabled by default, so that when you run in debug mode and there’s an exception somewhere in your flow, it will stop processing at the exception. Studio highlights the stopping point with a red, dotted line.

Before:

After:

3. Conditional breakpointsAre you picky? Then today’s your lucky day.

Suppose, for example, that you want to isolate one specific case in a really big set. What do you do? Put another Choice component in your flow just to separate it? No way, just apply a conditional breakpoint! Set it with whatever Mule expression you want evaluated and if it evaluates to true, flow execution stops there.

4. Expression evaluation
These come in two flavors:

  • Non eco-friendly (popup): Just use and dispose. Open it, evaluate, click somewhere else and they’re gone. Really simple, right? (My personal favorite)
    Tip: Use the popup shortcut and navigate with the arrow keys
  • Collector’s edition: add your expressions to the Mule Expressions pane so that Studio re-evaluates them at each step.

Save time and reduce frustration: give Debugger a try, by downloading Mule Studio.

Access our Mule Documentation for a more in-depth look at the Studio Visual Flow Debugger.

10 Little Mule Studio Gems

Reading Time: 11 minutes

Every so often, while using Studio, I come across clever little gems that our team thoughtfully inserted into the product to improve usability. These gems don’t get a lot of fanfare, nor do they often warrant much attention on their own, but put together, they make for a smoother, intuitive user experience. Nearly invisible, they have become nearly indispensable to me.

#1 Wrap in and Extract to

Building along, building along, then all of a sudden I decide to cache part of a flow. I could drag a cache scope onto the canvas, then drag message processors inside its boundaries. Or, I could Command+click to select a few message processors on my canvas, then right-click to select Wrap in > Cache. Done.  Similarly, if I wanted to just extract those message processors to a new, separate flow or sub flow, it’s right-click to select Extract to > Flow. Oh, right-click! Is there anything you can’t do?

#2 Distraction-free modeling

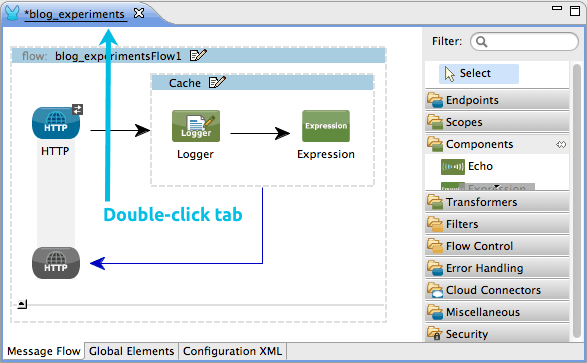
Want to get rid of the background noise and build your flows on a big, blank canvas? As an Eclipse-based IDE, take advantage of this OOTB feature: double-click the tab of your Studio project to minimize the other windows in Studio and maximize the canvas space. Double-click the tab again to resurface all the other windows.


#3 Insta-docs!

Let’s say you built an app in Studio and it is good. It’s elegant, it’s efficient, and it works like a charm. Everyone wants to see what you’ve done, and you want to show off your mad skillz. Rather than projecting Studio onto the meeting room wall, then trying to slide horizontally and vertically around the canvas, describing the different pieces verbally, you can instantly create much more presentable, and digestible, documentation that describes your project. From the File menu, select Export Studio Documentation to auto-generate an index.html file (and its attendant files) that contains all your flows, your XML and any content you added to the Documentation tab in each message processor. The layout of this documentation is designed to be presented to an audience, even if you’re not there to walk them through it.


#4 Print canvas

…and for your presentation, you can also print out your canvas to that your audience can reference the complete flow(s) as they are graphically rendered in Studio.  From the File menu, select Export diagram to…, save the PNG and create hard or soft copies that display your app’s flow(s) as pretty graphics.

#5 Tweak it

There will always be little things that could use adjusting. Maybe you prefer an XML line width of 65 instead of the default 72; maybe you want to change the default target namespace; maybe you find red text *really* distracting and want to change the error message text color from red to a less-alarming shade of mauve. Whatever the tweak, use MuleStudio Preferences. (MuleStudio > Preferences, or Command+,)


#6 Add libraries

Ever find that you need to add user libraries? There’s a wizard for that. Right-click your project’s name, then select Build Path > Add Libraries… then answer all the wizard’s questions to add your library. Want to get rid of an old one? Right-click your project’s name, then select Build Path > Configure Build Path… Click the Libraries tab, then just select the one you want to pitch and click the Remove button. Gone! (Full details.)

#7 Meddle with reality

Using Studio’s Visual Debugger yet? Stay tuned for a blog post that highlights the best parts of Debugger for a trove of useful tips on how to use it. Meanwhile, I’ll just call out one little gem: changing the payload of a message at a breakpoint. Let’s say you’ve applied a bunch of breakpoints to your application so that when running in debug mode you can check on the payload of a message as it reaches and passes through each breakpoint. That might help you understand any potential weak points in the app, but what if you want to see what happens if you change just one little part of the payload? With debugger, you can do it!  With your application running in debug mode, access one of the breakpoints, then click the little “X=Y=?” icon, which is the Expression Evaluator. In the yellow box that pops up, enter an expression to change the payload, then press enter. Click the Next Processor icon (or F6) to move forward to the next breakpoint, and note that your payload value in the message pane has changed.

#8 Set an Exception Strategy as Default

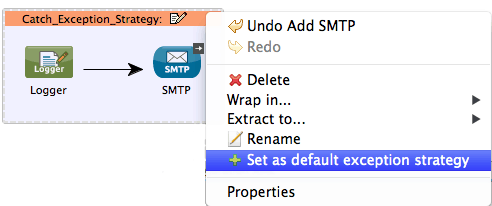
Though Studio automatically handles all exceptions with its default exception strategy, you can create your own custom global exception strategy, then make it the default for your application. Create a global exception strategy by first dragging an Exception Strategy onto your canvas outside and below all flows, then filling it with message processors to handle your exceptions. Then right-click the title bar of the exception strategy and select Set as default exception strategy. (Check the XML; there’s a new configuration global element sitting above all your flows referencing your global exception strategy as the application’s default.) 

#9 Create a POM for your new project

If you know, or suspect, that at some point you’ll need to export your Studio project and continue building or modifying it with Maven, then you better start with a pom.  If you normally click through wizards without reading anything (uh… isn’t that everyone?) then you might have missed it: on the third screen of the New Project wizard in Studio, there’s a checkbox labeled “Create POM file for project and maintain with Maven”. Check that. Now you get a POM to go with your project.

#10 What have I done?

If you’ve been playing around with your instance of Studio and have added a bunch of Mule extensions, runtimes, or plugins, you might find yourself wondering, “what the heck have I got installed here?”  Or maybe that’s just me. Anyway, if you want to take a look, navigate to MuleStudio > Preferences, then click to select Install/Update. From there, click the link that reads Uninstall or update software that is already installed. Studio displays it all: Installed Software, Features, Plugins, Installation History. Full details.)

Those are my favs. Got some of your own to share? Add a comment below. Happy right-clicking!