SOA School: Architecting Watertight Security for the New Enterprise

Reading Time: 21 minutes

Security is an ever-present concern for IT. It can be a rather daunting area when one considers all of the different possible dangers and the large variety of solutions to address them. But, the aim of Enterprise Security really just boils down to establishing and maintaining various levels of access control. Mule itself has always facilitated secure message processing both at the level of the transport, the service layer and of the message . Mule configurations can include all that Spring Security has to offer giving, for example, easy access to an LDAP server for authentication and authorisation. On top of that Mule Applications can apply WS-Security thus facilitating, for example, the validation of  incoming SAML messages. But in this post, rather than delve into all the details of the very extensive security feature set , I would rather approach the subject by considering the primary concerns that drive the need for security in a Service Oriented Architecture, how the industry as a whole has addressed those concerns, the consequent emergence of popular technologies based on this Industrial best practice and finally, the implementation of these technologies in Mule.

Primary Concerns

Integrity

This is all about knowing who sent the Message. Securing our IT resources is a matter of deciding who gets access to them and of course, entering into the realms of Authorisation, to what extent each person or system should have access to them. A Message (which is also akin to a service invocation) must be determined to be authentic in order for the Server to accept it and process it. It’s authentic if the Server recognises the Client as a valid user of the service. Now such recognition is usually achieved by some sort of Credentials accompanying the Message. However, verifying which Client sent the Message does not guarantee the Integrity of the Message: it may have been modified by some unfriendly third party during transit! Message Integrity, which includes Authentication, guarantees that the Message the Server received is exactly the one that was sent by the known Client.

Confidentiality

It is all very well for the Server to rest assured with the Integrity of a Message sent by a known Client, but the journey from Client to Server may have been witnessed by some unwelcome spies who got to see all of those potentially very private details inside the Message! Thus, it is necessary to hide those details from the point of delivery by the Client to the reception by the Server. An agreement is needed between the Client and Server in order to be able to hide the details of the Message in a way that allows only the Server to uncover them and vice versa.

Response of the Industry

Token based Credentials

The common practice of sending Username / Password pairs with Messages is not recomendable from two perspectives:

  1. Passwords have a level of predictability whereas the ideal is to maximise on randomness or entropy. Username / Password pairs are a low entropy form of authentication
  2. Also, the maintenance of Passwords is a pain! If you need to change a password then you immediately affect all Clients that make use of that password. Until each of these has been reconfigured you have broken communication with them. As a consequence there is no way you can block access to one Client in particular without blocking all the Clients that use the same password. 

A much better alternative exists in the form of high entropy Tokens which represent a more secure form of Authentication and, as we’ll see, Authorisation. The idea is for the Server to issue tokens based on an initial authentication request with Username / Password credentials. From then on the Client only has to send the token, so the net result is a great reduction in Username / Password credentials going to and fro on the network.  Also, Tokens usually are issued with an expiration period and can even be revoked. Furthermore, because they are issued uniquely to each Client, when you choose to revoke a particular Token or if it expires, none of the other Clients will suffer any consequences. 

Digital Signing

We humans sign all kinds of documents when it matters in the civil, legal and even personal transactions in which we partake. It is a mechanism we use to establish the authenticity of the transaction. The digitial world mimics this with its use of Digital Signatures. The idea is for the Client to produce a signature by using some algorithm and a secret code. The Server should apply the same algorithm with a secret code to produce its own signature and compare the incoming signature against this. If the two match, the Server has effectively completed Authentication by guaranteeing not only that this Message was sent by a known Client (only a known Client could have produced a recognisable signature), but that it has maintained its integrity because it was not modified by a third party while in transit. As an added benefit for when it matters with third party Clients, the mechanism also brings Non-repudiation into the equation because the Client cannot claim not to have sent the signed Message.

Public Key Cryptography

The age old practice of Cryptography has made a science of the art of hiding things! IT has adopted this science and can produce an Encryption of the message which is practically impossible to decrypt without a corresponding key to do so. It is as if the Client had the ability to lock a Message inside some imaginary box with a special key, hiding it from prying eyes, until the Server unlocks the box with its own special key. The Digital Signing discussed above produces signatures in this very way. Cryptography comes in two forms: Symmetric, when both Client and Server share the same key to encrypt and decrypt the Message; and Asymmetric, when the Server issues a public key to the Client allowing the Client to encrypt the Message, but keeps a private key which is the only one that can decrypt the Message: one key to lock the Message and another key to unlock it!

Defacto Standard Implementations

HTTPS

This is a rock solid standard protocol that implements at the level of the transport both Integrity and Confidentiality at the same time. Public Keys are emitted on Certificates which have been digitally signed by independant and trusted Certificate Authorities, thus guaranteeing that the public key was issued by the Server. Once the initial handshake has been completed by the exchange of Messages using public and private keys, the communication switches to the more efficient symmetric form using a shared key generated just for the duration of the communication, all of which occurs transparently.

OAuth2

This emerging standard governs the world of Authorisation using Tokens. I won´t go into all of the complexities of the complete OAuth2 dance here, but I can recommend OAuth2 as a valid way to secure our Enterprise and which scales well to meet the needs of the SAAS oriented New Enterprise. To that end there are two types of Clients we should cater for in our Secured SOA Architecture:

  1. The in-house Applications which are typically exposed to end-users. These should provide the username and password of the end-user and request a token on the strength of those. The process also affords us with the luxury of Single-Sign-On, because the token can be stored by the browser as a cookie based on the domain name of the organisation. All other web applcations can access the cookie. This is what Google are doing with their SSO for each of their cloud apps like Gmail, Calendar, Documents, etc.
  2. Third-party Applications providing services to our users but to which we’d like to grant limited access to our systems. We don’t want those Applications getting their hands on our end-users’ credentials, so we can force them through the typical OAuth2 dance which is what we all see so often nowadays when websites invite us to sign in using our Google, Facebook or Twitter accounts.

Solution in Mule

Let’s implement a RESTful webservice in Mule which will expose a list of Products in our online shop to various Client Applications. We will configure the access control so that certain operations are available only to certain Clients. We could even apply more specific access control by considering the roles of the users of these Applications: Admin for complete access and Standard for read-only access.

HTTPS Inbound Endpoint

The https inbound endpoint on our API needs to use a connector with a reference to a keystore. A keystore is a repository of public key certificates together with their private keys. These certificates are sent to the Client upon the first HTTPS request. The certificate contains the public key and identity of the server and is digitally signed either by the same server (self-signed certificate) or by an independent Certificate Authority. You can create your own self-signed certificate for development purposes using the JDK keytool utility. The keystore needs a password both for the keystore and for the private key.

Anypoint Secure Token Service

Mule can now act as an OAuth2 Provider, issuing tokens to registered Clients, applying expiration periods to these tokens, associating them to User roles and fine-grained access control known in the OAuth world as scopes. Refresh tokens can also be issued and tokens can be invalidated. Mule can of course subsequently validate incoming tokens against expiration periods, roles and scopes and thus grant or deny access to the Flows in the Application.

The above configuration registers 2 different clients for our API:

  • Web UI: a public web application providing read-only access to the protected Product listing.
  • Private Web UI: an internal admin app which allows Administrators to add new Products.

Note how the two web applications are considered in-house applications as described above and as such may exchange User Credentials directly for a Token. For example,

This would give a Response something like:

The request includes both scopes READ and WRITE. These appear in the requestable scopes for that particular client. Scopes represent broad levels of access to the Mule flows. The provided access token must be sent in with each request and can be validated by Mule to ensure it hasn’t expired or been revoked and that it has the scopes that correspond to a particular flow. In the following example we only allow requests that have WRITE scope.

More fine grained control can also be applied by comparing the role of the user for whom the token was issued with the allowed roles for the flow. The validate filter has a resourceOwnerRoles attribute to specify these. (The granularity of access control can be in either the grant or the role).

As we venture into the world of the New Enterprise, no doubt we may have to cater for applications belonging to partners. Imagine we were to expose access to our service to a Mobile Application. We need only register this new client in our OAuth2 Provider configuration. Note how the grant type for this configuration is TOKEN which corresponds to the IMPLICIT type according to the OAuth2 specification. This will result in the full dance that we all have experienced when Websites allow us to sign in using our Google, Facebook or Twitter accounts.

Finally

Anypoint Enterprise Security also allows us to explicitly sign Messages and verify incoming signatures and encrypt Messages with 3 different strategies and 20 different algorithms as well as to decrypt incoming Messages. There may be cases when you have to explicitly sign or encypt Messages you send out to third parties or likewise decrypt and verify signatures from third parties. For the purpose of the Clients over which we have complete control in our architecture, it is sufficient to use HTTPS, but for those sideline cases you have all the power of the best that the Industry has to offer in the extremely easy configurations that Mule demands of you! You can download the above example Application here.

Lightweight publish/subscribe with Mule and MQTT

Reading Time: 8 minutes

If you think that telemetry should only be dealt with by Mr. Chekov, think again… When the “Internet of things” met publish/subscribe, the need for a lightweight messaging protocol became more acute. And this is when the MQ Telemetry Transport (MQTT in acronym parlance) came into play. From its own words, this connectivity protocol “was designed as an extremely lightweight publish/subscribe messaging transport. It is useful for connections with remote locations where a small code footprint is required and/or network bandwidth is at a premium“.

In a world where everything will eventually have an IP address, messages will be constantly flowing between devices, message brokers and service providers. And when there are messages to massage, who you gonna call? Mule ESB of course! With this new MQTT Connector, built on Dan Miller‘s solid ground work, the Internet of things, which had its rabbit, will now have its Mule!

In this blog we will look at an example where Mule is used to integrate conference booth QR Code scanners with an MQTT broker. Why using MQTT? If you’ve ever been to a technical conference and expo, you’ve surely tasted how abysmal the quality of a WIFI network can be. Beside confirming that the shoemaker’s children always go barefoot, it is also an encouragement for using a messaging protocol that’s both resilient and modest in its network needs. With this said, let’s first start by looking at the overall architecture diagram.

Continue reading

Open for Big Data: when Mule meets the elephant

Reading Time: 9 minutes

Picture an architecture where production data gets painstakingly replicated to a very expensive secondary database, where, eventually, yesterday’s information gets analyzed. What’s the name for this “pattern”? If you answered “Traditional Business Intelligence (BI)”, you’ve won a rubber Mule and a warm handshake at the next Mule Summit!

As the volume of data to analyze kept increasing and the need to react in real-time became more pressing, new approaches to BI came to life: the so-called Big Data problem was recognized and a range of tools to deal with it started to emerge.

Apache Hadoop is one of these tools. It’s “an open-source software framework that supports data-intensive distributed applications. It supports the running of applications on large clusters of commodity hardware. Hadoop was derived from Google’s MapReduce and Google File System (GFS) papers” (Wikipedia). So how do you feed real-time data into Hadoop? There are different ways but one consists in writing directly to its primary data store named HDFS (aka Hadoop Distributed File System). Thanks to its Java client, this is very easily done in simple scenarios. If you start throwing concurrent writes and the need to organize data in specific directory hierarchies, its a good time to bring Mule into the equation.

In this post we will look at how Mule’s HDFS Connector can help you write time series data in HDFS, ready to be map-reduced to your heart’s content.

Continue reading

Mule ESB with the Oracle Database and IBM WebSphere MQ – Use case 2 of 3

Reading Time: 23 minutes

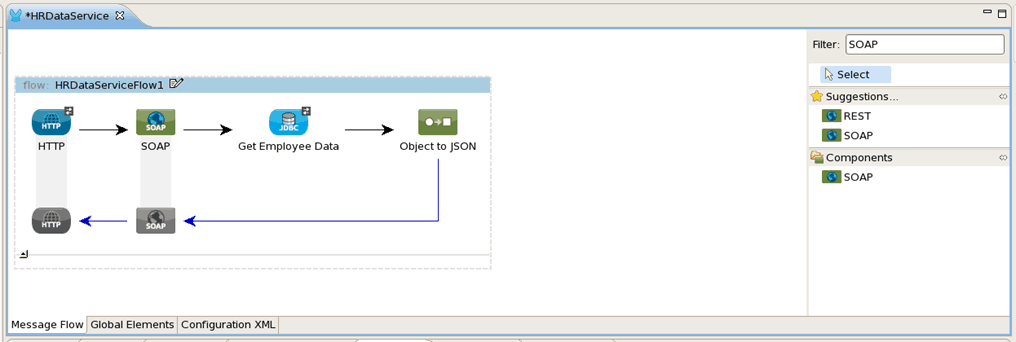
In Part 1 of this three part blog, we created a simple message flow in Mule Studio exposed as a basic HTTP service that retrieves employee data from an Oracle HR database and returns it in JSON format. JSON is a standard format that is very popular among web and mobile applications. Let’s now take a look at how to easily turn this into a SOAP web service, which is a standard in use in a lot of internal SOA and on-premise integration projects. We will do this without any coding. We will first generate a SOAP web service using a top-down approach with an existing WSDL and then graphically map the database table structure to the expected message format of the SOAP web service (Note: Setup steps are at the end of each part for the necessary software. Part 1 of this blog needs to be completed.)

Part 2: Service enabling the Oracle HR database with SOAP and XML.

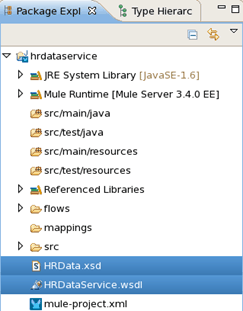
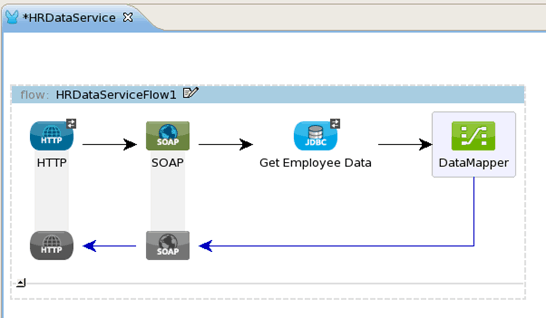
Now let’s turn the HTTP/JSON service we created in Part 1 into a SOAP web service by using a top-down approach of generating services from an existing WSDL. Download the files HRData.xsd and HRDataService.wsdl and place them in the root folder of your hrdataservice project.

Back in the message flow, add a SOAP component right after the HTTP End Point.

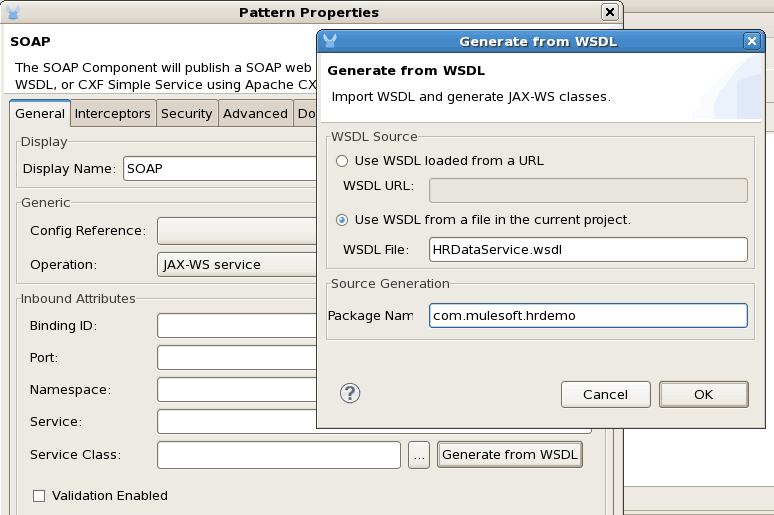
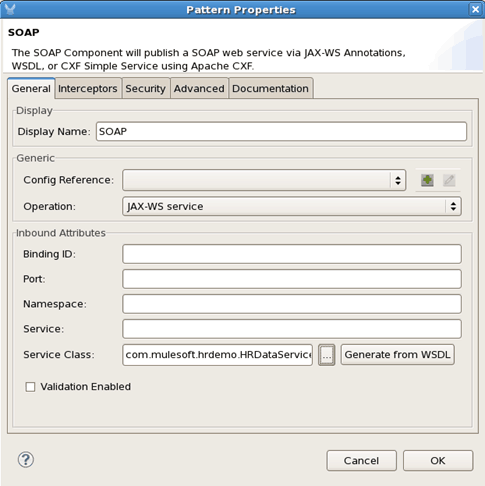
Double-click the SOAP Component and click Generate from WSDL. Specify the WSDL File HRDataService.wsdl and a package name of com.mulesoft.hrdemo. This will generate the Java classes required for your web service implementation.

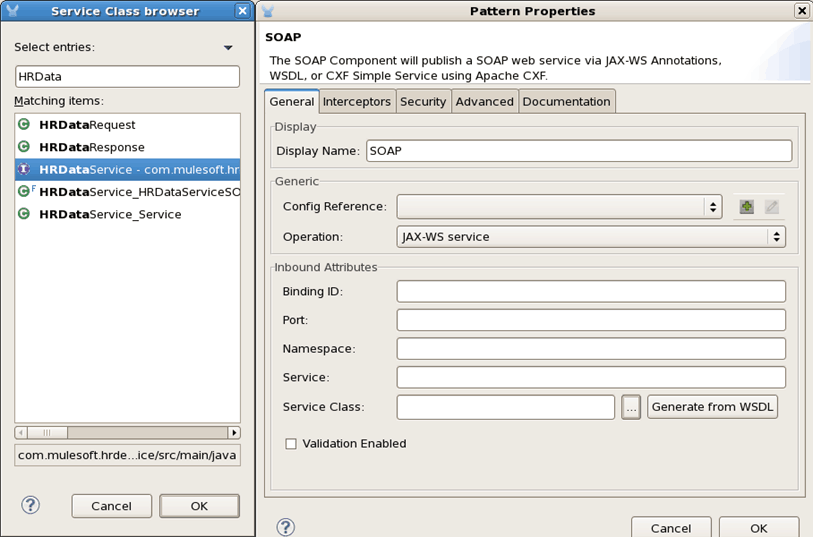
On the Service Class, browse for the Interface called HRDataService (com.mulesoft.hrdemo.HRDataService).

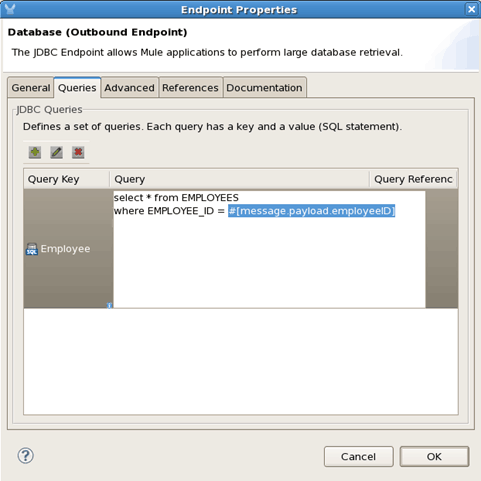
Double click the Get Employee Data database component and in the Queries tab, edit the Query. Replace #[message.inboundProperties[’empid’]] with #[message.payload.employeeID]. We will now get the employee ID parameter from the SOAP message instead of the HTTP URL.

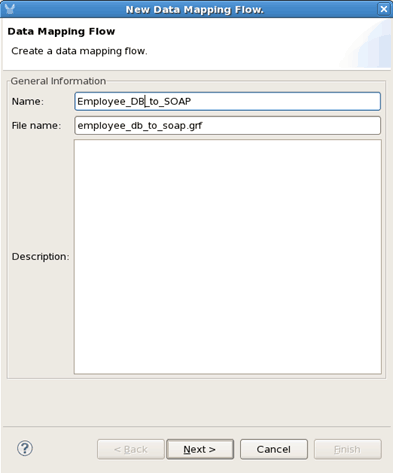
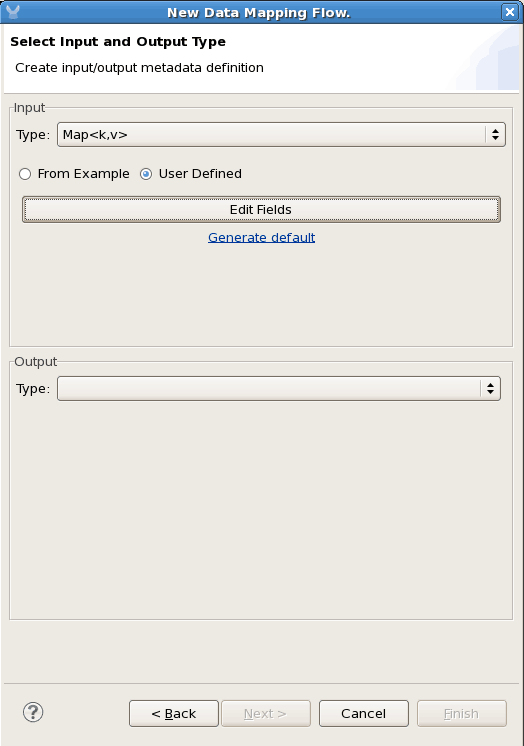
Next, let’s do a transformation using the Data Mapper. Drag the Data Mapper component to the end of the flow and call it Employee_DB_to_SOAP.

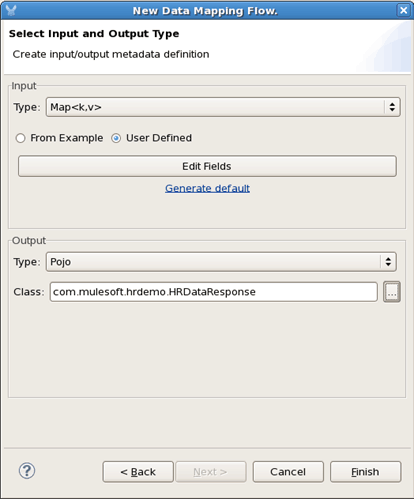
For the Input, specify a Map type and choose User Defined.

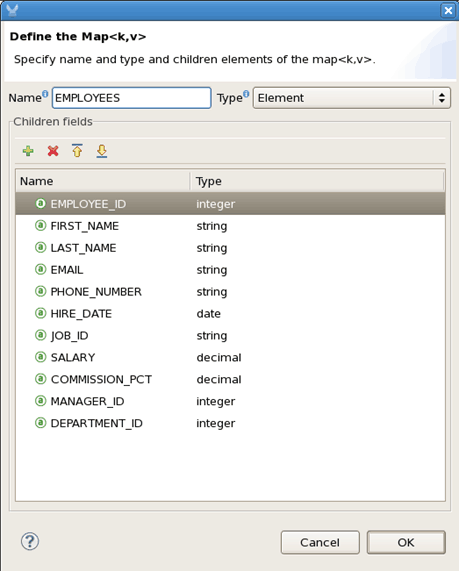
Enter the following fields to match the Employee database table structure.

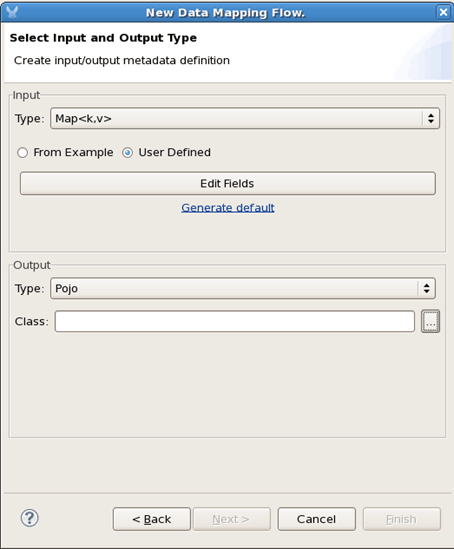
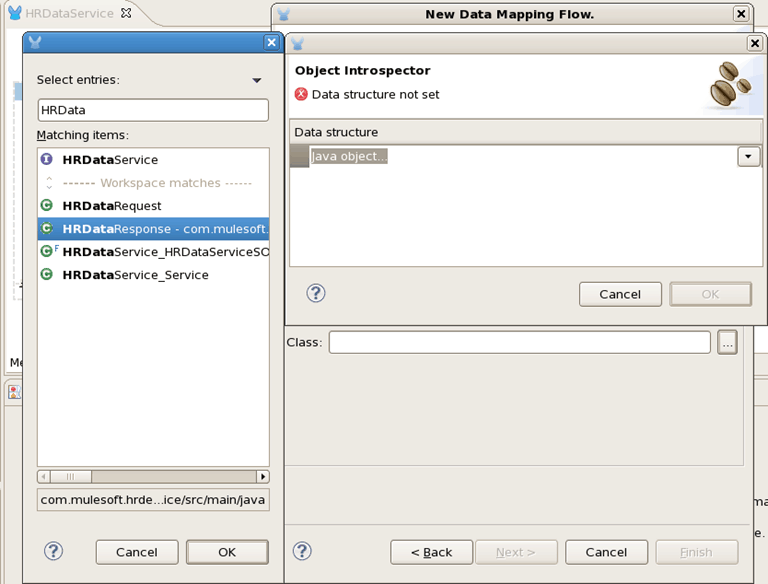
For the output, select POJO and locate the class HRDataResponse. This class was generated from the WSDL.

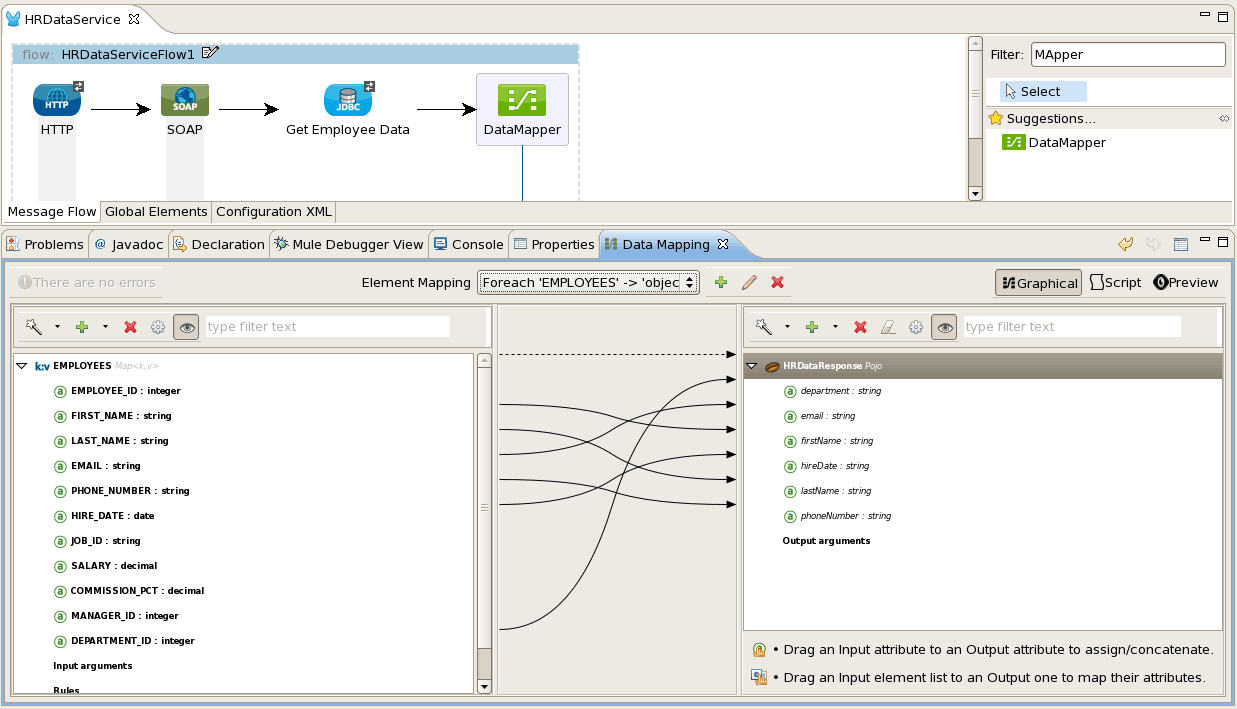
Map the source and target elements as follows:

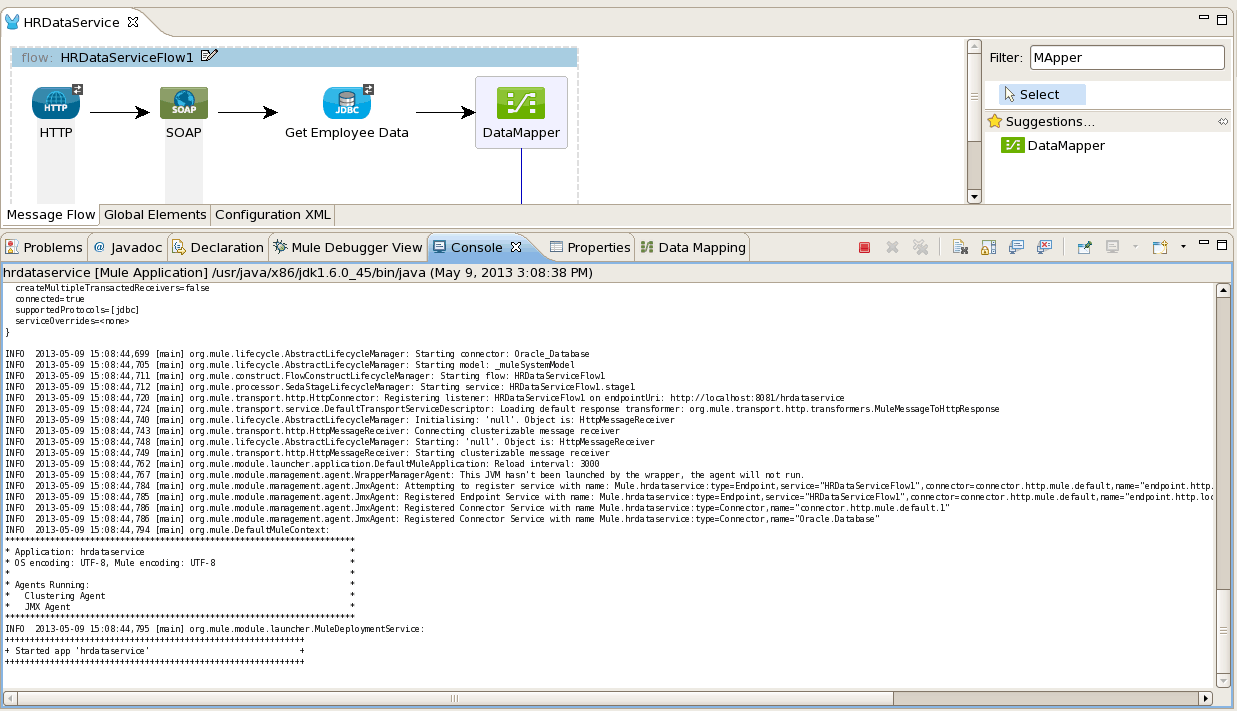
Save your project. The Mule ESB runtime will dynamically pick up the changes and redeploy, which you should see from the Console output.

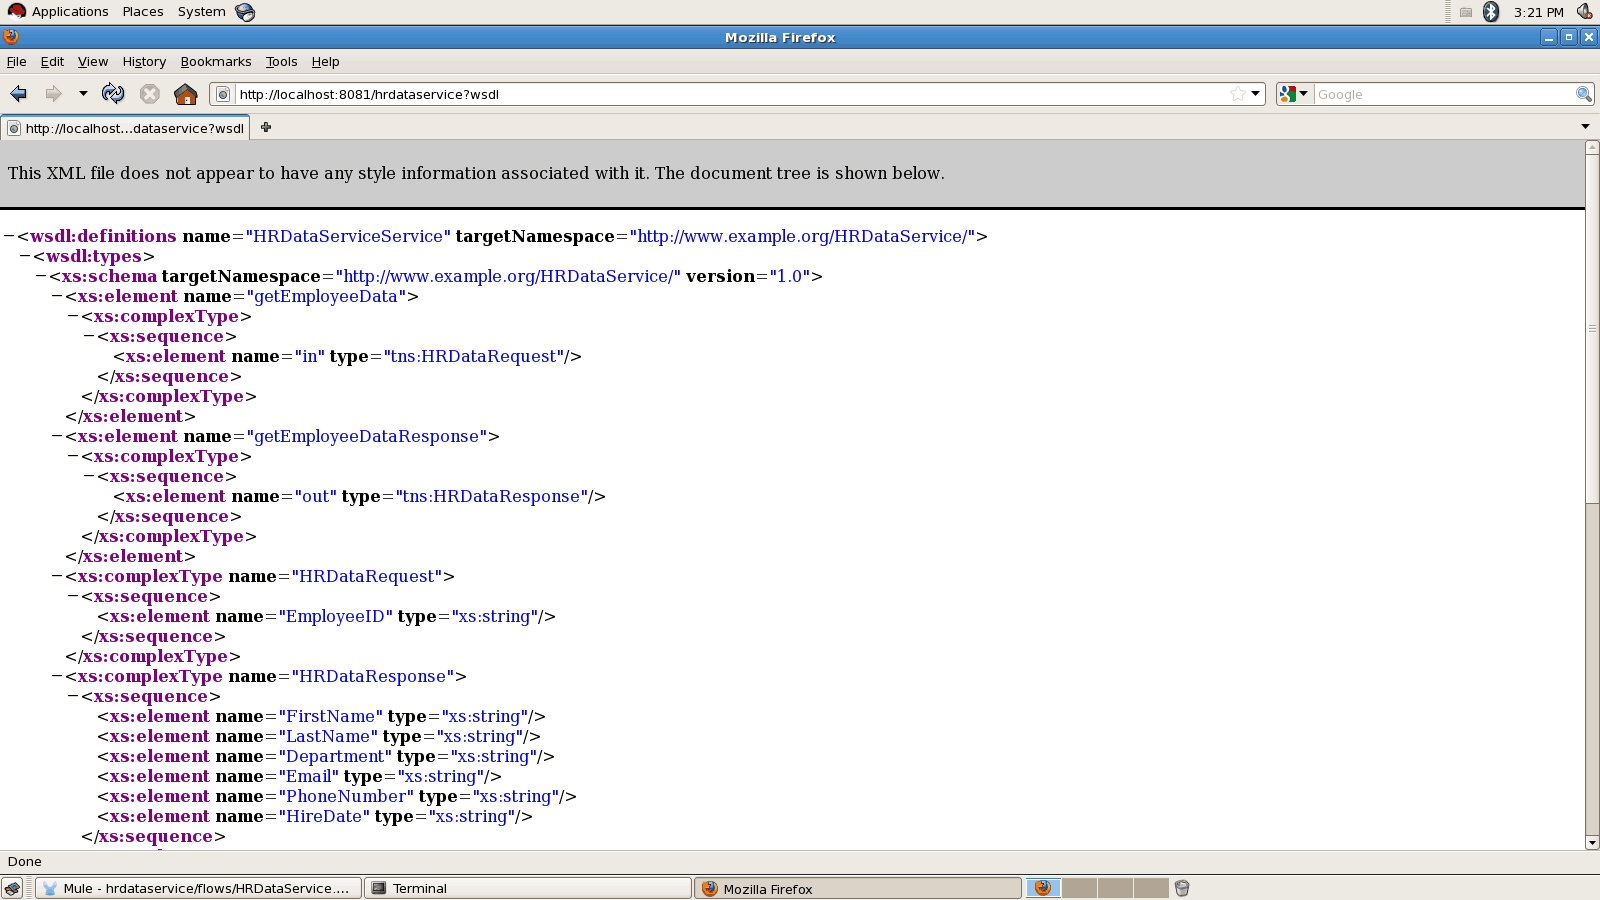
Start a browser and enter the URL: http://localhost:8081/hrdataservice?wsdl to see the WSDL document.

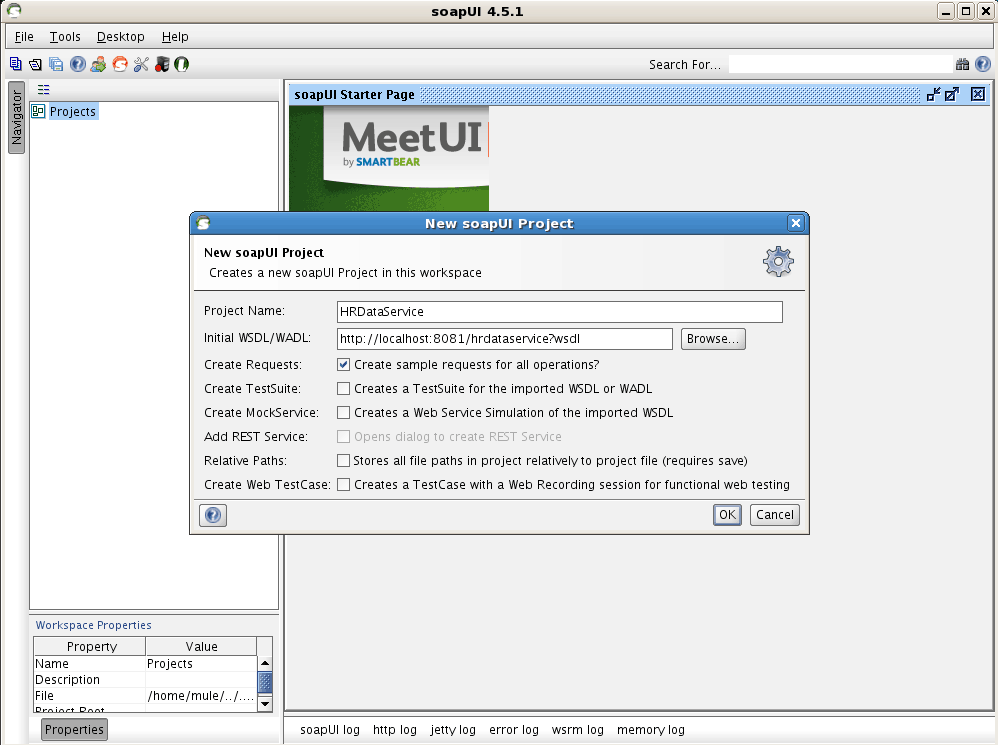
Start SOAP UI and create a new project called HRDataService with the WSDL URL: http://localhost:8081/hrdataservice?wsdl

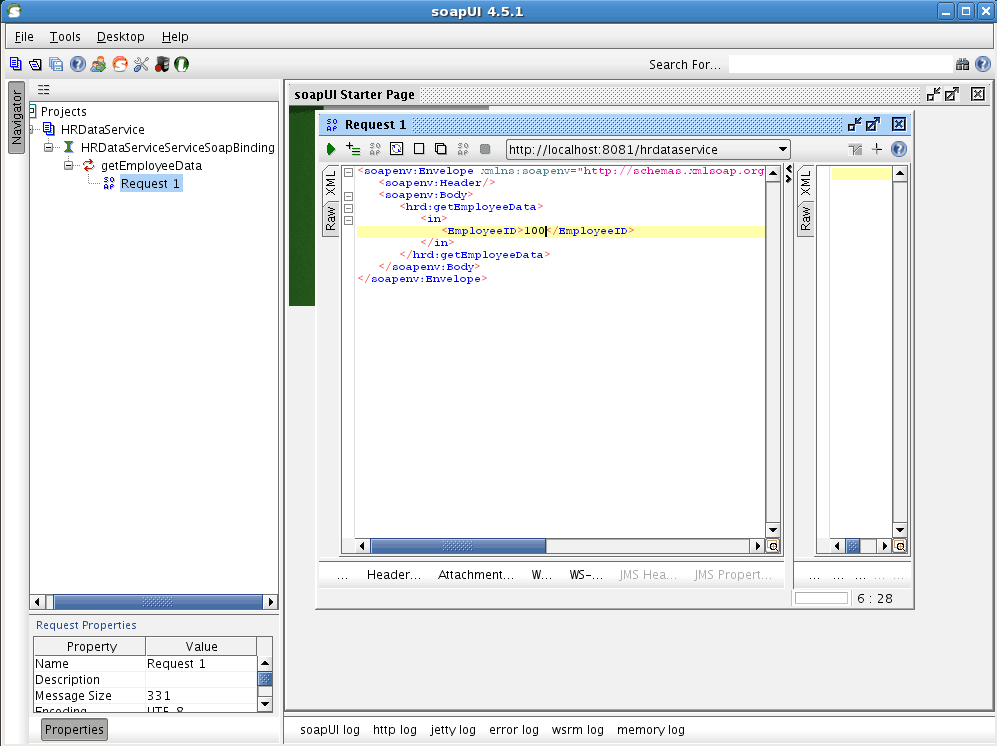
On the SOAP Request, enter an Employee ID of 100 and click the icon to execute the web service.

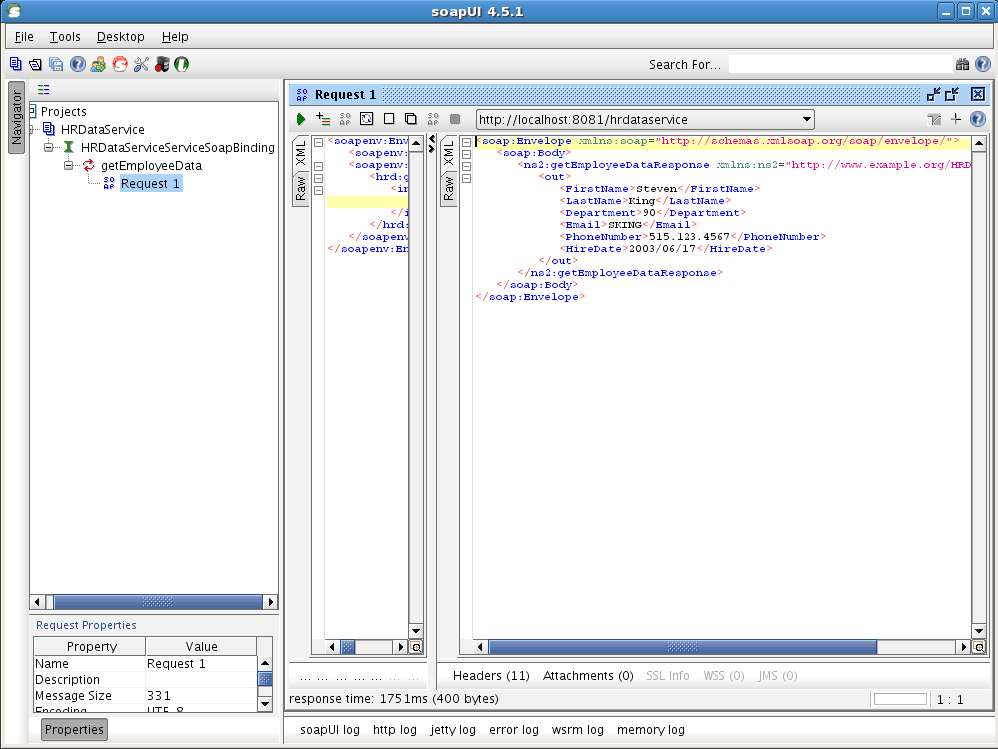
You should see the employee data for Employee 100 (Steven King) in the SOAP response.

Summary

As you can see, it is very easy to create services with Mule Studio – whether plain HTTP Services with JSON or SOAP-based Web Services. It is very easy as well to transform data to and from heterogeneous data formats like that of a database table structure and XML. In this example, we were able to accomplish these without writing any code by utilizing the SOAP component for top-down web service generation and the Data Mapper for transformations. For more on Mule, check out: http://www.mulesoft.com/.

Setup Steps

Part 1

SOAP UI

Change the Studio Category of your DevKit Component

Reading Time: 3 minutes

Anyone that has used DevKit to write a Mule extension and then wanted to add it to Studio, may have notice that the extension will appear under the Cloud Connectors category in the palette. This is not a problem when the extension is actually a Cloud Connector, but is sort of a problem when it was something else (for example a component like the LDAP connector). This is not an issue anymore since DevKit 3.3.2, as you can now use the @Category annotation at class definition level (Connector or Module) to select under which category you want your extension to be listed in:

It is important to mention that:

  • You can only add the connector to one of the existing Studio categories (this means you cannot define your own category)
  • The values for name and description attributes of @Category need to have specific values (please don’t be creative), as shown in the following list:
    • Endpoints: org.mule.tooling.category.endpoints
    • Scopes: org.mule.tooling.category.scopes
    • Components: org.mule.tooling.category.core
    • Transformers: org.mule.tooling.category.transformers
    • Filters: org.mule.tooling.category.filters
    • Flow Control: org.mule.tooling.category.flowControl
    • Error Handling: org.mule.tooling.ui.modules.core.exceptions
    • Cloud Connectors (DEFAULT): org.mule.tooling.category.cloudconnector
    • Miscellaneous: org.mule.tooling.ui.modules.core.miscellaneous
    • Security: org.mule.tooling.category.security

Too ‘meh’ to build the category annotation yourself? Just copy/paste from the following gist:

Hope this tip helps you place your Mule extensions under the right Studio category.

Announcing CloudHub availability in Europe

Reading Time: 2 minutes

I’m thrilled to announce the availability of CloudHub in Europe. With this announcement, we’re extending the industry-leading CloudHub platform to address the needs of our European customers with dedicated computing resources located in the European Union.

European companies are adopting the cloud faster than ever — Salesforce recently announced that Europe was their fastest growing region last year. However, one of the primary obstacles to using cloud services in the EU is complying with the EU data protection directive which regulates the processing of personal data. With the availability of CloudHub in Europe, it’s now significantly easier for European organizations to comply with these regulations by ensuring data never leaves the EU.

Another challenge which European companies are facing is the latency of data travelling back and forth between the US and the EU. With CloudHub resources located in Europe, companies are able to access data more quickly and publish APIs under a new eu.cloudhub.io domain.

Please contact your MuleSoft representative to have the European region enabled for your CloudHub account today.

MuleSoft named best place to work in 2013

Reading Time: 8 minutes

MuleSoft has been named one of the “Best Places to Work” by the SF Business Times. The Times’ rankings are based on anonymous, voluntary surveys which rank their employer in areas such as teamwork, retention, co-workers, manager effectiveness, trust in senior leadership, benefits and overall job satisfaction.

So what is it about MuleSoft that makes it such a great place to innovate and work? I joined MuleSoft about 6 months ago as VP of Engineering, so I have been able to look at things from a newcomer’s perspective.

As I reflect on what I’ve seen over the past few months, it’s become clear that although the company has been growing by leaps and bounds over the past year, we’ve focused on maintaining the culture and company DNA that makes us unique and special. Here are a few examples…

Hire Great People
We have a huge challenge ahead of us – to disrupt a $500 billion industry – and it’s going to take some of the smartest and highly motivated people in the world to do it. It starts with every person who comes in the door. We constantly look for people that are curious, creative, deep problem solvers and results oriented. It’s great to be in a company where everyone around you raises the bar.

Open 
Transparency is key for any company that wants their employees make great decisions and feel like they are key to the success. Revenue, metrics and goals are shared with the whole company, all the time. Weekly all-hands meetings allow employees to ask any questions on their minds and get direct and honest answers. We maintain an open workspace without any offices – our CEO sits at a desk next to our engineers and marketing team, making it a very open and casual environment. The final aspect of openness is on a personal level – employees at MuleSoft are direct with each other and speak honestly and openly, there is no politics – all of this leads to an environment of trust.

Feel Empowered
All our employees feel empowered to make decision and take initiative. Growing at the pace we do we come across new and unique challenges every day. Everyone feels empowered to personally remove obstacles and get things done.

Be Creative
We look for creative people, who enjoy a challenge and coming up with unique solutions to really hard problems. From engineering to marketing to sales I see people constantly coming up with new ideas and novel ways of solving problems I haven’t seen before. Creativity and innovation seems to happen on every level across the company.

Engineering culture
We were founded as an open source company and we value technology innovation, team collaboration and building great software products. Our developers get to work on some of the most challenging and complex problems including creating products that power integration at some of the biggest companies in the world and building next generation cloud platforms.

We hold meetups and hackathons many times a year where our engineers brainstorm new ideas, use bleeding edge technologies and work together to improve our products and take them in new and unique directions. In our hackathon last month we had over 18 projects and ideas that our team worked on over a 24 hour period, many of which will end up in our product suite or being adopted by engineering. The ideas ranged from a raspberry-pi enabled robotic car running Mule to a version of our Cloud ESB supporting HA using Redis on AWS to a speech-to-text translation engine to route calls to the correct support team.

Our engineers also get a lot of opportunity to travel and meet customers at company events and receive feedback first hand from the customers using our products.

Enjoy the ride
We believe it’s possible to be ambitious, hard working and game change an industry while also having a fun time doing it. Whether it’s all-company white water rafting trips, weekly happy hours, cooking each other waffles for breakfast or creating fun videos that make us laugh every time we see them over a beer.

There are over 150,000 developers using our platform and over 3,500 companies worldwide. Not many companies of our size have those statistics and scale behind them. Yet we feel like we’re only getting started. It’s great to be doing this in a company that has now been voted one of the best places to work, again.

If you think this may be the best place to wok for you, we are hiring.

Mule has landed on GitHub

Reading Time: 3 minutes

We are happy to announce that we moved the Mule project to GitHub. Since 2009 we have been using GitHub to host all our new projects, and Mule was the last standing project we had on SVN. We wanted to do it right, without losing any history, commits, etc, and  it took us a while.  We are finally taking this last step and sorry you had to wait this long to be able to fork Mule!.

Nowadays git gained popularity because of its flexibility. If you are not convinced by now you should probably read this wiki page.

Git got even better with the rise of GitHub becoming the de facto place were open source projects are hosted (as it used to be SourceForge back in 2001).

Beside git hosting, GitHub provides a set of nice features such as fork, pull requests, inline editing, etc, that allows virtually every GitHub user to contribute to projects they are most interested in.

You can find Mule ESB source code on https://www.mulesoft.com . If you don’t know how GitHub works, you can read the documentation we put together on how to do it here. We also updated our contributor’s guide to let you know how to develop Mule ESB and we are looking forward for your pull requests with fixes or improvements you want to contribute back to us.

If you want to learn more about GitHub, you can visit their documentation.

If you are trying to migrate a large project from SVN to GitHub, feel free to contact us!, we learned a few tricks with this experience so we might be able to point you the right steps and tools.

Happy Forking!

Introducing The Anypoint Platform

Reading Time: 8 minutes

This is the most exciting time to be in the enterprise.  When I started my career, I was usually asked to integrate to two types of applications: large legacy mainframe systems that had a team of ‘experts’ acting as gatekeepers and horribly customised enterprise applications that frankly nobody wanted to touch without a team of ‘experts’ to blame if things broke. There was nothing glamorous about my chosen vocation, yet I loved it.  I wanted to figure out how to make these applications to better work together.

My biggest problem 12 years ago was finding the right tools to build the architectures we wanted to build; lean, light and low-maintenance. There were slim pickings and most people would default to point-to-point integration; the environmentally-unfriendly practice of tying applications together with custom code and then forgetting about it.

When I created Mule I wanted to make it easier to connect systems together. A few years later, as SaaS emerged, we created cloud connectors and DevKit to make it easier to connect to SaaS applications and APIs. Then we created CloudHub to make enterprise-grade cloud integration a reality.  And today we’ve taken the next step by announcing The Anypoint Platform: the only platform that connects any application, any data source, any device and any API, in the cloud and on-premise.

The Anypoint Platform combines our existing platform (Mule ESB, CloudHub and connectors) with new capabilities for API creation, publishing and governance, rounding out everything you need to connect the New Enterprise. We’ll be covering the new capabilities in new posts over the coming days and we have the Mule Summit tour coming up that will go in depth on the Anypoint Platform, but for reference the new capabilities include:

  • APIkit: This is our open source design toolkit for building REST APIs.  The focus is to allow you to build consistent and scalable APIs.  APIkit allows you to model what your API will look like and take care of versioning, URI scheme, security, and content negotiations as wells as adding CORS support and Swagger built in.
  • Anypoint Service Registry: Built from the ground up to manage policy enforcement at run-time, this is a cloud-based registry offering (built on CloudHub, using APIkit).  ASR is used to govern and manage all of you internal services and APIs, both on-premise and in the cloud. As well as support dynamic service lookups and virtualization.
  • Anypoint API Manager: Released in Beta today, this cloud-based API management service allows enterprises to connect with business partners and public communities.

APIs are the driving force that is enabling change in the enterprise.  Open APIs have given the enterprise a playbook on how to decouple complex systems and make them accessible to everyone.  In 2005 there were just a handful of open APIs from the likes of Yahoo, eBay, Salesforce and Amazon. Today that number has exploded to over 13,000, and APIs in the enterprise is set to explode too.  The consumption of Saas is critical to enable seamless processes that can span on-premise and cloud applications and API publishing is fundamental to enabling mobile and device strategies as well opening new revenue channels. We’re entering into an era of hyper-connectivity, the Anypoint Platform has been built to meet these needs of a hyper-connected world.

We’re not a fan of fat software stacks and as such each piece of the Anypoint platform is designed to stand alone, opposed to being a feature in a giant stack.  This means you can pick and choose the parts of the platform you want to use. For example, you may choose to just use Mule Community and APIKit, or CloudHub, APIKit and Anypoint API Management, or everything together.  However, each piece of the Anypoint platform will also work well with the others.

Integration is no longer just about connecting legacy and package applications together behind the firewall.  The advent SaaS and mobile in particular have forced enterprises to think differently about the IT landscape.  The number of endpoints has exploded and all of these applications and consumers live outside of the firewall. This is the New Enterprise and its highly fragmented. Our platform is designed to take on any integration challenge whether it is modernizing legacy systems with services, publishing device APIs for mobile consumers or connecting SAP and Salesforce.  The Anypoint Platform connects anything anywhere.

Follow: @muleSoft@rossmason

Warp Drive Engaged – MuleSoft Raises $37M to Power the New Enterprise

Reading Time: 6 minutes

Today, we announced a $37 million expansion round of funding, led by the premier venture capital firm NEA, with participation by new strategic investor salesforce.com as well as all of our existing investors. I couldn’t be more excited about our position.  This capital lets us grow the company even faster to meet the explosive demand that we are seeing around the world and allows us to step up investment in our cloud platform and software products, innovating more aggressively to define the next generation of integration.

Continue reading