
Like many developers and architects who build APIs and integrations, I was on top of the world when I completed the training on Anypoint Platform Development fundamentals (Mule 4); I was now able to take an idea for an API and build, design, deploy, and implement my API in a matter of hours. I now held the shiny key to become a MuleSoft Certified Developer — I just had to pass the MuleSoft Certified Developer – Level 1 exam. “I’ve got this in the bag!” I thought to myself.
My journey to becoming a MuleSoft Certified Developer
A few weeks later, I sat down to take the exam. It was harder than I expected, but I still felt good about the results. Sure, I may have struggled with a couple things, but overall I did well and definitely passed… right?
Wrong. I failed my first time, and it sucked.
If you’re anything like me (and I work for MuleSoft, I should know this stuff), you don’t take no for an answer. Luckily, when you complete the MuleSoft Certified Developer exam, it tells you how well (or not so well) you did on different topics within the course. I took a look at my feedback, and like many of you, found that I did well in a lot of areas — and downright awful in others. The area I scored the lowest in was error handling. In fact, I’m pretty sure that I got 0% of the questions right. What could I be doing wrong?
Doubling down on error handling
I went back to the course materials and read the error handling section. After that, I took the practice quizzes that are part of the free MuleSoft.U Development Fundamentals. I got 30%. Determined, I re-read the course materials and tried and re-create the flows that were shown so gracefully and neatly in the student slides. I walked through each debugger example step by step. Once I went through all the simple examples provided in the course, I started to play around with my own examples and throw in little twists like they do in the exam. Finally, the ah-ha moment happened for me.
My ah-ha moment
How I thought error handling worked, as described in the course materials, was totally wrong. When I looked at error handling from a different perspective, everything became simpler. Here’s the methodology that I used to look at error handling that helped me conquer the MuleSoft Certified Developer – Level 1 (Mule 4) exam and become a MuleSoft Certified Developer!
Error handling fundamentals
The first thing that I realized is that when you are dealing with error handling, don’t try and boil the ocean. If you understand the simple concepts first, it makes understanding the complex problems that much easier. In the case of error handling with Mule 4, this means taking a step back and understanding what an error actually is.
There are two types of errors in Mule 4:
System errors
System errors are errors that occur outside of Mule flows when no Mule events are involved. These are usually issues with deployment or mal-formed code or other such errors.
Messaging errors
Messaging errors that happen within a flow when there is some kind of processing issue. These types of errors create Error Objects which (in most cases) can be handled.
What we are concerned about in this post is handling Messaging Errors, specifically how to handle the error objects that are created when a Messaging Error occurs. In order to do this, we have to understand what an Error Object in Mule 4 is.
5 components of an Error Object
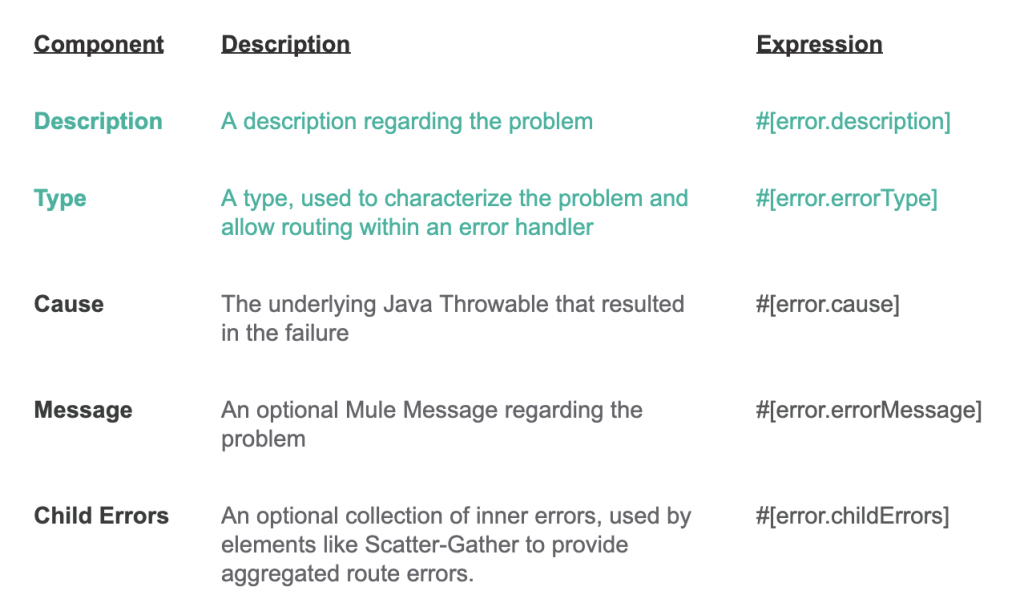
For the sake of this discussion, we really only care about the description and type.
Now that we have a good picture of what an error is, we can dive into how errors can be handled in Mule 4.
There are two error handling scopes in Mule 4:
- On Error Propagate
- On Error Continue
Again, before we jump into how each one of these different scopes can be used, we need to understand the difference between the two. The way I like to think about these two different error scopes fundamentally is this:
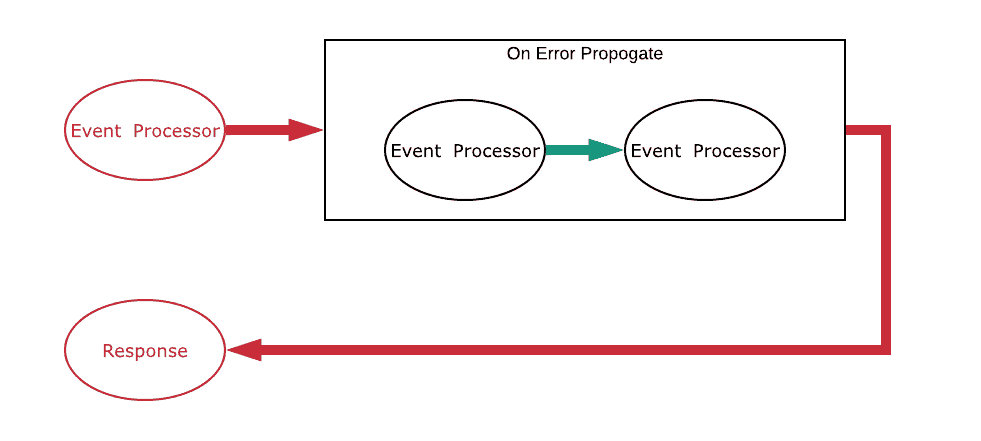
On Error Propagate: RED in RED out
On Error Continue: RED in GREEN out

If you take nothing else away from this riveting discussion on error handling, remember this: On Error Propagate: RED in RED out. On Error Continue: RED in GREEN out. If you remember this, error handling scopes will become much simpler to understand.
So what do these different colors mean? To put it simply, red means there’s a Mule Error Object is being passed. Green means a normal Mule message is being passed. The big piece of this to remember is that when you use the On Error Propagate scope (RED in RED out) the original Mule Error Object that was created is what is returned, not anything created within the error handling scope.
Another fundamental thing to remember about error handling in Mule 4 is that whenever an error happens, the current scope of the flow is processing stops dead in its tracks and (depending on which error handling scope is used) either an Error Object or normal Mule Message is passed back to the parent flow. This is important because no matter what you do in a flow to handle an error, you can’t continue with your current scope of work.
Simple component flow examples
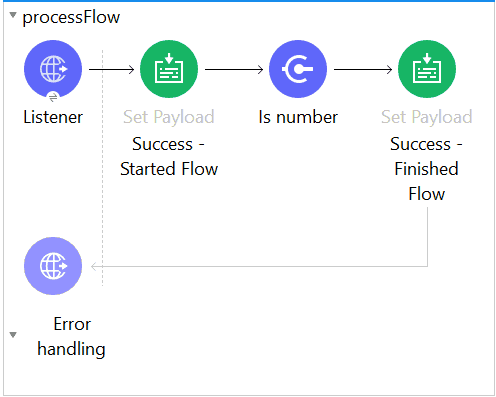
Let’s start with a simple flow with a few simple components:
- An HTTP Listener that initiates the flow
- A Set Payload processor that sets the payload to “Success – Started Flow”
- A Validator processor that checks to see if the current payload is a number
- This is the part where an error will get created as the payload is a string (“Success – Started Flow”) and not a number
- A Set Payload processor that sets the payload to “Success – Finished Flow”
On Error Propagate
In our first example, we will use an on Error Propagate scope. Some important concepts to remember here are:
- RED in RED out.
- Even though a payload is set in the On Error Propagate scope, because the scope is RED out, the original error message that was created is what is returned.
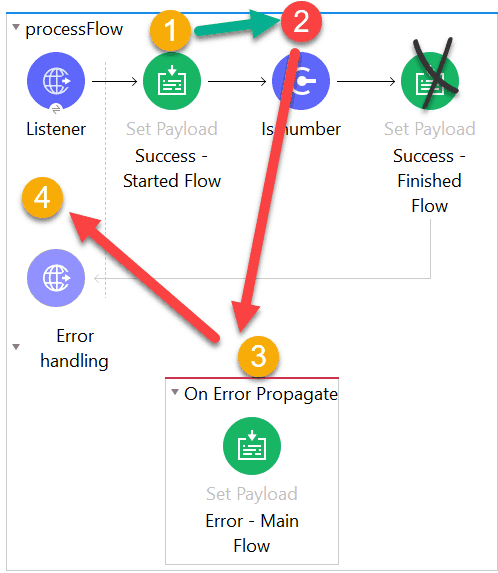
Here’s what’s happening here:
- Payload is successfully set to “Success – Started Flow”
- The Is Number validator creates an Error Object because the payload isn’t an integer
- Flow execution stops
- #[error.description] = “payload is not a valid INTEGER value”
- #[error.errorType] = VALIDATION:INVALID_NUMBER
- The On Error Propagate error Handler handles the error
- The payload is set to “Error – Main Flow”
- “payload is not a valid INTEGER value” is the error message returned to the requestor in the body of the HTTP request
- HTTP Status Code: 500
On Error Continue
Next we will use an On Error Continue scope. Some important concepts to remember here are:
- RED in GREEN out.
- Because this is an On Error Continue, GREEN out, the payload that is set in the error handler is returned and no error is passed back
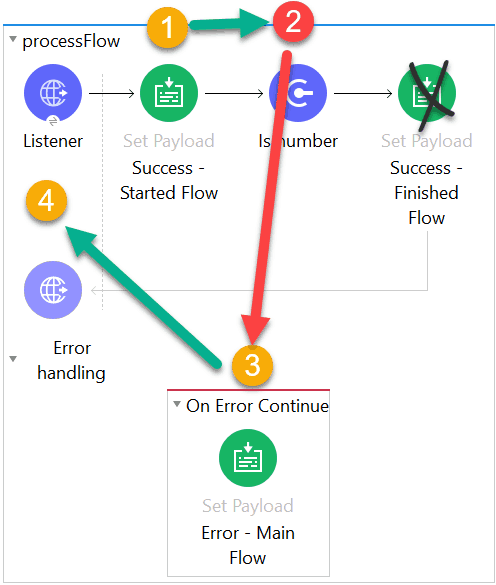
- Payload is successfully set to “Success – Started Flow”
- The Is Number validator creates an Error Object because the payload isn’t an integer
- Flow execution stops
- #[error.description] = “payload is not a valid INTEGER value”
- #[error.errorType] = VALIDATION:INVALID_NUMBER
- The On Error Continue scope handles the error
- The payload is set to “Error – Main Flow”
- “Error – Main Flow” is returned to the requestor in the body of the HTTP request
- HTTP Status Code: 200
This should give you the basics of error handling. In my next blog post, I will explore how to take these skills and apply them to real scenarios. I will discuss how you can handle errors at both the application level and at the individual flow levels within your application. For those of you just starting your journey with MuleSoft, check out What’s new with Mule 4?


