Light Up the Internet of Things

Reading Time: 8 minutes

IoT Lights demo @ MuleSoft HQ

twitter-demo1


To liven up the 2nd floor of the MuleSoft SF office, we decided to showcase a slightly modified version of the IoT demo we gave in last year’s Chicago and New York MuleSoft Summits. The demo we have listens for any mentions of @mulesoft on Twitter. If found, a Mule app running on a Raspberry Pi makes the lights glow. Initially dim, the lights glow brighter with more mentions.

Now let’s dive into the specifics of this fun little demo we’ve created.

The genesis of this demo was a brainstorming session for a MuleSoft Summit keynote presentation. We wanted to show something that showcased IoT in conjunction with MuleSoft technology. We decided to simulate home automation via APIs, which essentially means using Internet of Things APIs to control the “things” around one’s home. In our case, the “things” we were controlling were Philips Hue light strips (which we shaped to form the MuleSoft logo). In addition, as is typical in many IoT architectures, we used a “controller” closely located to these “things” – think of how a Nest device (controller) manages the heaters (things) around a home. In our case, the controller we used was a lightweight Mule app running on a Raspberry Pi, which connects to both the external network to receive information, and to the internal network to control the lights.

Continue reading

Anypoint Exchange: Discover and Add Integration Best Practices

Reading Time: 6 minutes
oprah

Anypoint Exchange is home to integration best practices, hosting the complete listing of MuleSoft’s connectors, templates and examples. With our latest release, we are thrilled to give customers the ability to curate their own exchange.

Preloaded with MuleSoft’s assets – connectors, templates and examples – to help you get started, customers can extend the exchange by adding customized information that will increase adoption of internal best practices and encourage collaboration across the organization. Any assets added by customers will be kept private to their individual organization.

Continue reading

Mule Enterprise Management and the new Mule agent

Reading Time: 6 minutes

This is the second of a series of blog posts around the new Mule agent. For an overview of the new Mule agent, be sure to read Introducing the new Mule agent. In this post, I’ll talk about the new agent in relation to the Mule Enterprise Management Console (also known as MMC).

Readers of this post are probably familiar with MMC, which is MuleSoft’s current on-premises management/monitoring solution. The agent is a first step in the development of MuleSoft’s next generation management and monitoring solution. Think of this solution as more than just MMC 2.0. Over the next few Anypoint Platform releases, this agent will unify management and monitoring of Mule ESB, CloudHub, and API Gateway to provide MuleSoft customers with unparalleled visibility and control over their connectivity landscape. And because we’re taking an API-led connectivity approach to developing the agent, it will be highly extensible.

For current MMC customers reading this, don’t worry. We know MMC is a critical part of many enterprise production deployments. MuleSoft will continue to support MMC in its current form, which includes adding features and fixing bugs as needed. We will also continue to support older versions of MMC as long as its corresponding Mule version is supported (e.g. MMC 3.4.2 will be supported as long as Mule ESB 3.4.2 is supported). Furthermore, we will continue shipping new versions of MMC until customers have validated that the new management solution is a suitable replacement.

Note that the name, packaging and delivery date for the new management solution are all still TBD. We’ll continue to update you around the new management solution as more development is done and the release date gets closer.

The new management solution and the new agent

Our primary goal for developing the agent was for our new management solution to leverage its APIs, as shown in the diagram below.

As shown in the diagram, MMC will continue to interface with a Mule runtime (ESB or API Gateway) via the existing MMC agent, and the new management solution that is currently under development will interface with the same runtimes via the new agent. An important detail in this diagram is that the new agent and the MMC agent can coexist (in compatible Mule runtimes), which we hope will facilitate a smooth transition for MMC users to the new management solution.

Comparing MMC vs the new agent

Comparing MMC vs the new agent is not an apples-to-apples comparison. That said, if there’s one thing to keep in mind when looking at the agent in relation to MMC, it’s that the agent should only be used over MMC when APIs ALONE are used for management/monitoring, which is typical in situations where existing third party apps are the primary mechanisms used to manage/monitor Mule instances. Unlike MMC, the agent does not have a graphical UI. If you are looking for a full MMC replacement, that’s only coming later with the new management solution.

We do not believe the new agent in itself can fully replace MMC within an enterprise’s architecture, but we do believe that there are certain use cases where the agent is a superior choice for runtime management in lieu of a full-blown management GUI like MMC, and there are also certain use cases where the agent can complement, or run alongside, MMC deployments. We’ll talk about some of those use cases in a separate blog post.

Learn more about the agent by reading the full Mule Agent documentation, and feel free to post comments within this blog post or in the MuleSoft forum. Thanks for reading, and stay tuned for the next installment of the agent blog post series.

Missed the last post? Check it out here: Introducing the new Mule agent »

Making Zen of API Platform Deployment Architecture

Reading Time: 4 minutes

The general guiding principles of the Zen philosophy can actually be quite helpful in designing the Anypoint Platform for APIs‘ deployment architecture. The emphasis on having a holistic approach, while striving for simplicity, symmetry, and minimalism, works as well for meditation as for coming up with a stable, robust and secure architecture. Here, we will outline the four most common models in use today that dovetail with the teachings of the Zen philosophy.

1. On-premises

on-prem-e1424731537302

The first model is a pure on-premises configuration.

Continue reading

API Best Practices: The Wrap Up (Part 7)

Reading Time: 9 minutes

This is part seven of the API design best practices series. Read part one of the series.

Looking Back

Unfortunately, this series of API Best Practices has come to a close. Over the last several months we’ve taken a look at how to design a flexible, extensible, and usable API. These steps included:

1. Planning Your API – The first and most basic step, is understanding what it is that you’re actually building. Understand what your customers want (this means involving them), understand what different types of APIs there are out there, and why you are building the kind you are (REST, REST-like, SOAP, RPC). Lastly, it’s important to map out the functionality that your users need – and to not get stuck in a resources/CRUD mindset when doing so.

2. Utilizing Spec Driven Development – Using a spec like RAML to model your API, lets you get an immediate visual representation of what it is that you’re actually building while taking advantage of code reuse and design patterns for consistency. Keep your users involved and prototype (mock) your API for them to test out using tools like the API Notebook. Keep making revisions to your design until you have a solid foundation and have fixed 99% of the design flaws. Then start building!

3. Using Nouns for Resources – Keep your resources versatile and flexible. By using nouns you can stay true to REST principles and avoid tightly coupling your resources to methods or actions. Remember that you generally want your resources in the plural form (users) and they should map to the objects or areas that your clients are trying to manipulate (ie: /users to modify users).

4. Following CRUD and use HTTP Action Verbs – By thinking of actions in a Create, Read, Update, and Delete format you can take advantage of the HTTP Action Verbs or methods and make it easier for developers to utilize your API. Be sure to understand the difference between POST, PUT, and PATCH – and when to use which.

5. Using JSON when possible – JSON is more compact and more widely supported by languages than XML, YAML, and other formats. However, some clients may require other formats, such as XML – which is where the Content-type header comes in!

6. Using the Content-type header – Even if you’re only planning on returning back one format (such as JSON), the Content-type header gives you the flexibility to add in more formats down the road and support multiple client’s needs without having to modify your API.

7. Hypermedia… Hypermedia… Hypermedia – Yes it’s a challenge, but by adding hypertext links to your API result with a standardized format such as HAL or JSON API, you’re giving developers the tools to better understand and discover your API, while also providing them with the application state (can an item be edited, deleted, etc).

8. Utilizing HTTP Status Codes – Tell your clients what’s happening, when things are successful (200, 201) or when they’re not (304, 400, 500).

9. Providing descriptive error messages – When something doesn’t work, don’t just tell them it didn’t work, tell them why. Take a look at some of the more popular error messaging formats including Google Errors, vnd.error, and JSON API’s error format.

10. Remembering that SDKs can be part of the solution, but they can also be part of the problem – Don’t expect an SDK to solve your problems or reduce your workload – instead look at them for what they are – a tool to help developers get started more quickly with your API. And a tool that you’ll need to be maintaining.

11. Taking advantage of an API Management tool – such as MuleSoft’s Anypoint Platform for APIs. API Managers are designed to protect and help scale your API– keeping threats out and protecting you from both unintentional and malicious attacks on your API– while also handling authentication, provisioning, and throttling to keep your API running optimally.

And that brings us to number 12… one of the best pieces of advice I’ve ever received for building an API:

Keep it Simple. As you design your API there will be temptation to do fancy or “innovative” things within your API – don’t. Instead, remember that you are building a foundation for future development. The fancier you get, the more likely you are to limit yourself or fall victim to bad practices. Instead, the simpler you keep your API, the longer you’ll be able to extend it, and the easier it will be for your clients to utilize. Simplicity is key.

Remember, building an API is easy… but designing an API that lasts – that’s the hard part.

Interested in learning more? Discover Anypoint Platform for APIs or get started with API Management with API Manager

Want to learn more about designing your API? Stay tuned to @MuleDev, and follow @ProgrammableWeb for all the latest news in the API ecosystem!

New RAML Tools for .NET Developers using Anypoint Platform

Reading Time: 7 minutes
guest_post

This post is brought to you by Pablo Cibraro. Pablo is a Software Architect focused on MuleSoft’s solutions for Microsoft.


As part of our on-going effort to make Anypoint Platform even more accessible and intuitive for .NET developers, we are thrilled to introduce a RAML parser and Visual Studio extensions that make it easy to consume and implement APIs using RAML.

What is RAML?

RESTful API Modeling Language (RAML) is a language for describing a Web API in terms of resources, methods and implemented patterns (security, paging, filtering, projections, etc). RAML is based on YAML and leverages other open standards such as JSON or XML to document the schema of the resource representations. In short, RAML allows you to do the following for your API:

  • Write Human-readable documentation using Markdown
  • Define supported resources and HTTP methods
  • Reuse common usage patterns such as data paging or filtering
  • Describe expected responses for multiple media types with schemas and examples for each
  • Define security aspects

Here’s an example of a RAML document describing a very simple API for browsing a movie catalog:

Continue reading

Introducing the new Mule agent

Reading Time: 5 minutes
icon-muleears-blue-big

Together with the release of Mule 3.6, we’ve also shipped a new Mule agent that exposes new APIs to manage and monitor running Mule, enhancing the experience of creating API-led connectivity in a big way.

The new Mule agent exposes APIs that allow enterprises to tie easily into their existing SDLC processes and applications. The agent also has a flexible framework that’s quickly customizable to meet new operational governance requirements around Mule.

This is the first of a series of blog posts where you can learn about this new agent.

What is the new Mule agent?

The agent provides two very powerful pieces of functionality. Specifically:

  1. the Mule agent exposes Mule runtime APIs via REST and WebSockets
  2. the Mule agent enables Mule instances to publish data to external systems

Let’s talk about these two pieces of functionality more, as these impact, the way users interact with Mule ESB from an operations, manageability, and monitoring perspective.

1. The Mule agent exposes Mule runtime APIs via REST or Websockets

Before the agent release, the only easily consumable, externalized Mule runtime APIs were those exposed by Mule Enterprise Management’s REST APIs, which provided functionality for managing servers, cluster nodes, and applications. Calling Mule Enterprise Management’s (also known as MMC) REST API required that MMC, a separate web application, is installed o an application server. If a user today wants to invoke agent APIs, a separate MMC installation is no longer required, as the new agent runs in-process with Mule. In other words, users will be able to call (agent) APIs directly in Mule without needing to install any other additional piece of software. For a full list of the APIs that the agent exposes, check out the full API documentation in this API portal.

As we were building the agent, we’ve been carefully considering what APIs to expose, and how to properly represent them. We’ll be creating a separate blog post on the agent architecture, so more on that later.

2. The Mule agent enables Mule instances to publish metrics to external systems

Aside from exposing APIs that can be invoked via REST or Websockets, the agent also allows users to configure and customize it such that the agent itself pushes information to external systems. Here’s a use case – let’s say a Mule customer already uses Zabbix, Nagios, or a similar operational monitoring system. With the agent, Mule can be configured to push metrics to these systems every specified time interval.

I’ve recorded a few quick demos on basic agent functionality:

Installing the agent:

Calling agent APIs:

Configuring agent-publishers to third party systems:

Learn more about the agent by reading the full documentation here, and feel free to post comments on this blog post or in the MuleSoft forum. Thanks for reading, and stay tuned for the next installment of the agent blog post series.


Exposing CXF webservice with Mule Cache

Reading Time: 6 minutes

guest_post
The first thing that comes to mind on Mule Cache scope is how to implement this cache mechanism with a webservice. Mule has a wonderful mechanism of caching with its cache scope, available in Anypoint Studio with Mule ESB Enterprise, and there are examples available on internet on how to extend the Mule caching mechanism with EHCache. Check out Mule caching with EHCache if you are still looking for an example.

In this post, I will demonstrate a simple example of how to use this powerful caching mechanism (with EHCache) on a webservice.

To implement a SOAP webservice with Cache you need to have a flow divided into two as the following:

anirban_1

In the first flow ServiceFlow, the payload after HTTP inbound endpoint is getting converted into String and getting into the Mule Cache block. In the Cache block, the payload is dispatched to the next flow using VM outbound connector.

In the second flow ServiceFlow2, the payload is accepted by the VM inbound endpoint which is then passed to the CXF component containing the webservice interface and then followed by a Java component which is responsible for implementing the interface.

Now, the reason I’ve used an Object to String before the Cache block is to convert the payload into a String to make it a consumable payload (The HTTP inbound endpoint produces a streaming payload, so it is not cachable. The to string transformer deserializes this stream to a non-consumable payload, thus the cache scope works) since the Cache will only accept consumable values in it to store.

Here is the following code for this implementation:

Now, what we’ll do is run and test the webservice. This webservice retrieves a row from the database and will show the row value in the SOAP response.

Here’s how we’ll test the webservice:

anirban_2

You can see that we have used SoapUI to test the webservice. Now when we hit the service, you can see in the SOAP request, it takes id as input and then fetches all the data from the database for that id.

Now, what we will do is manually deleting the entire row from the database. In my case, I have used sql server and deleted the row from the table using a SQL query:

anirban_3

With this in place, if we again hit the service, we will get the same response as we got earlier:

anirban_4

You can see that, though the entire row is deleted from the database table, it’s still showing the response, which means it is fetching the response from cache and not hitting the actual database.

If we now look into our XML configuration, we will find the following bit of XML:

The documentation for these properties states:

timeToIdleSeconds is the maximum number of seconds an element can exist in the cache without being accessed.

timeToLiveSeconds is the maximum number of seconds an element can exist in the cache regardless of use. The element expires at this limit and will no longer be returned from the cache.

So, now if we hit service again after the time defined in timeToLiveSeconds , we will find the following result:

anirban_5

As you can see, it clearly shows no records are there in the database, which means the cache has expired and the service is actually hitting the database.

I’ve hopefully been clear enough in displaying the implementation of Mule cache (extending EHCache) with a webservice in a simplest way.

Now it’s your turn to experiment with the Cache scope. Please share your comments and experiences below in the comments section!

API Best Practices: API Management (Part 6)

Reading Time: 11 minutes

This is part five of the API design best practices series.  

Design is Important, But…

Over the last several weeks we’ve looked at the design aspect of building APIs.  We’ve covered planning out your API, spec driven development, and best practices.  But your API is really a vehicle for developers to access data and services, much like a plane is a vehicle for transporting people to and from places.  But building the plane isn’t enough, along with having the actual vehicle, you need airports with checkpoints to make sure that only the people who are supposed to be getting in that plane have access, and likewise that no one is trying to do anything malicious.

The hidden danger of an API is that it can expose vulnerabilities within your application.  Both accidental and malicious abuse of your API can hammer your servers causing downtime for you and your customers.  And often times, this is as simple as an inexperienced developer (or even an experienced one) throwing in an infinite loop.

Authentication is Key

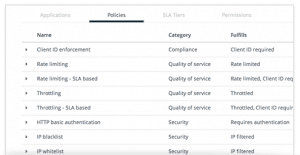
By providing your API users with a unique API token, or API key you can tell exactly who is making calls to your API.  Along with having quick access to determining potential malicious users which can immediately be removed, you can also set permissions and SLAs for users depending on their individual needs.  This means that you can set a default SLA for most users, giving them say only 4 calls per second, but for silver partners they get 10 calls per second, for gold partners 100 calls per second, etc.  This means that you can not only identify abuse quickly, but also help prevent it by limiting their access to certain aspects of your API, and by limiting the number of calls they can make to your API.

Throttling Isn’t Bad

Throttling and rate limiting isn’t a bad thing.  Again, by throttling your API and setting up different SLA tiers you are able to help prevent abuse – often times completely accidental.  This means that your API is able to operate optimally for all of your users, instead of having one infinite loop bring it crashing down for everyone.

And yes, you may have partners that need more calls than others, or who the limits do not make sense for.   But again, by setting up SLA tiers based on your standard API user’s needs, and then creating partner tiers, you can easily give the the permissions they need, while limiting the standard user to prevent abuse.

The API key, or unique identifier for an user’s application also helps you identify who your heavier users are – letting you get in contact with them to make sure their needs are being met, while also learning more about how they are using your API.

Security. Security. Security.

An API Manager should also be designed to handle security, not just by validating a boarding pass (API key) and directing them to their appropriate gate (permissions, SLA tier), but your API Manager should watch out for other dangerous threats, such as malicious IPs, DDoS, content threats (such as with JSON or XML), and others.

It should also be designed to work with your current user validation systems such as OAuth2 to help protect your user’s sensitive data (such as their username and password) within your API.  Keep in mind that even the most righteous of applications are still prone to being hacked – and if they have access to your user’s sensitive data, that means that hackers might get access to it too.  It’s always better to never have your users expose their credentials through the API (such as with basic auth) but instead rely on your website to handle logins and then return back an access token as OAuth2 does.

But… Security is Hard

policies

One of my favorite talks, by Anthony Ferrara sums this up very nicely…  Don’t do it.  Leave it for the Experts.  Granted, his talk was specifically on encryption, but there’s a lot of careful thought, planning, and considerations that need to be taken when building an API Management tool.  You can certainly build it yourself, and handling API keys or doing IP white-listing/ black-listing is fairly easy to do.  However, like an airport, what you don’t see is all of the stuff happening in the background, all the things being monitored carefully, security measures implemented by experts with years of experience in risk mitigation.

For that reason, as tempting as it might be to build one yourself, I would strongly encourage you to take a look at a professional API Management company- such as MuleSoft (of course, I might be a little biased).

Expensive… but Incredibly Cheap

It’s very easy to look at an API Manager’s price tag and have a little bit of sticker shock.  However, it’s important to understand that when it comes to security, you can either pay up front- or much more down the road.  By having a proxied API Manager you have a tool that can prevent malicious attacks from reaching your server, helping keep your network, architecture, and user data safe.  After all, the average cost of a breach in personal data is 5.5 million – unless you’re a much larger company like Sony, and then you’re looking at 172 million, a price tag that makes even the most expensive API Manager well worth it.

Along with the security factor, building an API Manager takes a substantial amount of time, and maintenance.  Even without considering the need for multiple security experts to help ensure you are mitigating malicious attacks on your API, you may find that the investment to build, and maintain even the simplest of API Management solutions quickly adds up, and will most likely exceed the cost of using a pre-existing service.

Click to Learn More about MuleSoft’s API Management Solution

Next week we’ll review:

Using .NET code and Visual Studio with Anypoint Platform

Reading Time: 4 minutes
.NET Connector

Our January 2015 release of Anypoint Platform brings with it many new updates to power API-led connectivity. For organizations with investments in .NET, we are thrilled to add to the list the 2.0 release of our .NET Connector. The enhanced .NET Connector enables .NET developers to use familiar languages and tools when building integration applications with Anypoint Platform.

With this connector, you can use Visual Studio and any Common Language Runtime (CLR) language to write code for complex transformation and message enrichment to apply business rules or perform custom message routing logic within a Mule application. You can also reference or reuse existing code including third-party assemblies, and build new libraries of custom codes specifically for your application.

Continue reading