HowTo – Wrap SOAP web service around a database

Reading Time: 10 minutes

We recently introduced our HowTo blog series, which is designed to present simple use-case tutorials to help you as you evaluate Anypoint Platform. This first blog in Series 1 will show you how to insulate your backend systems like databases by exposing a system API using SOAP over HTTP.  The principle behind this approach is our API led connectivity methodology, which is an evolution of SOA.

For years, most organizations have tightly coupled their front end applications with the backend enterprise systems like ERP and databases. The logic to access and process data from backend systems is baked directly into these front end applications. If there is any change in the backend system, it turns into a very costly exercise to propagate that change to each dependent application.

decoupling_transform

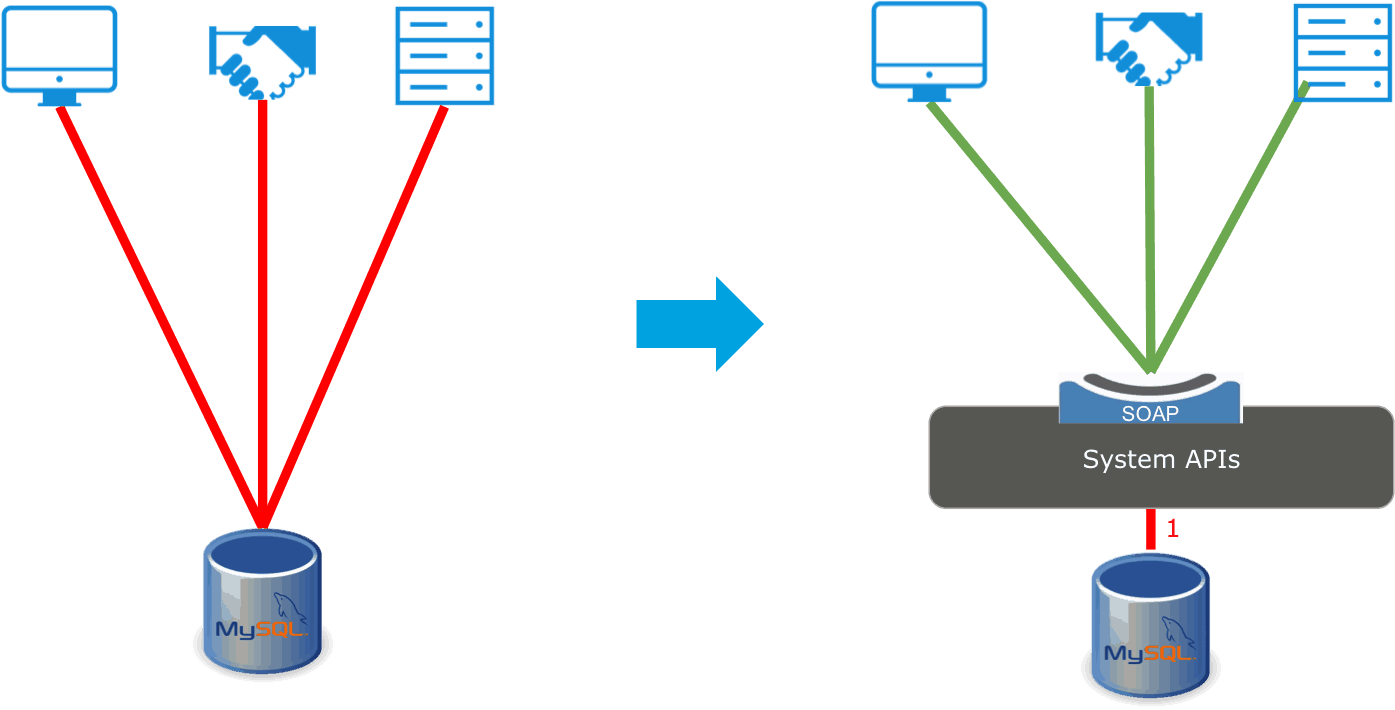
Therefore, there is a need to insulate these enterprise systems and provide an abstraction layer using a system level API. Having a system API decouples the front end consuming applications from interface changes in the backend enterprise systems, exposes information in your business specific semantics and provides flexibility to make changes with less impact. Although some systems like SaaS applications do have vendor provided APIs, having a system API layer still allows the user to abstract the complexity of these vendor APIs. These APIs will be highly reusable for different integrations, will change more infrequently and will be governed by Central IT given the importance of the underlying systems.  As a best practice, we first define the API contract (in this case, for a SOAP interface, so we’ll use a WSDL) before implementing the API. This approach helps to decouple the consumers of the API from the provider to speed development, provide reusability of assets like schemas, security schemes, and transport resources and help with versioning of the APIs.

Pre-requisites:

  • Anypoint PlatformMuleSoft Anypoint Studio.
  • WSDL created with Eclipse editor. The eclipse plugin installed into Mulesoft Anypoint Studio.
  • SOAP UI for testing.
  • A database where we can create and load a sample table required for this project. In this example, we will use an instance of the MySQL database.
  • The Mule project downloadable from Anypoint Exchange.
  • To follow the example in this guide, run the SQL script loan.sql to set up the table and load it with some sample data. You will find the loan.sql file in the project under the folder src/main/resources

Steps:

  1. Start Mulesoft Anypoint Studio and point to a new workspace.
  2. Create a new project. File -> New -> Mule Projectpicture2
  3. Give a name to the project and click finish. You will see the mule configuration file where we can now add the Mule flows.
    Here is more information to understand Mule configuration.picture3
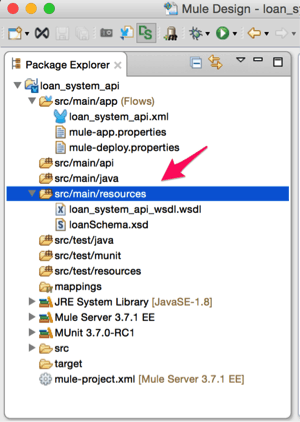
  4. Copy the schema and WSDL for loan service in the following directory path of the project, loan_system_api /src/main/resourcesDevBlogSeries1Part1
  5. Add HTTP endpoint to the Mule configuration file. Dropping the HTTP endpoint on the canvas will automatically create a flow (What is a mule flow?). In the HTTP endpoint properties tab below click on connector configuration.picture4
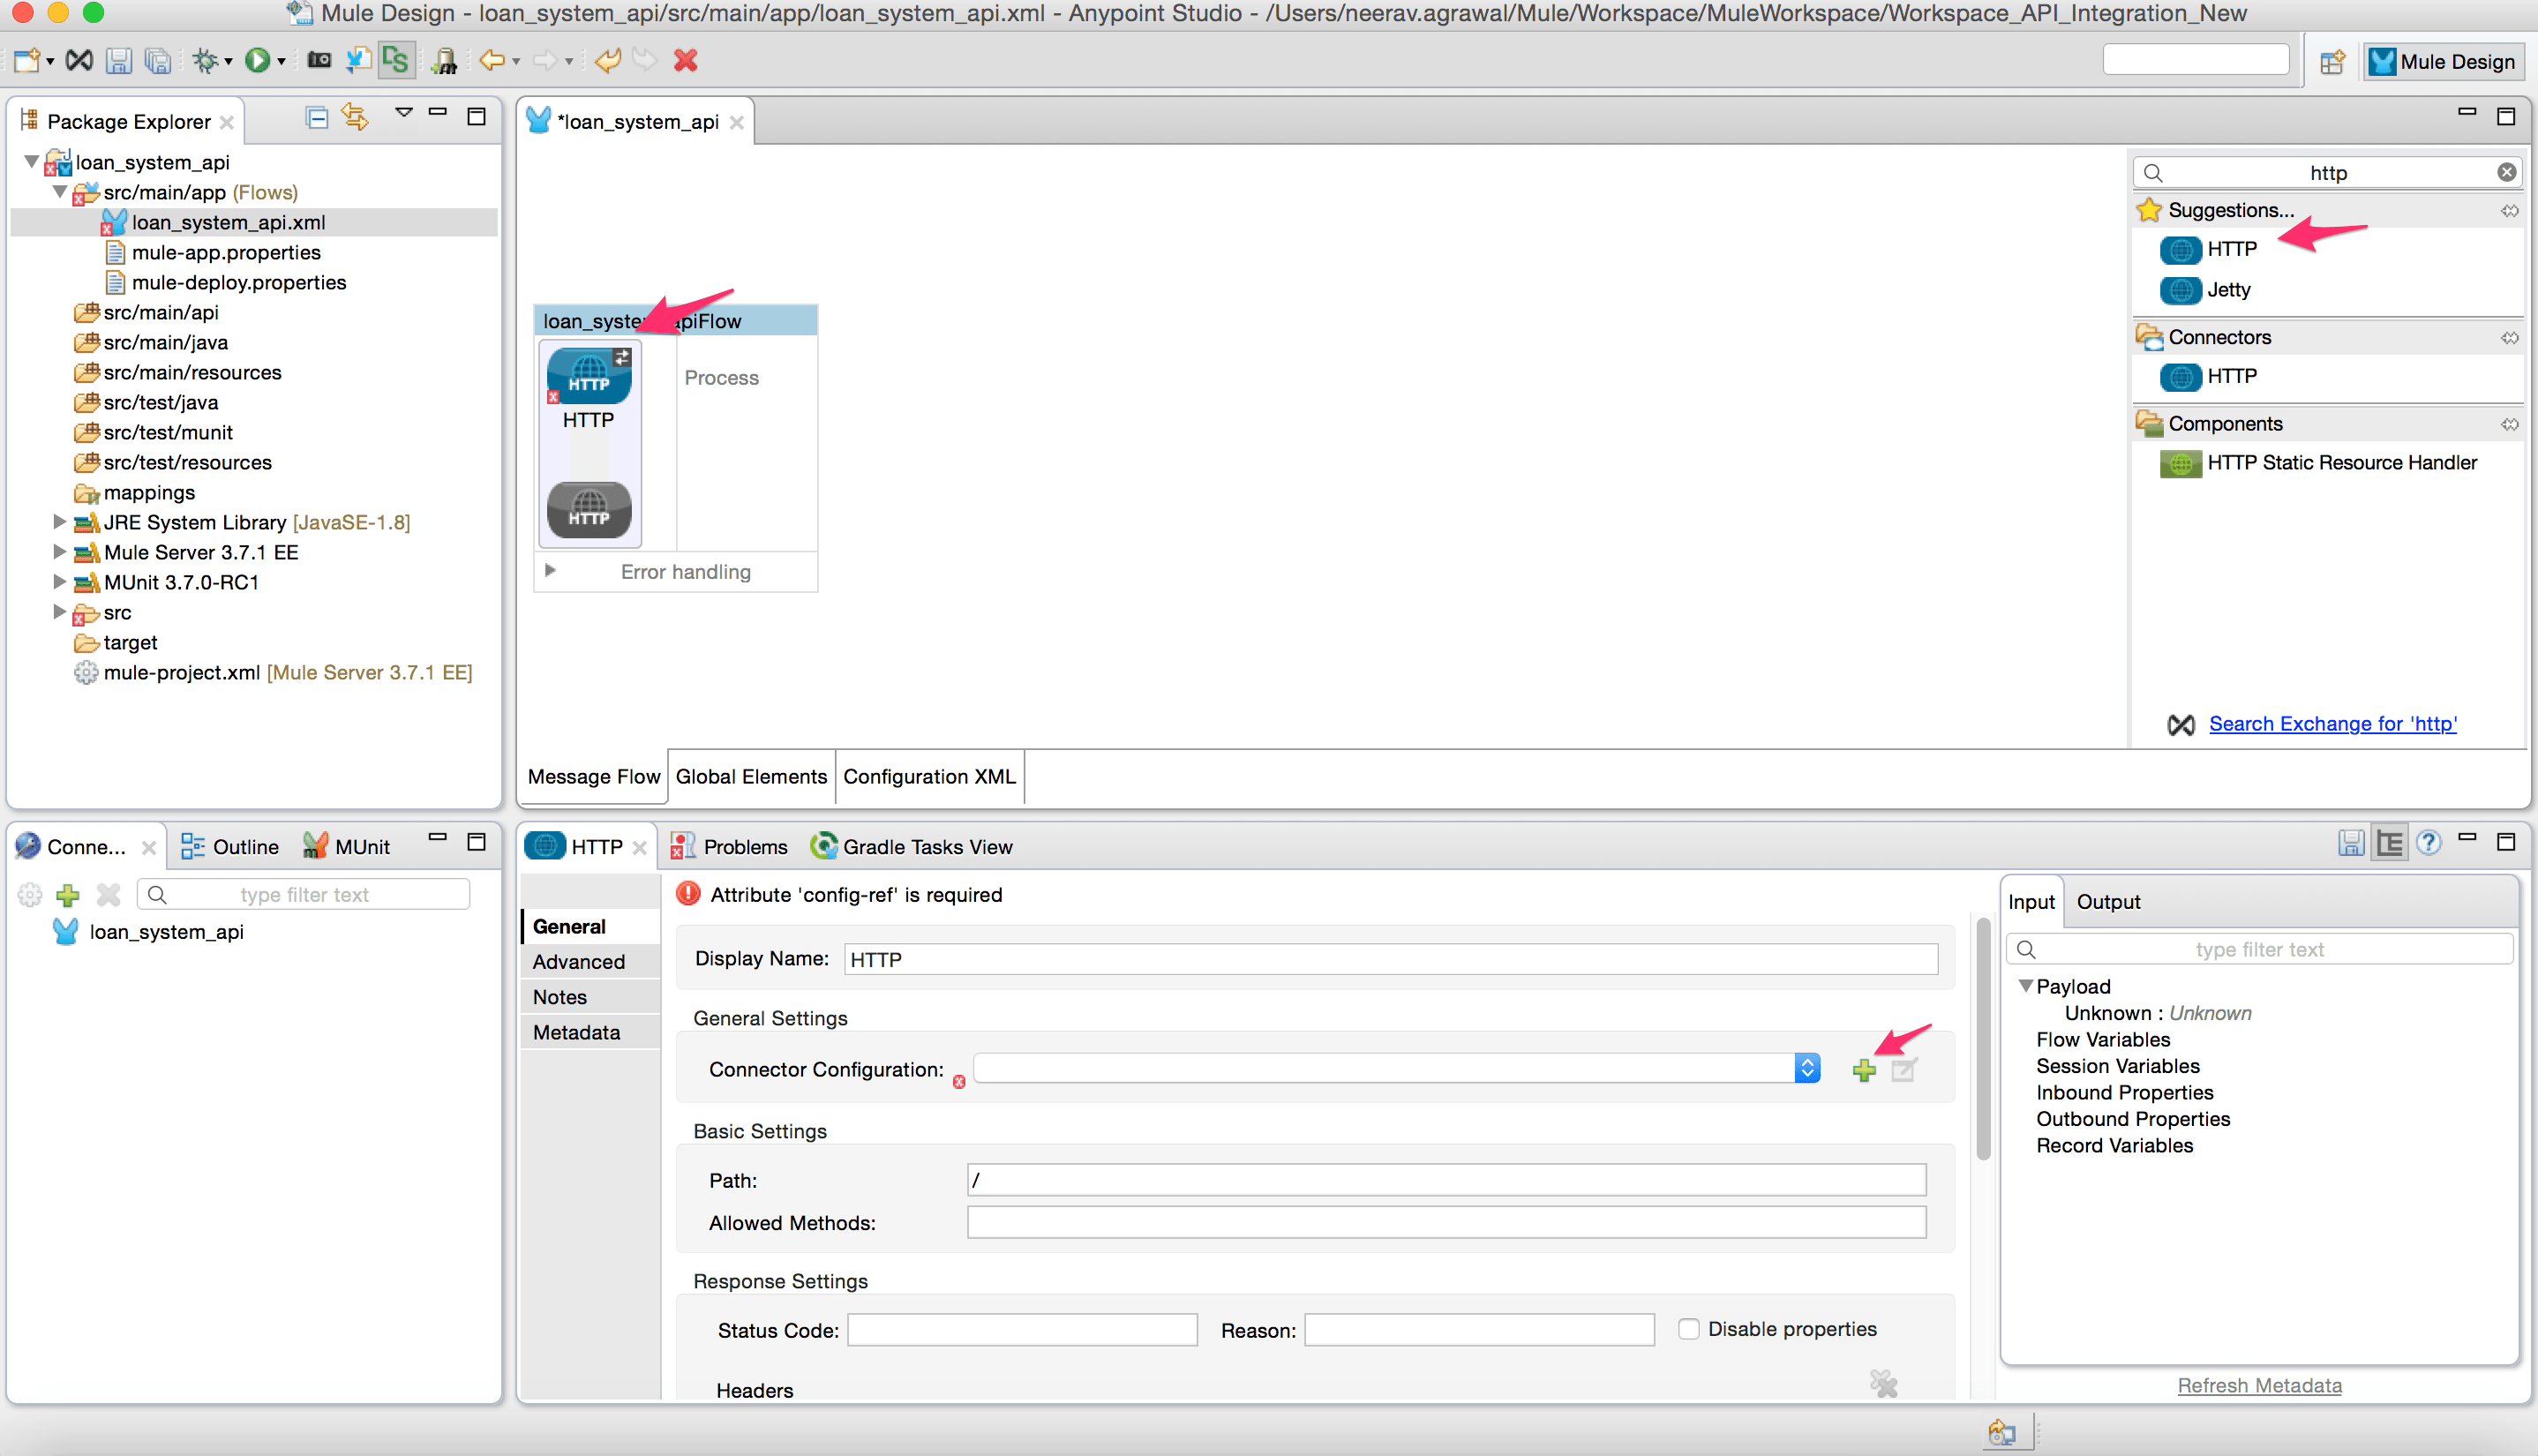
  6. Configure as below and click Ok.picture5
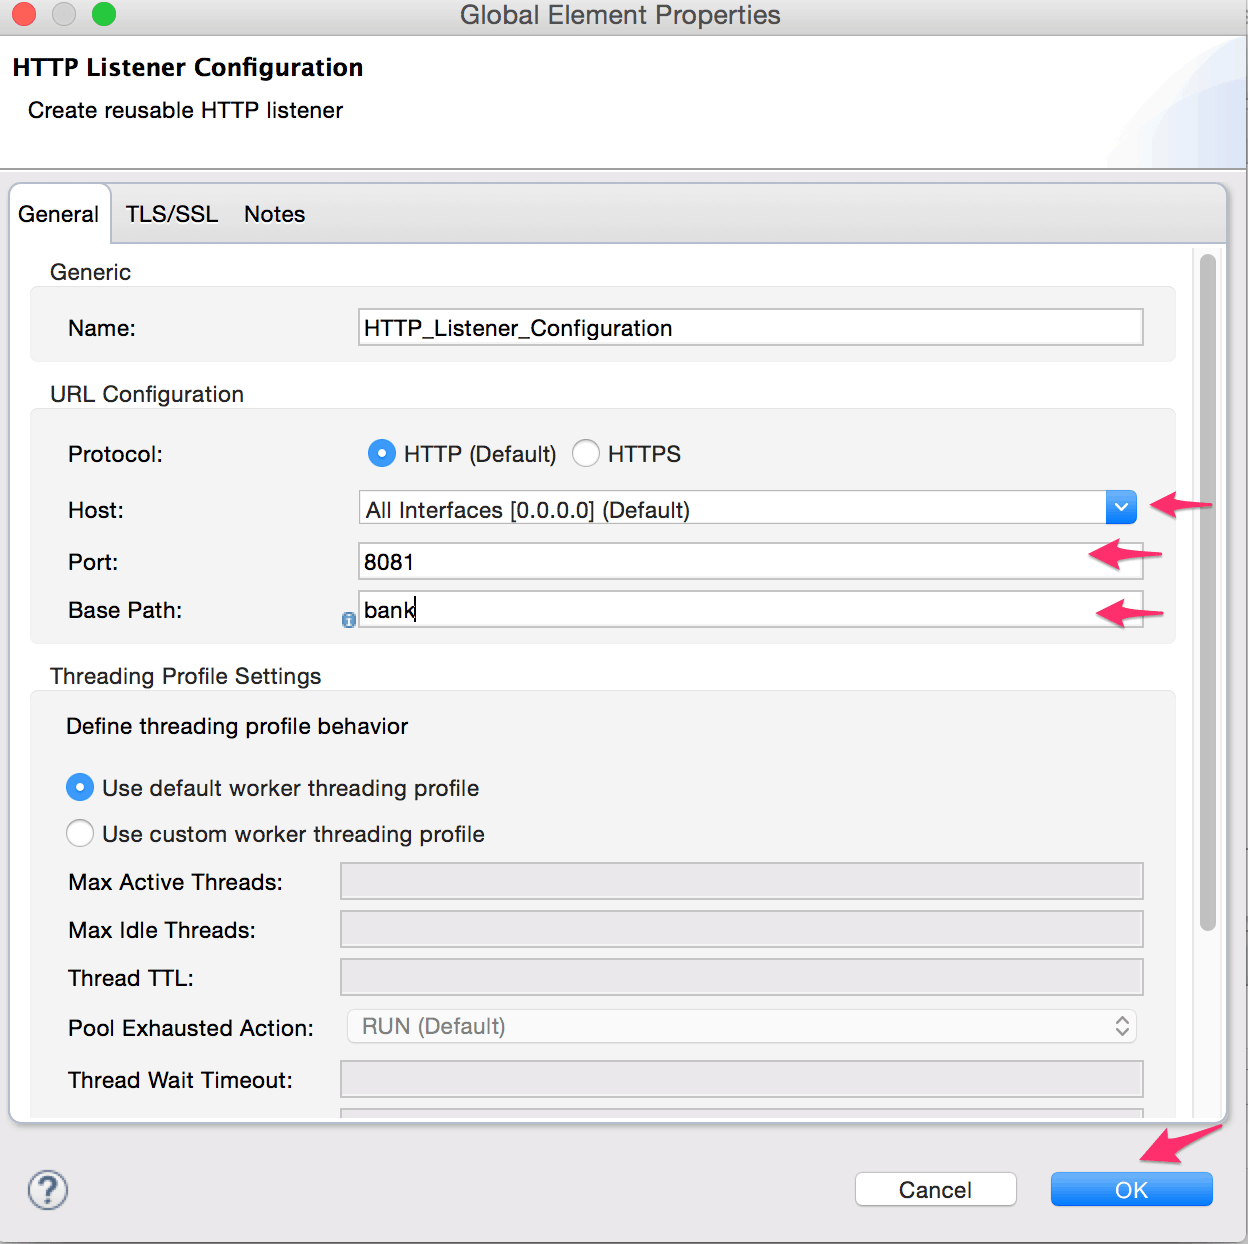
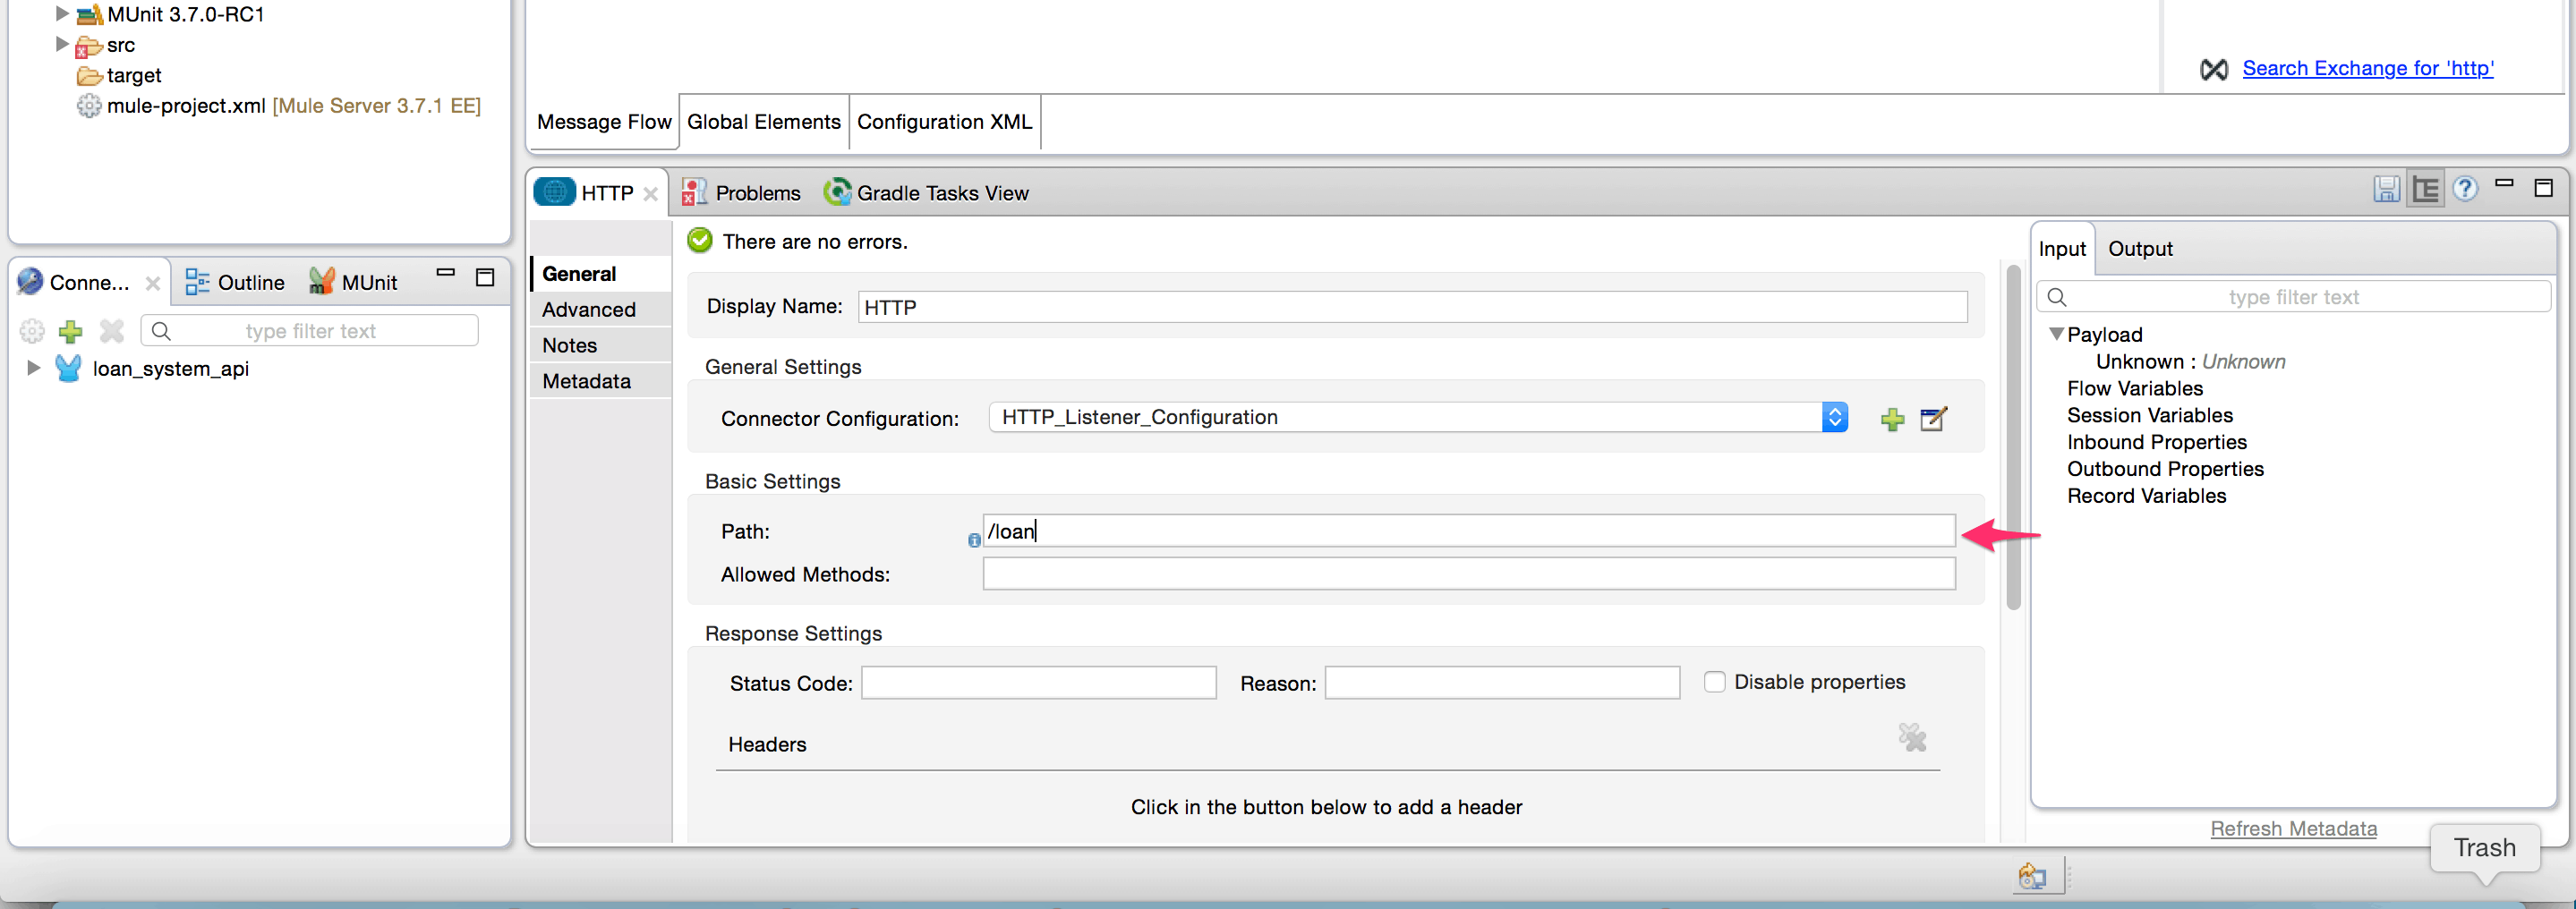
  7. Add value “loan” to the path variable in HTTP property.
    picture6
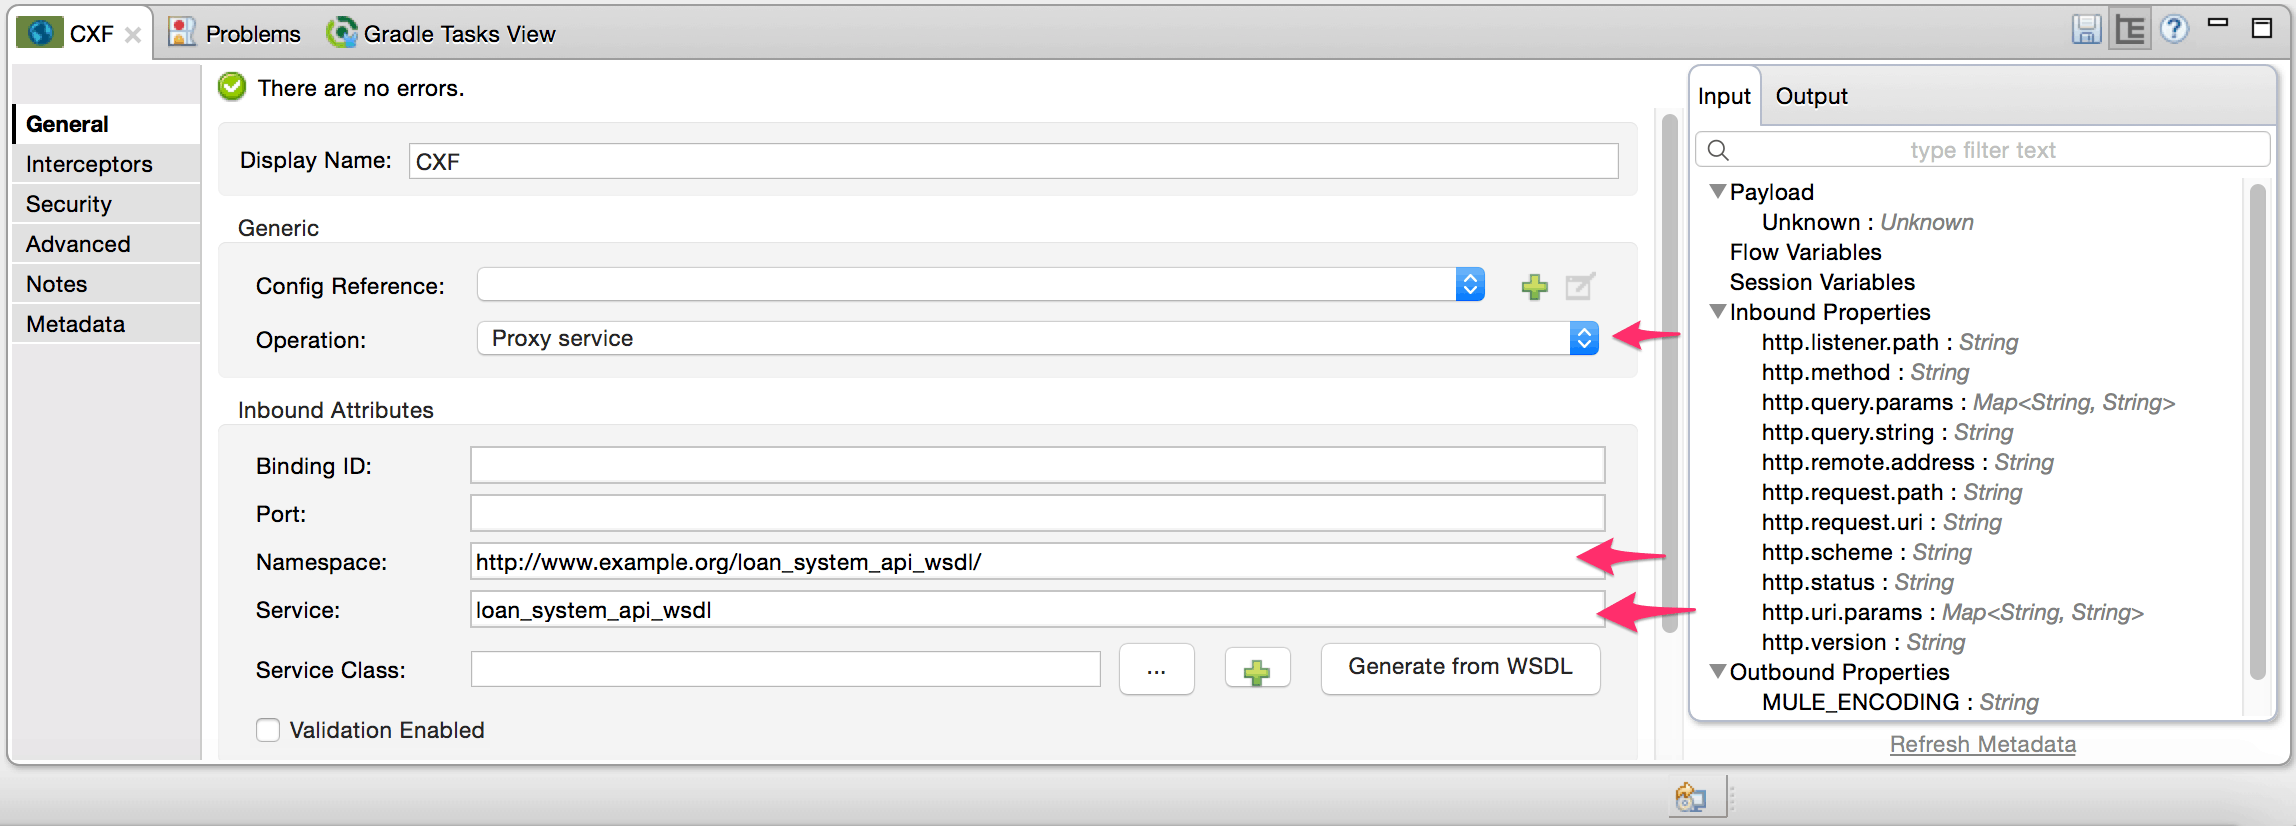
  8. Add the CXF component to the flow.
    (Here is more detail on the CXF component.)
    picture7
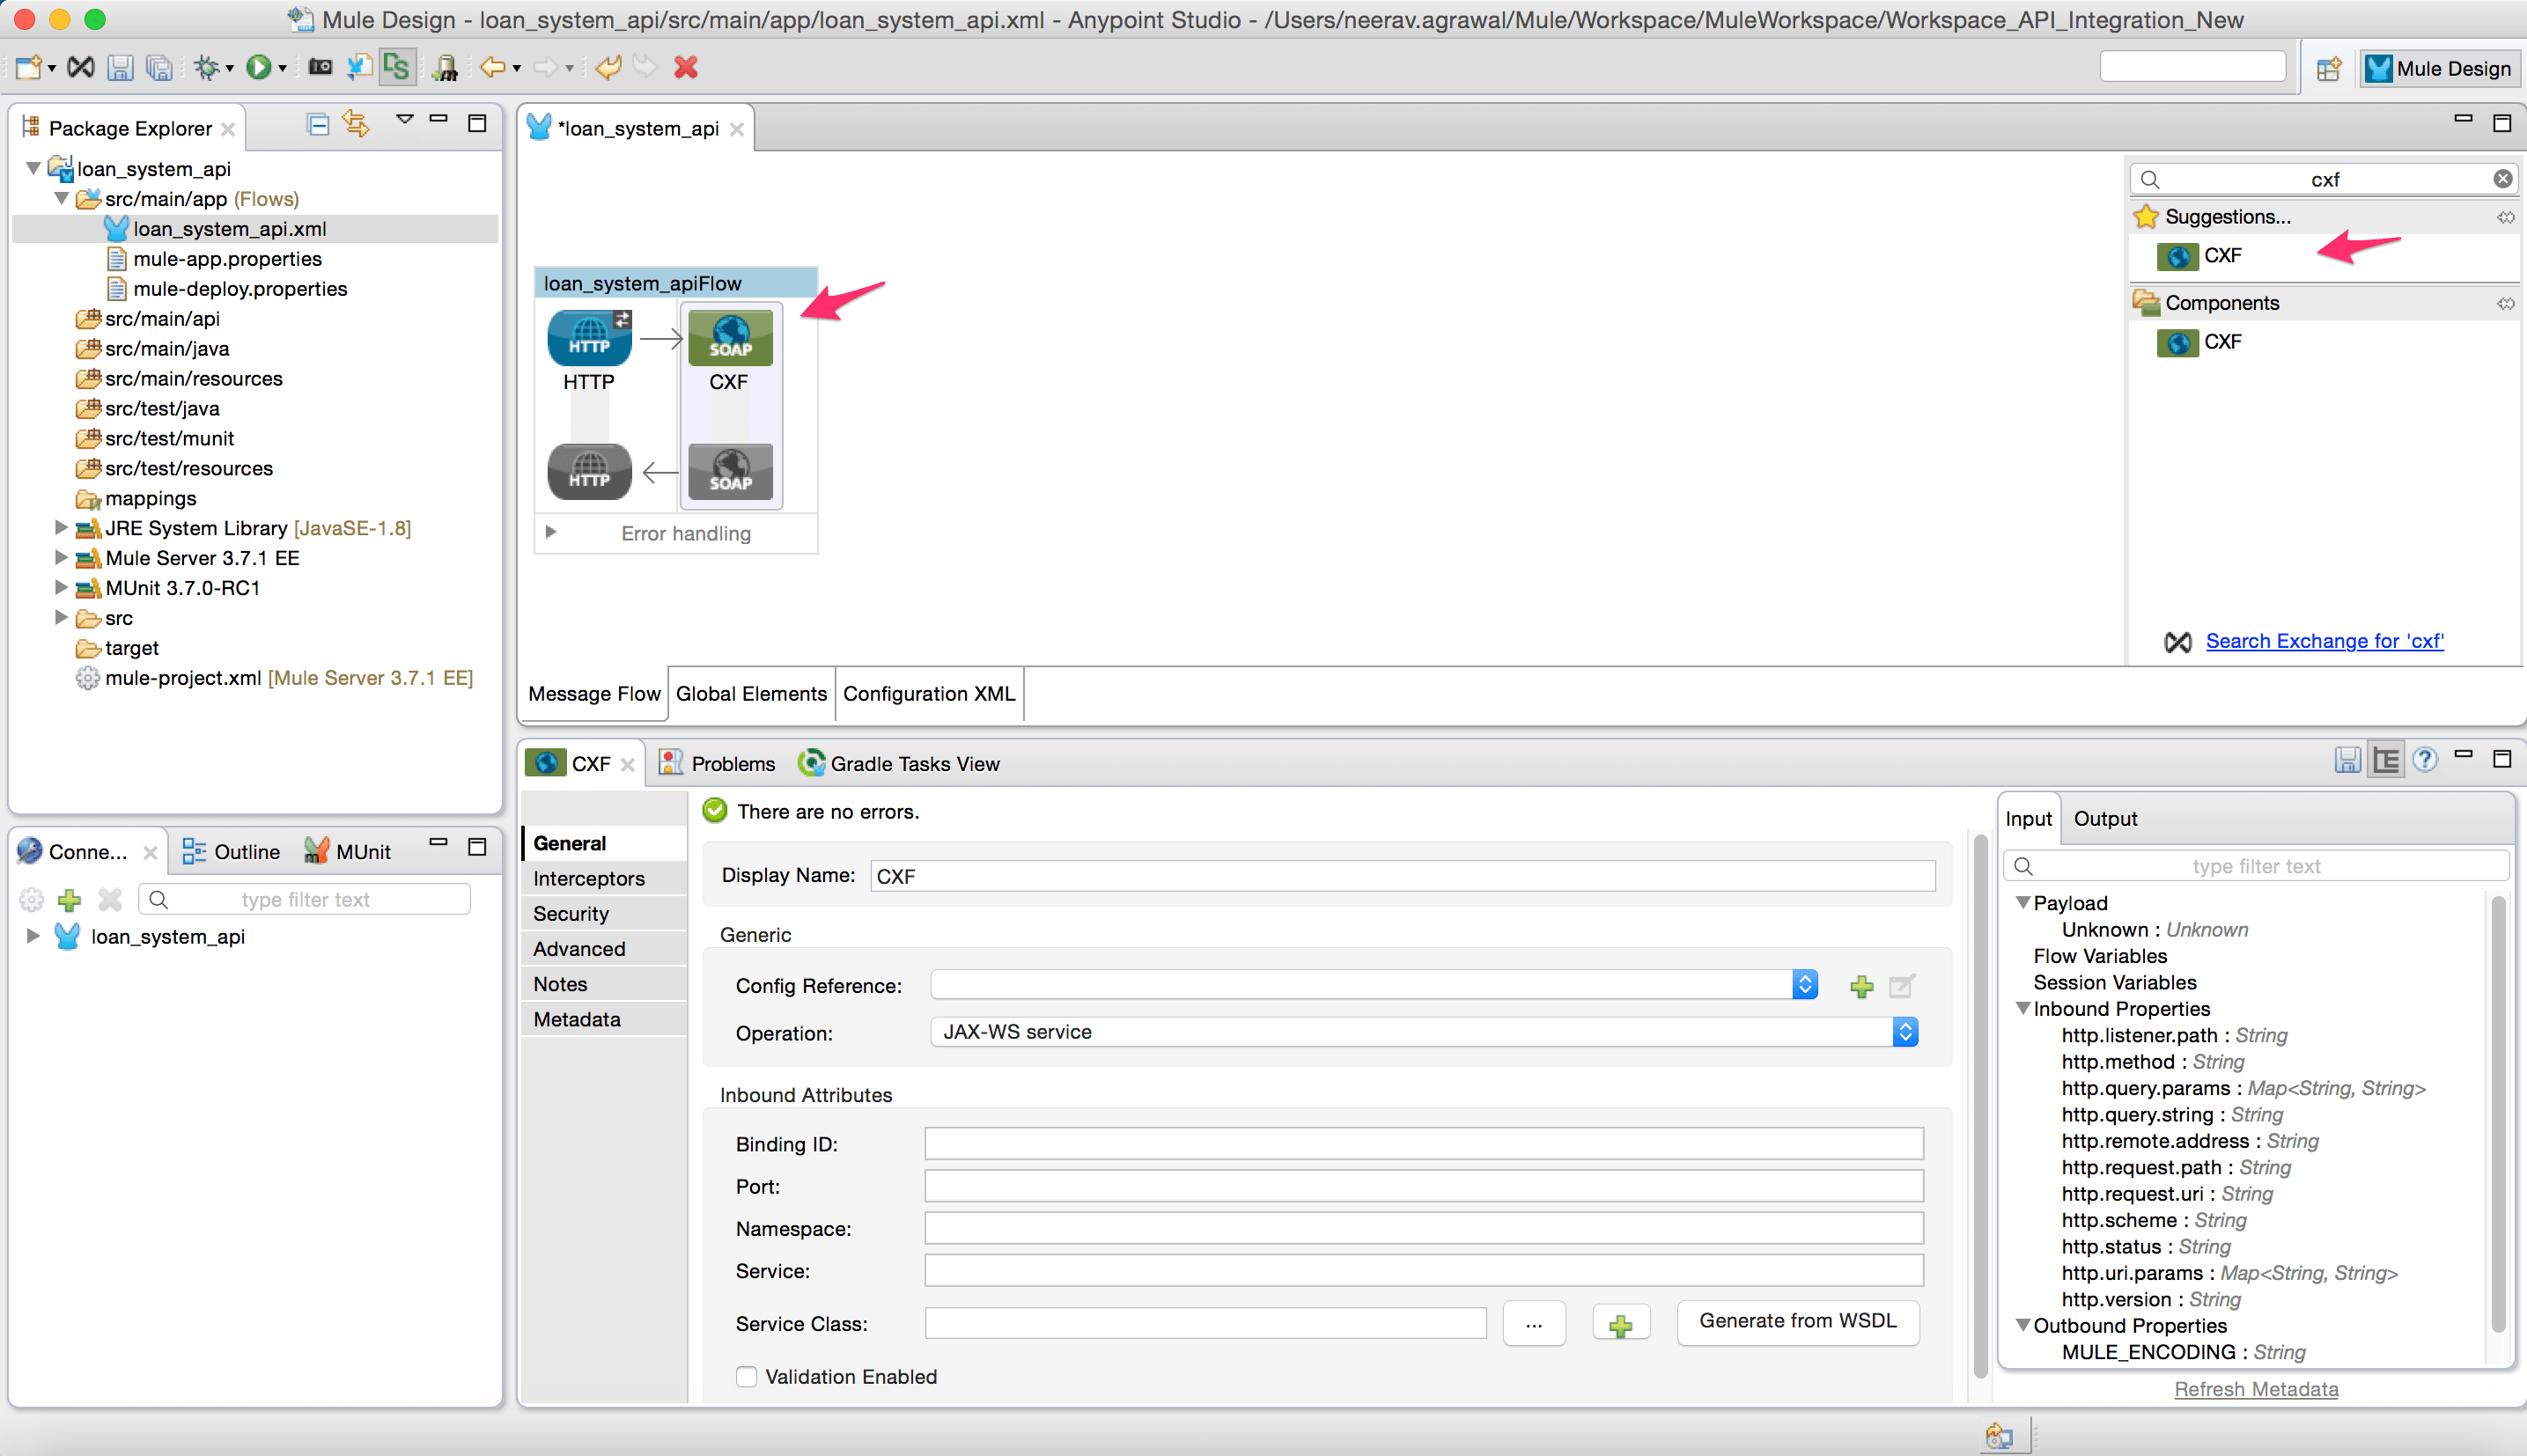
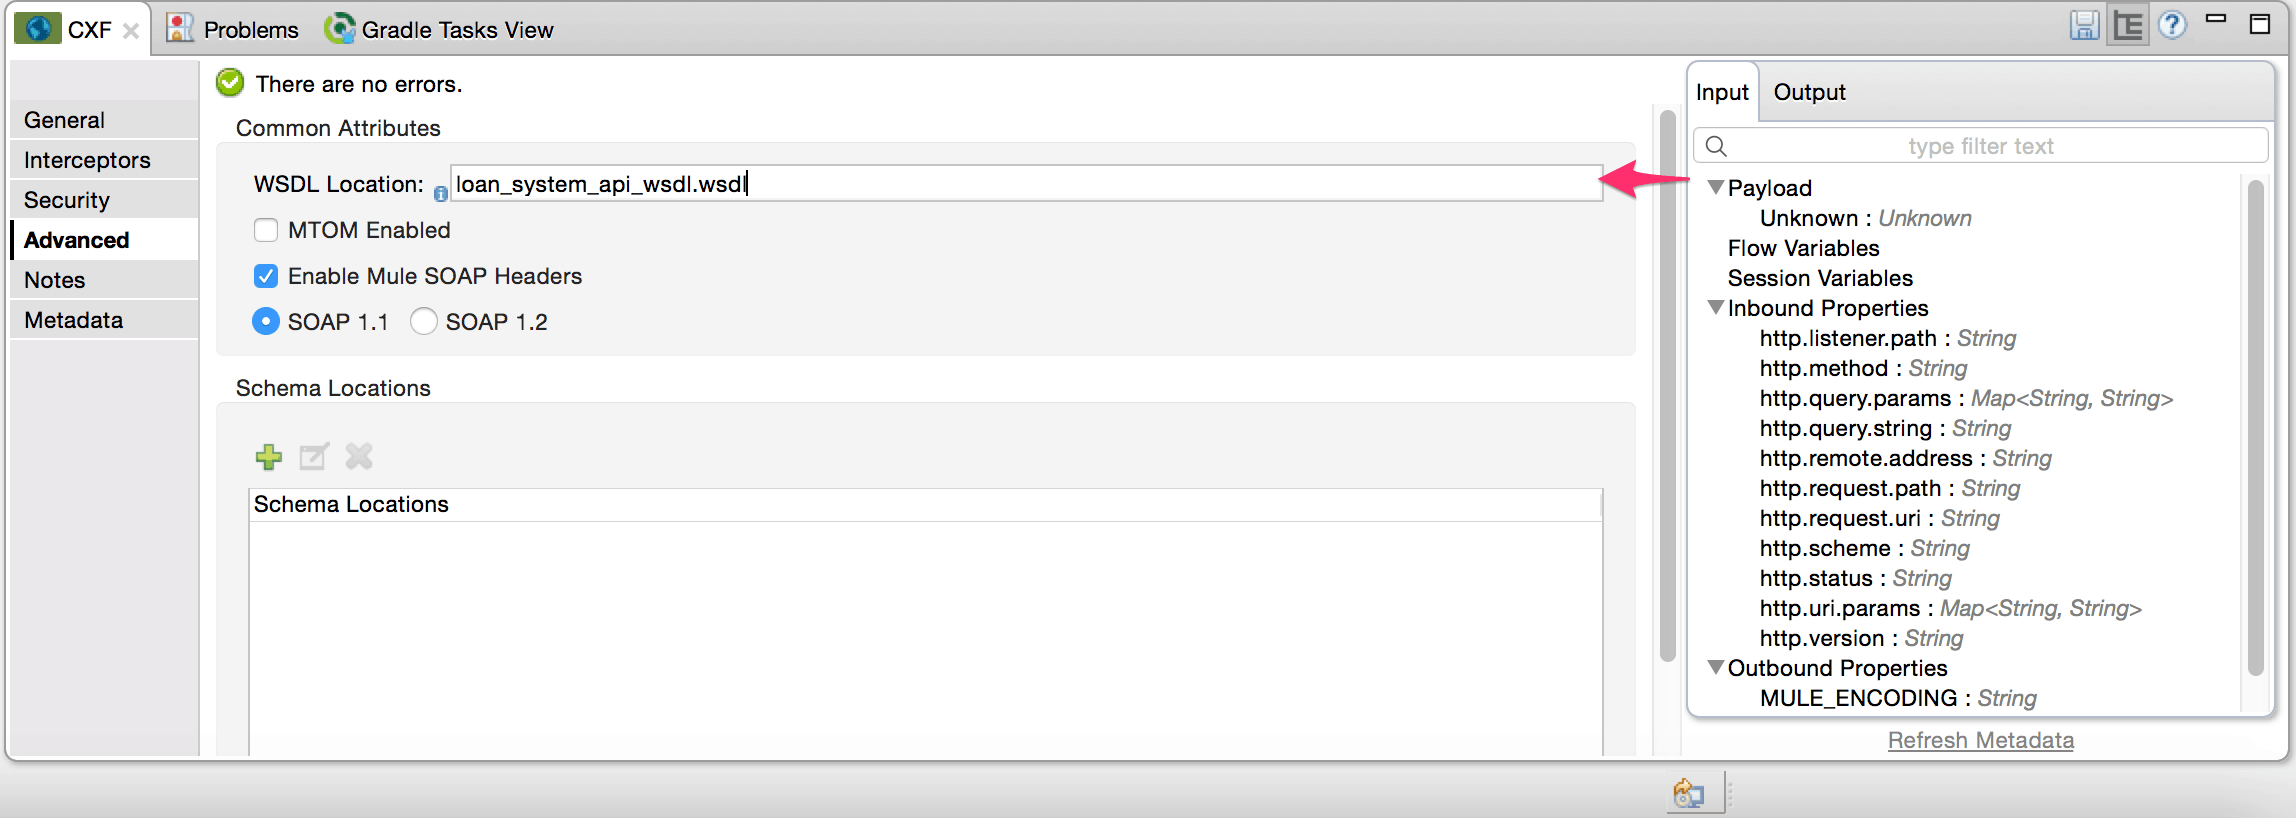
  9. Change the configurations for the CXF component to match the parameter from the WSDL. Add the WSDL location in the advanced tab.
    picture8
    picture9
  10. Add transformer “Dom to XML”.
    (Note: This transformer will convert the org.w3c.dom.Document object to XML message. This way we can apply XPath expressions to extract various values from the incoming message payload.)picture10
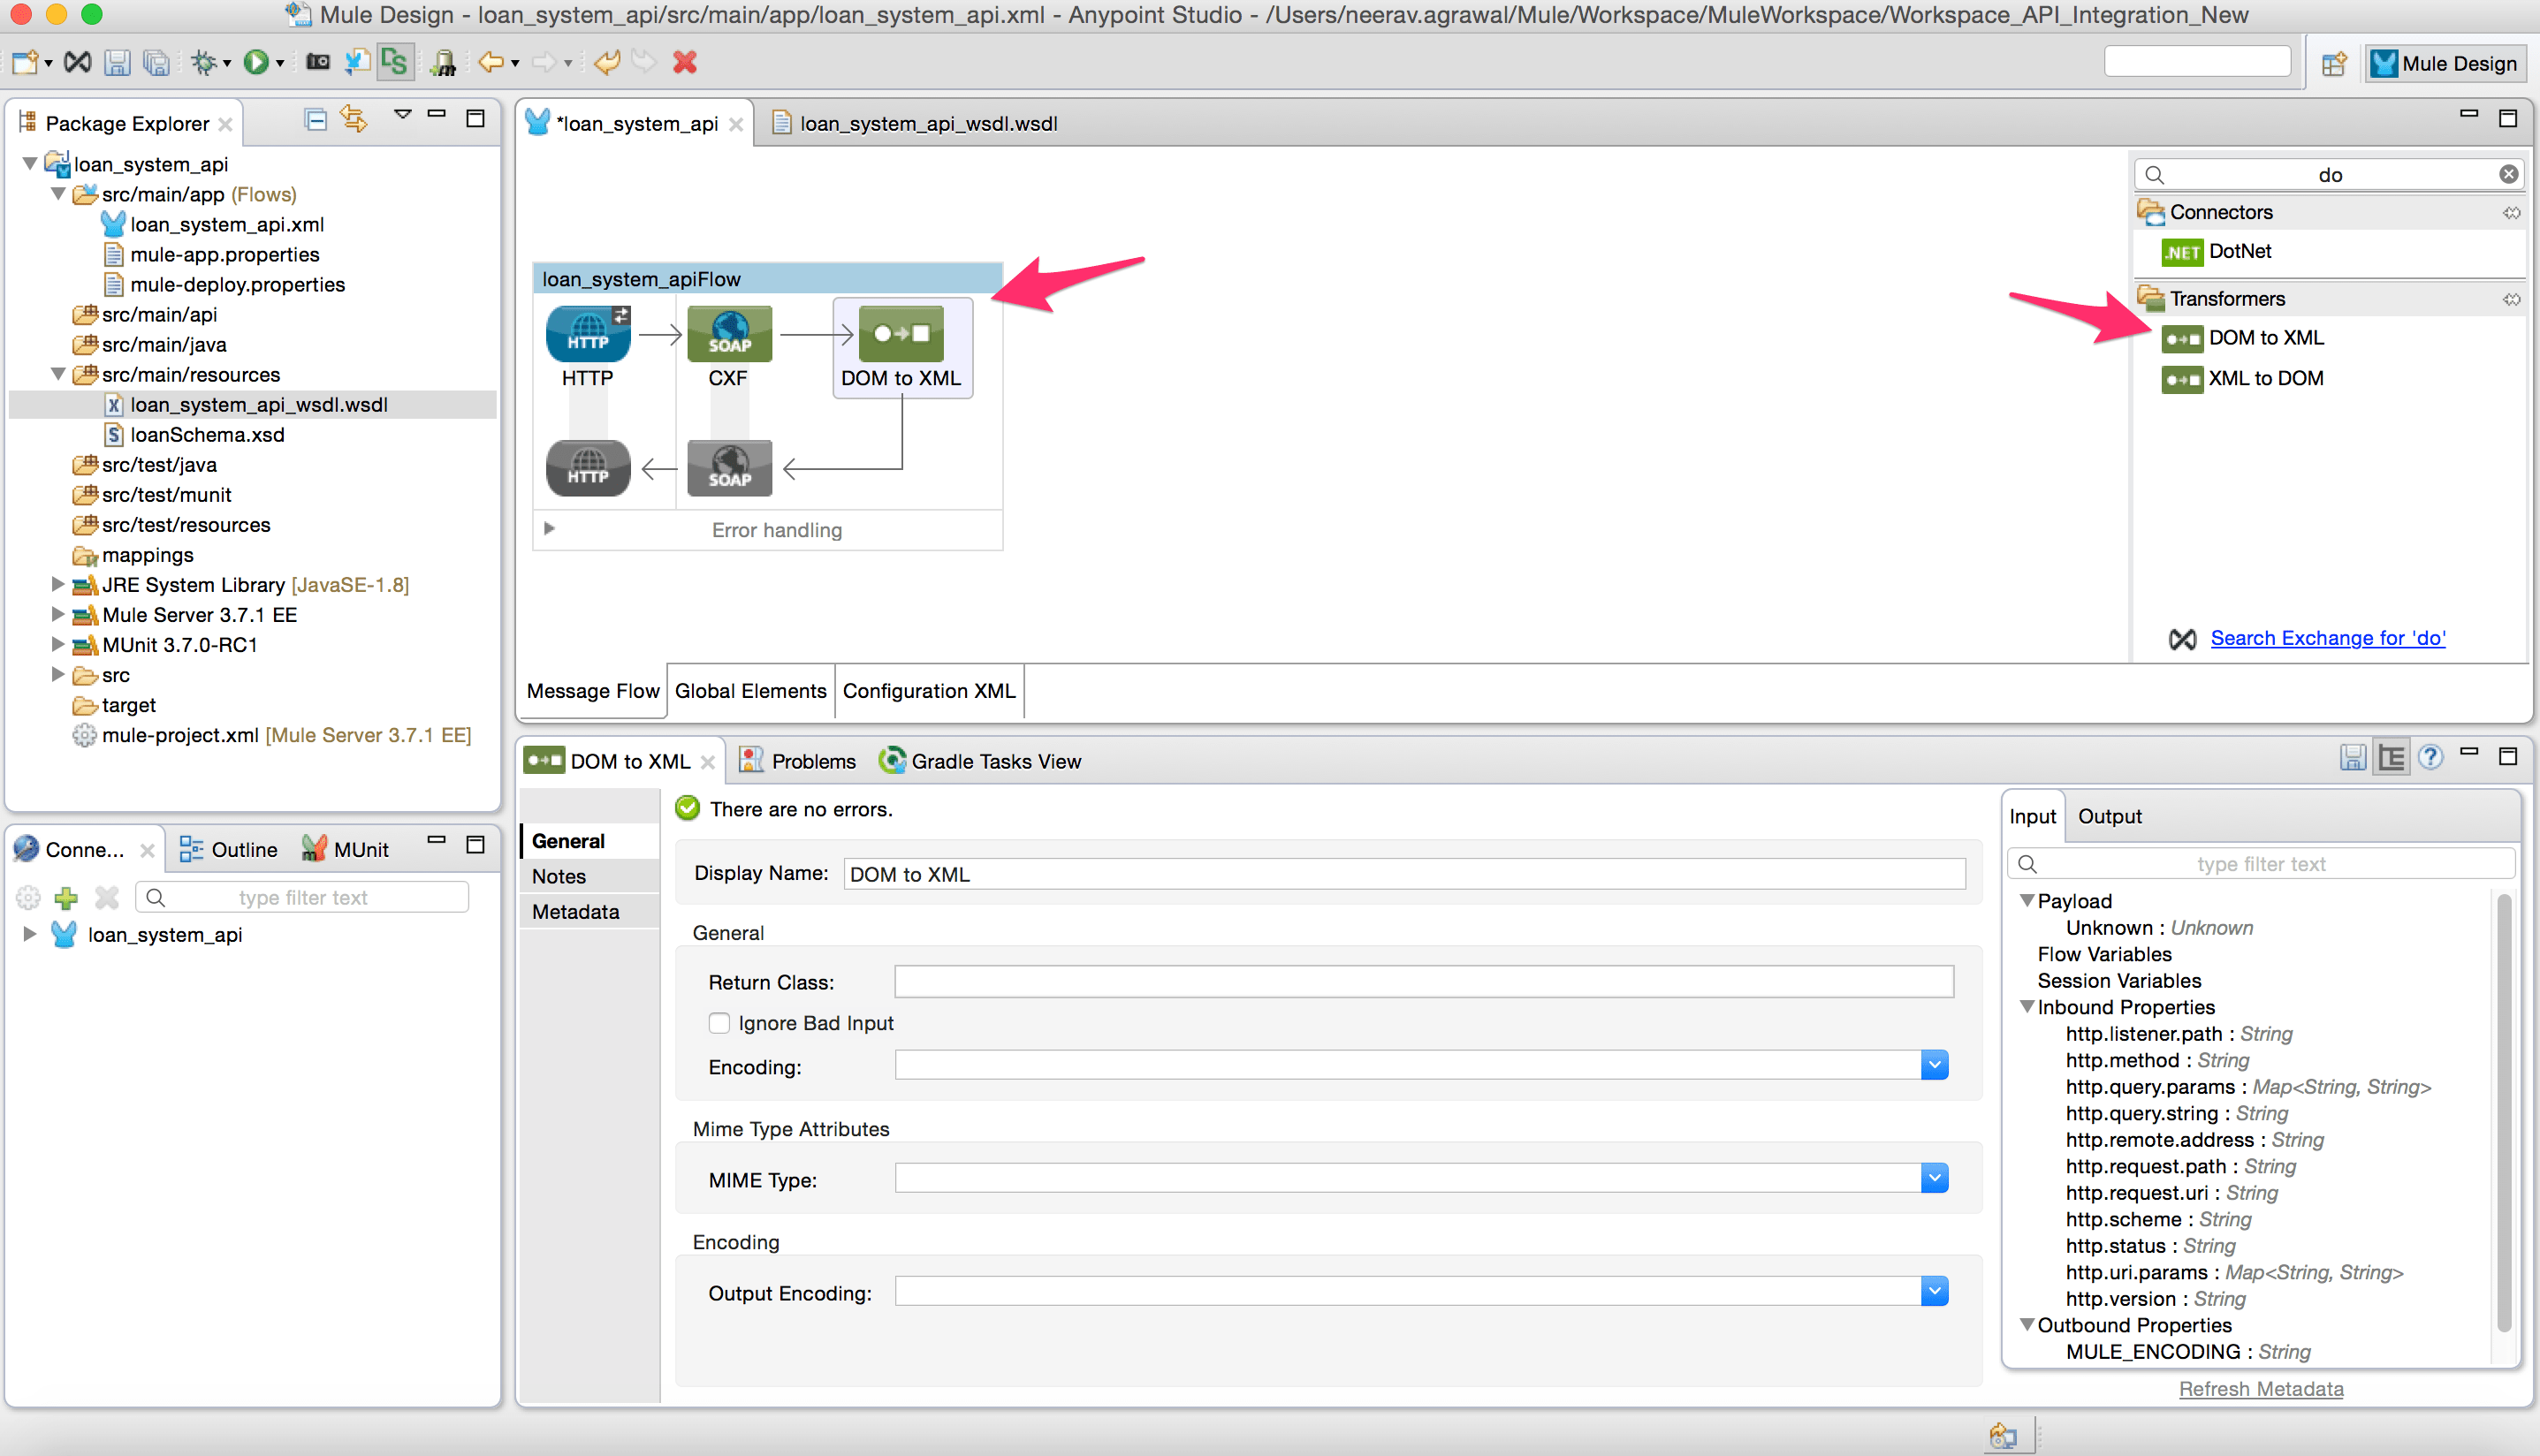
  11. To parse the XML, SOAP request message switch to the Configuration XML view and add the following.
    This namespace is obtained from the WSDL (Here are more details on how namespaces are handled in MuleSoft).
    picture11
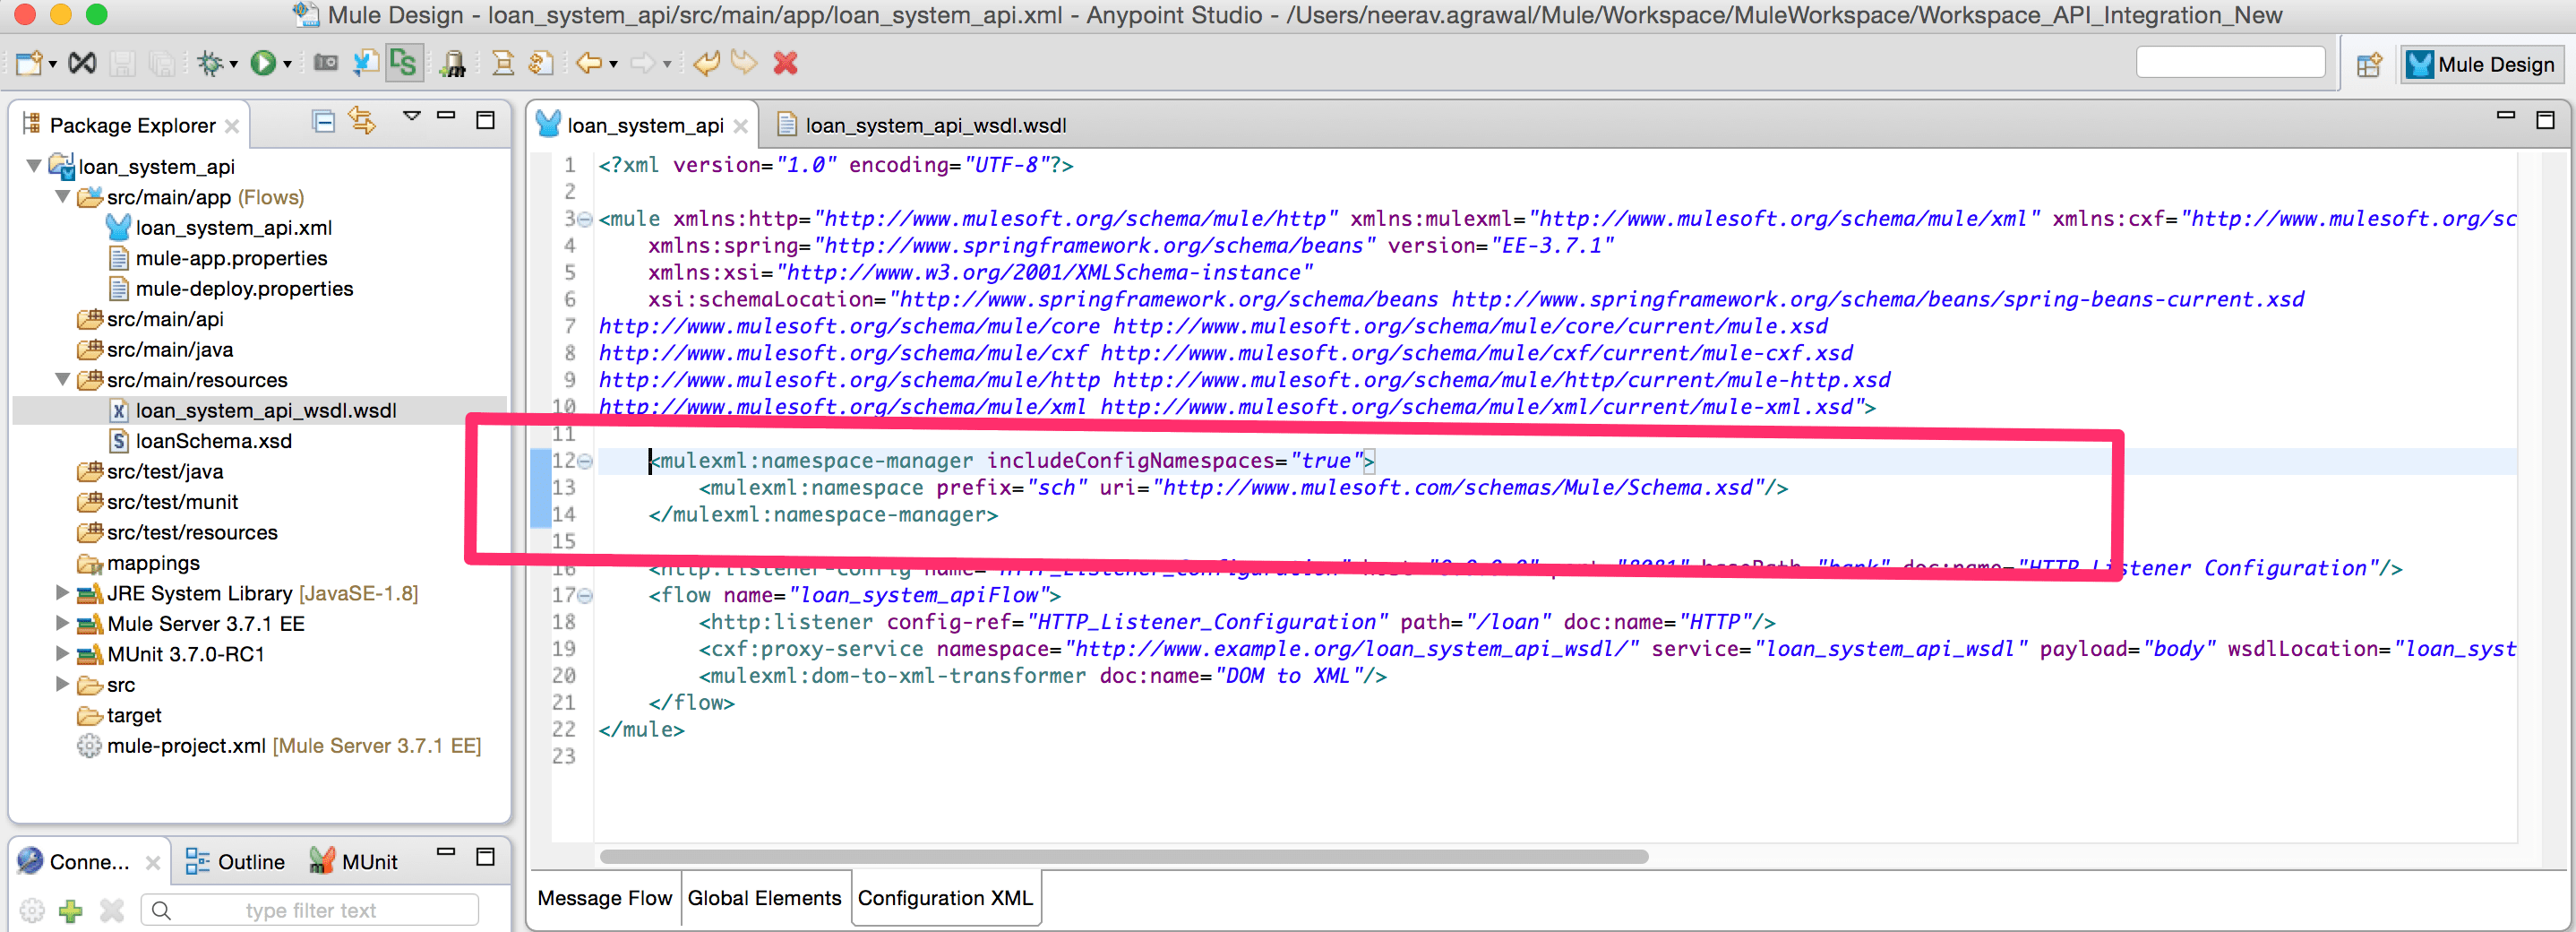
  12. Add the database connector to look up the table.
    picture12
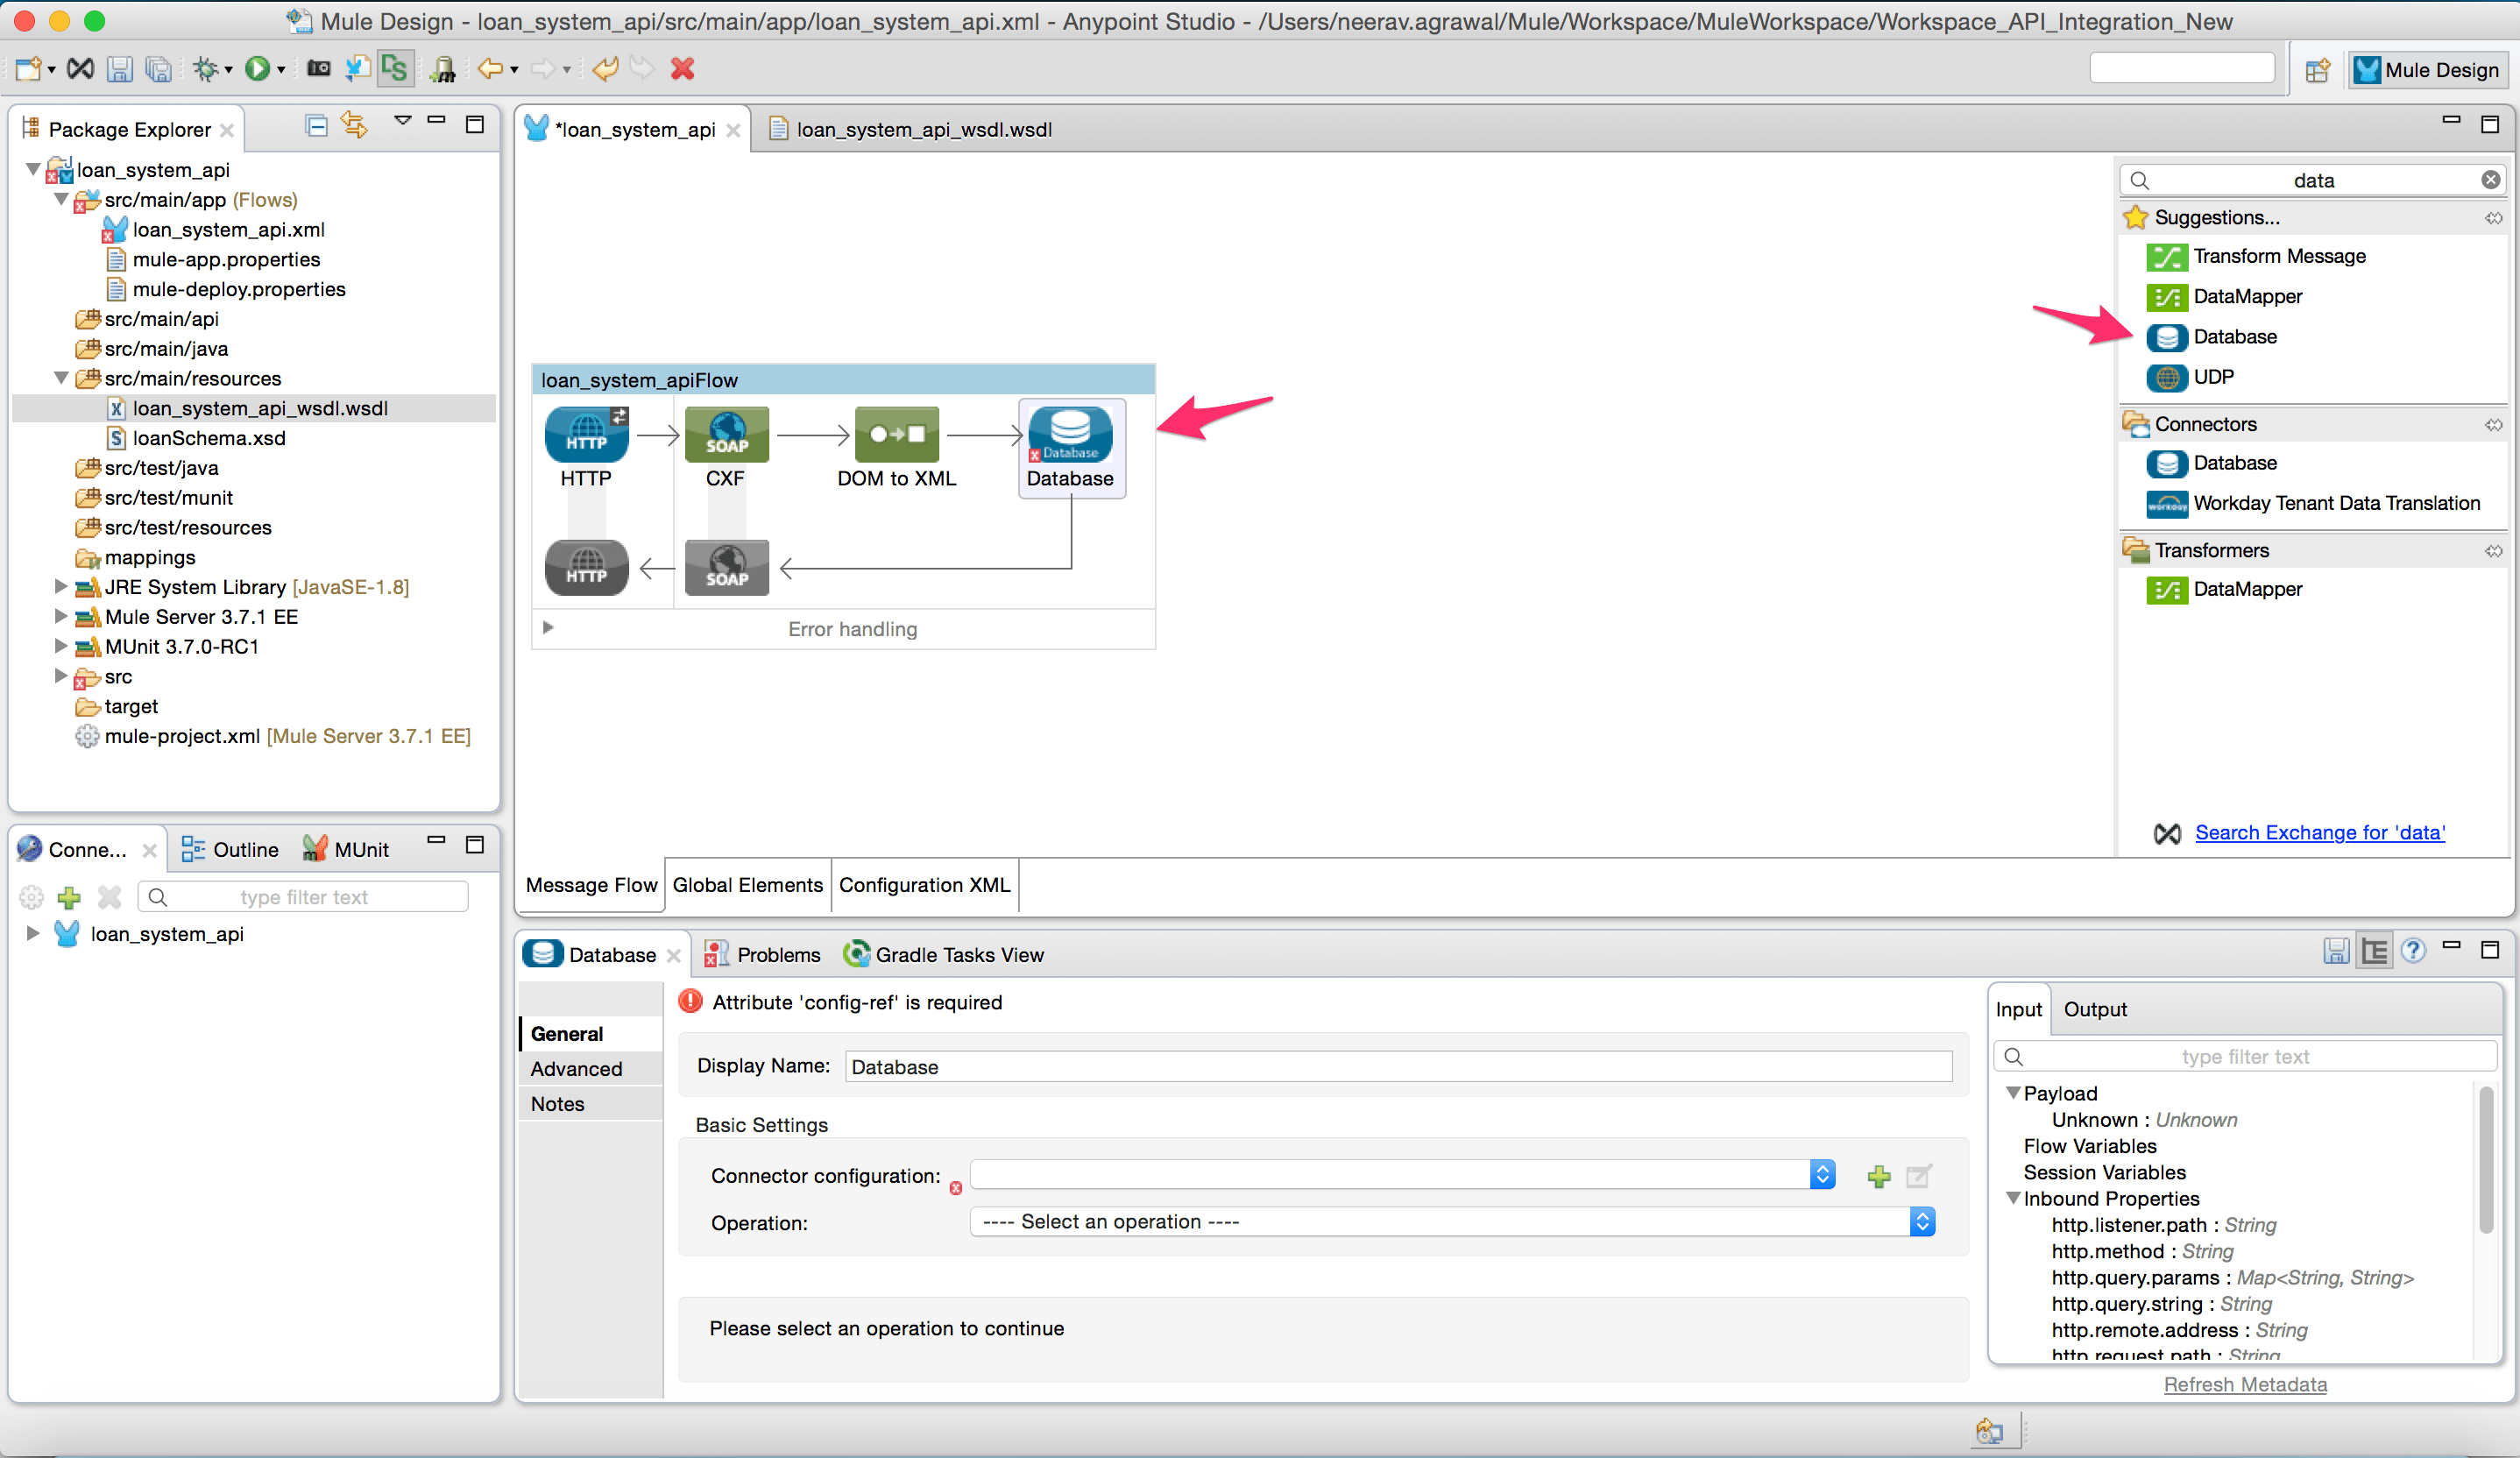
  13. Configure the database with all the parameters.
  14. Configure the database connector property with the following select query by using the XPath query to extract the input parameter from the request payload.select * from loan where loan_id = #[xpath3("sch:getLoanRequest/sch:loanId")]  picture13                      
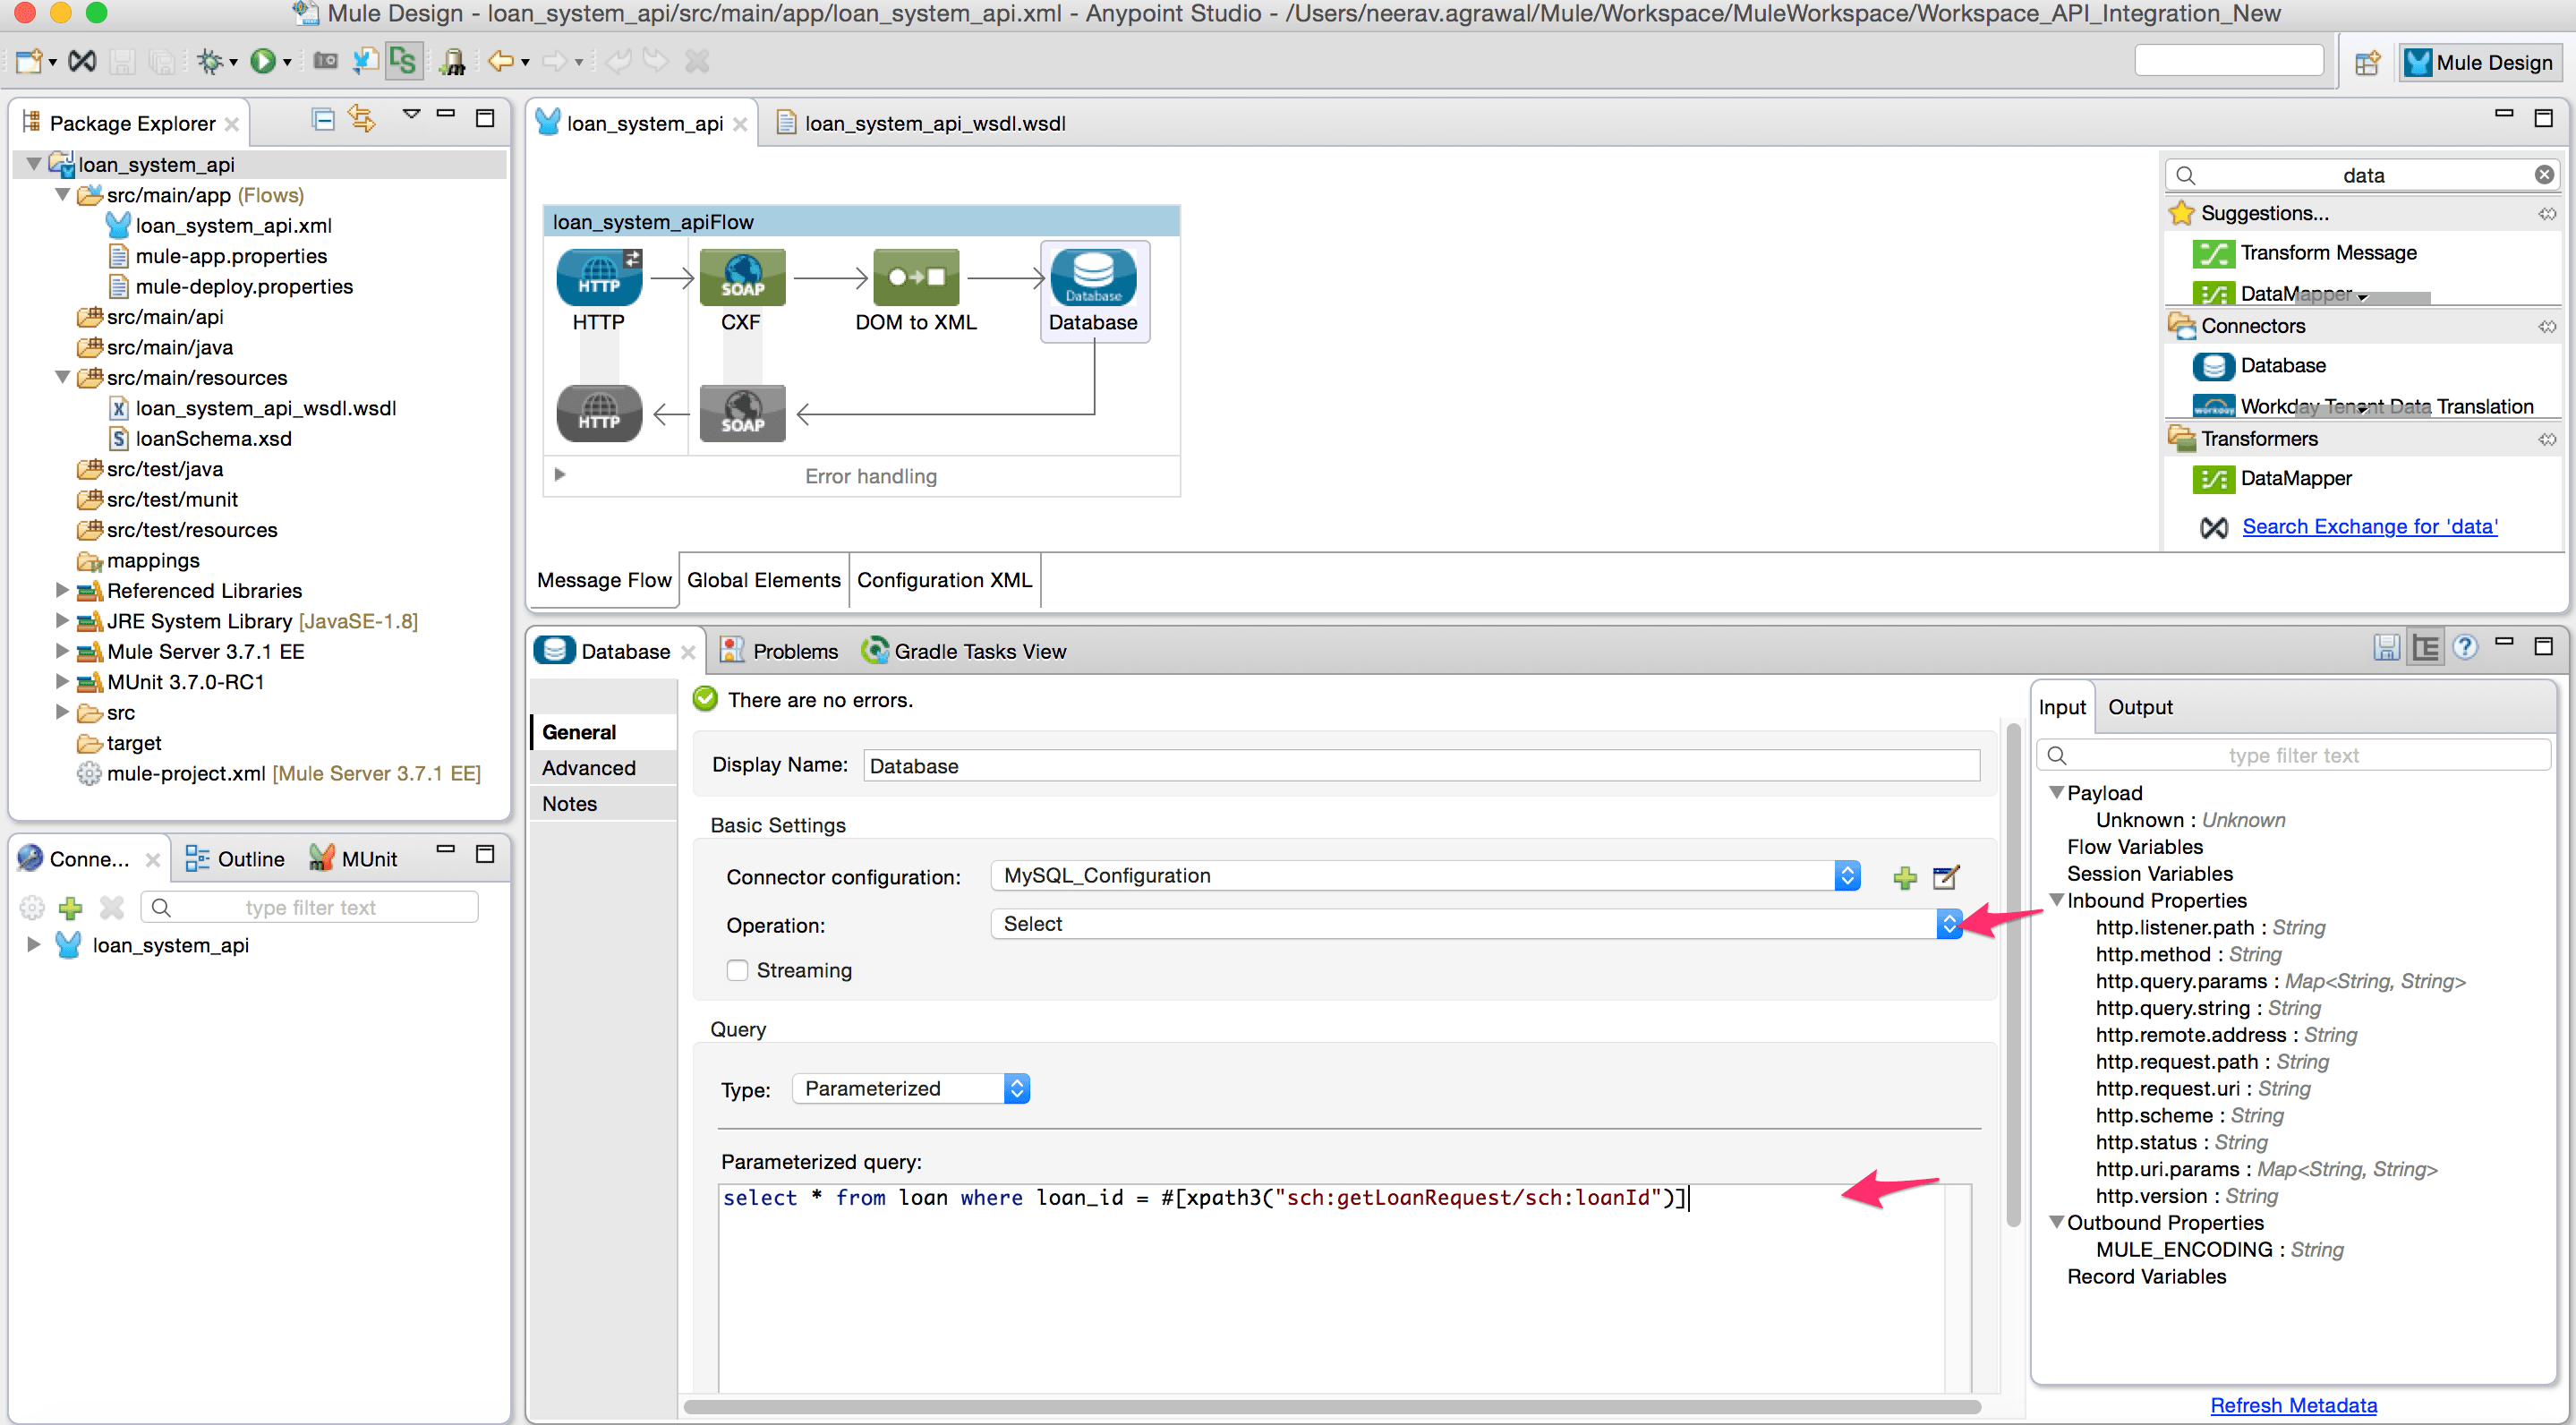
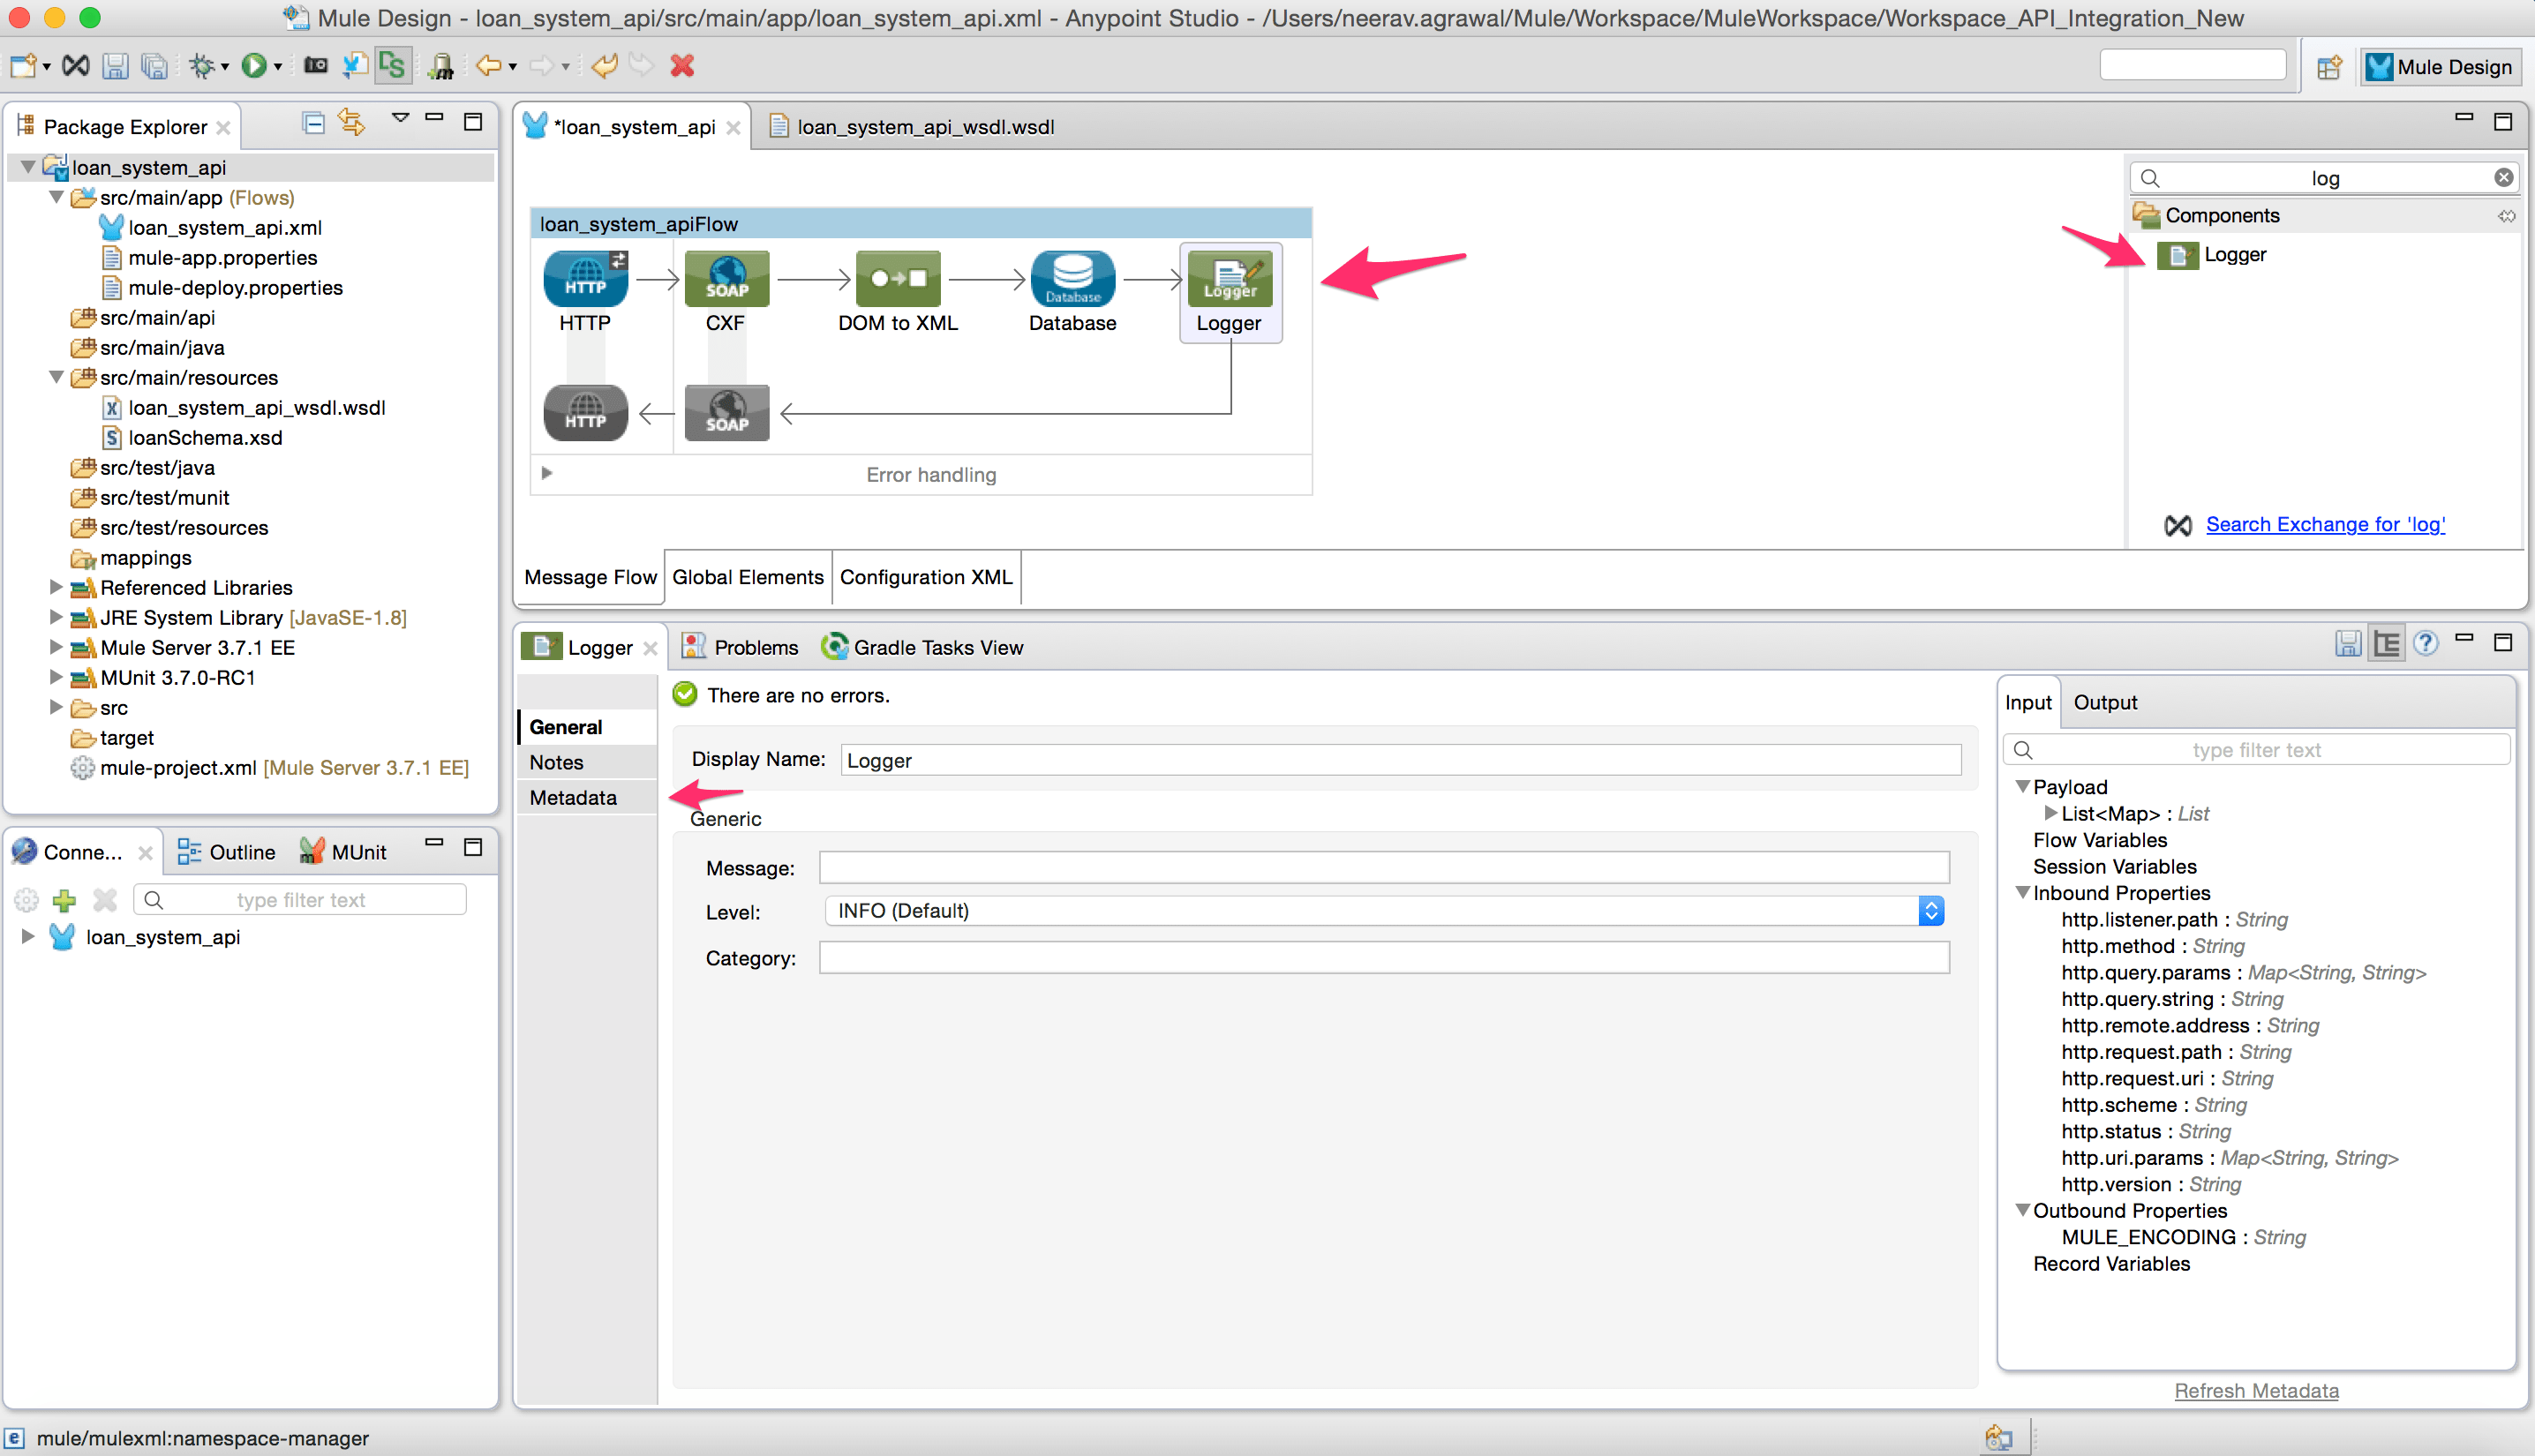
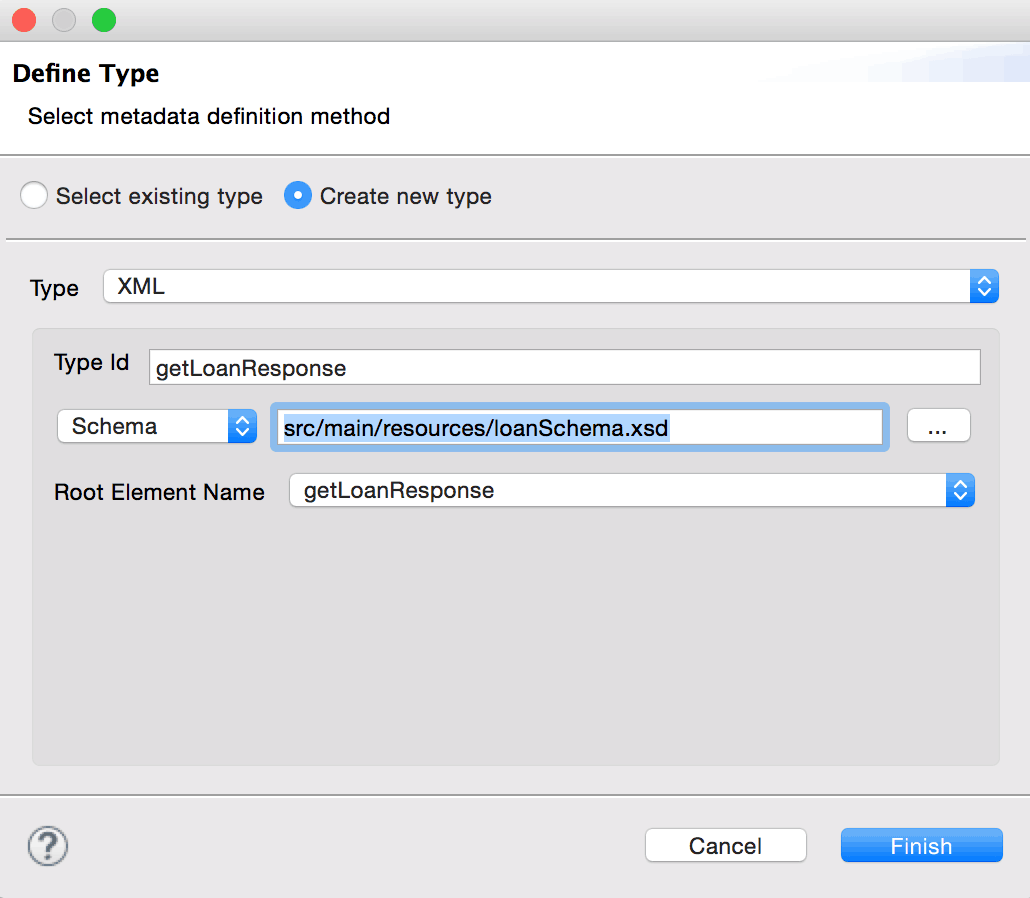
  15. Add a logger component. Configure the metadata of the logger component with the schema object of the SOAP response message. This is done to assist with data mapping in the next step.picture14picture15
    picture24
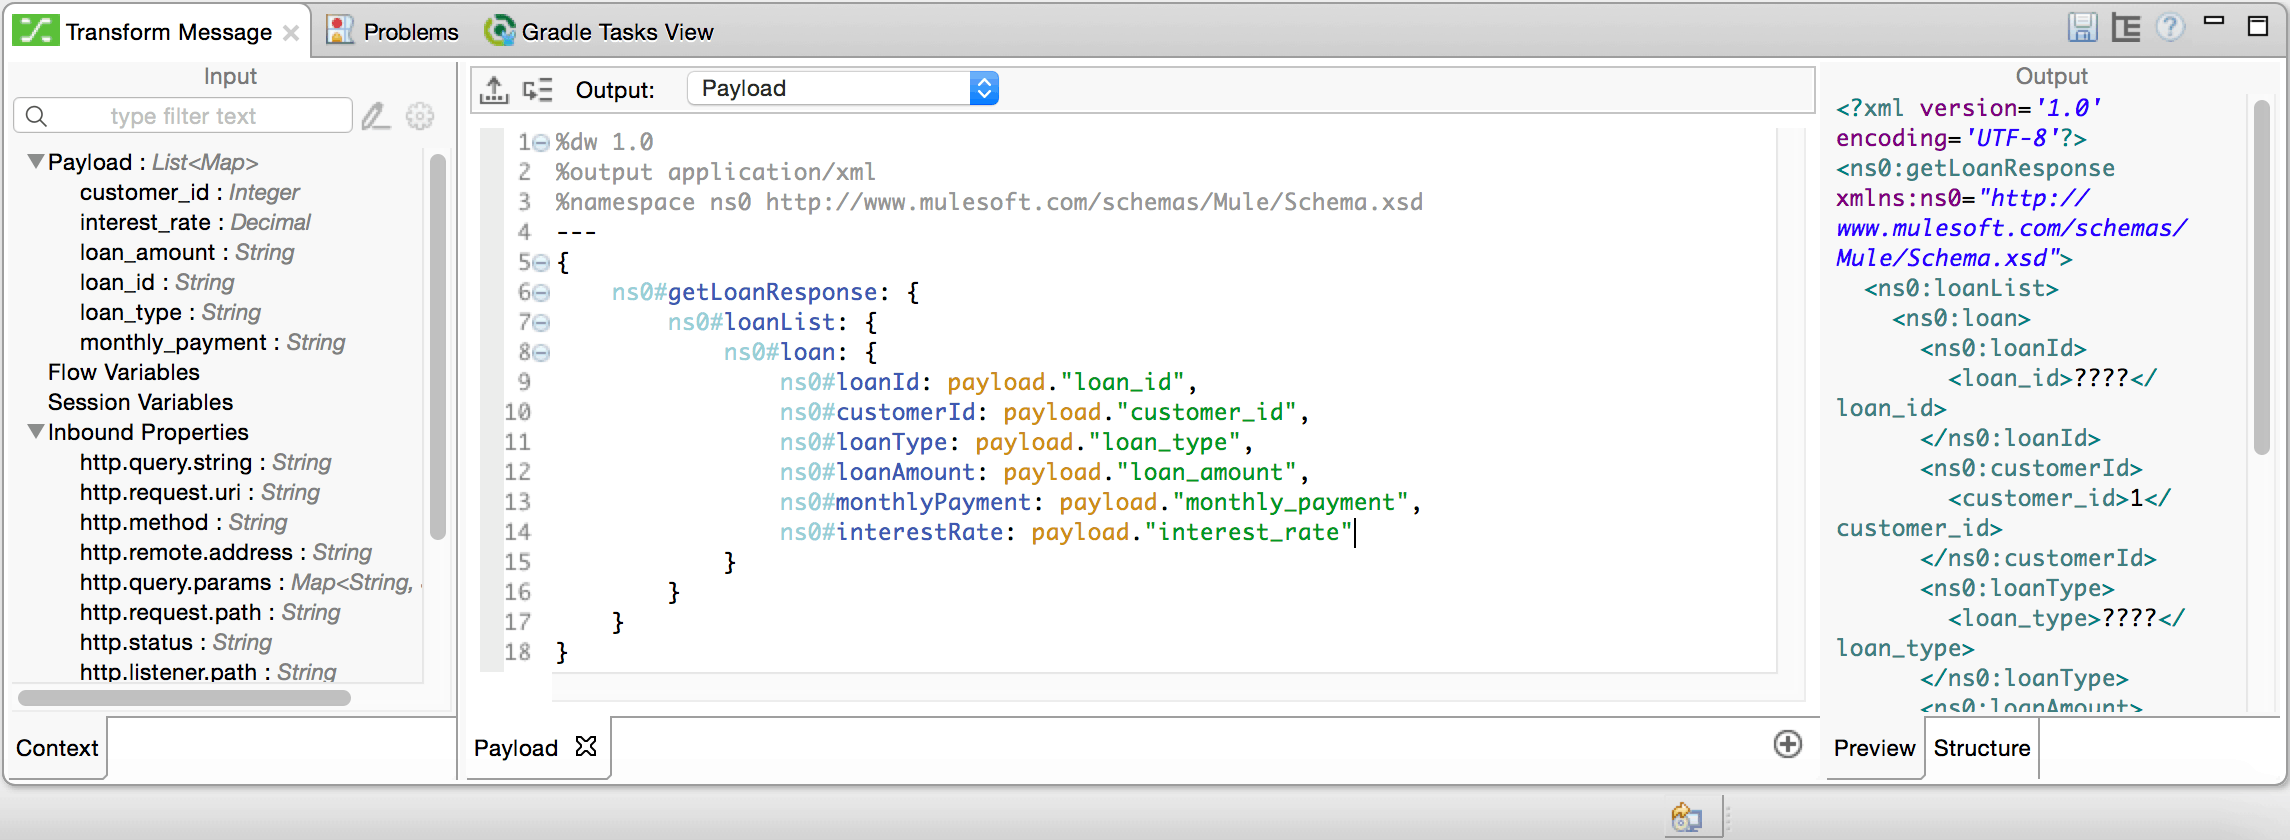
  16. Add the component “Transform Message” in between the database connector and logger (Here is more detail on Transform Message).picture17
  17. To see all the fields click the button to show the scaffold output structure.
    picture18
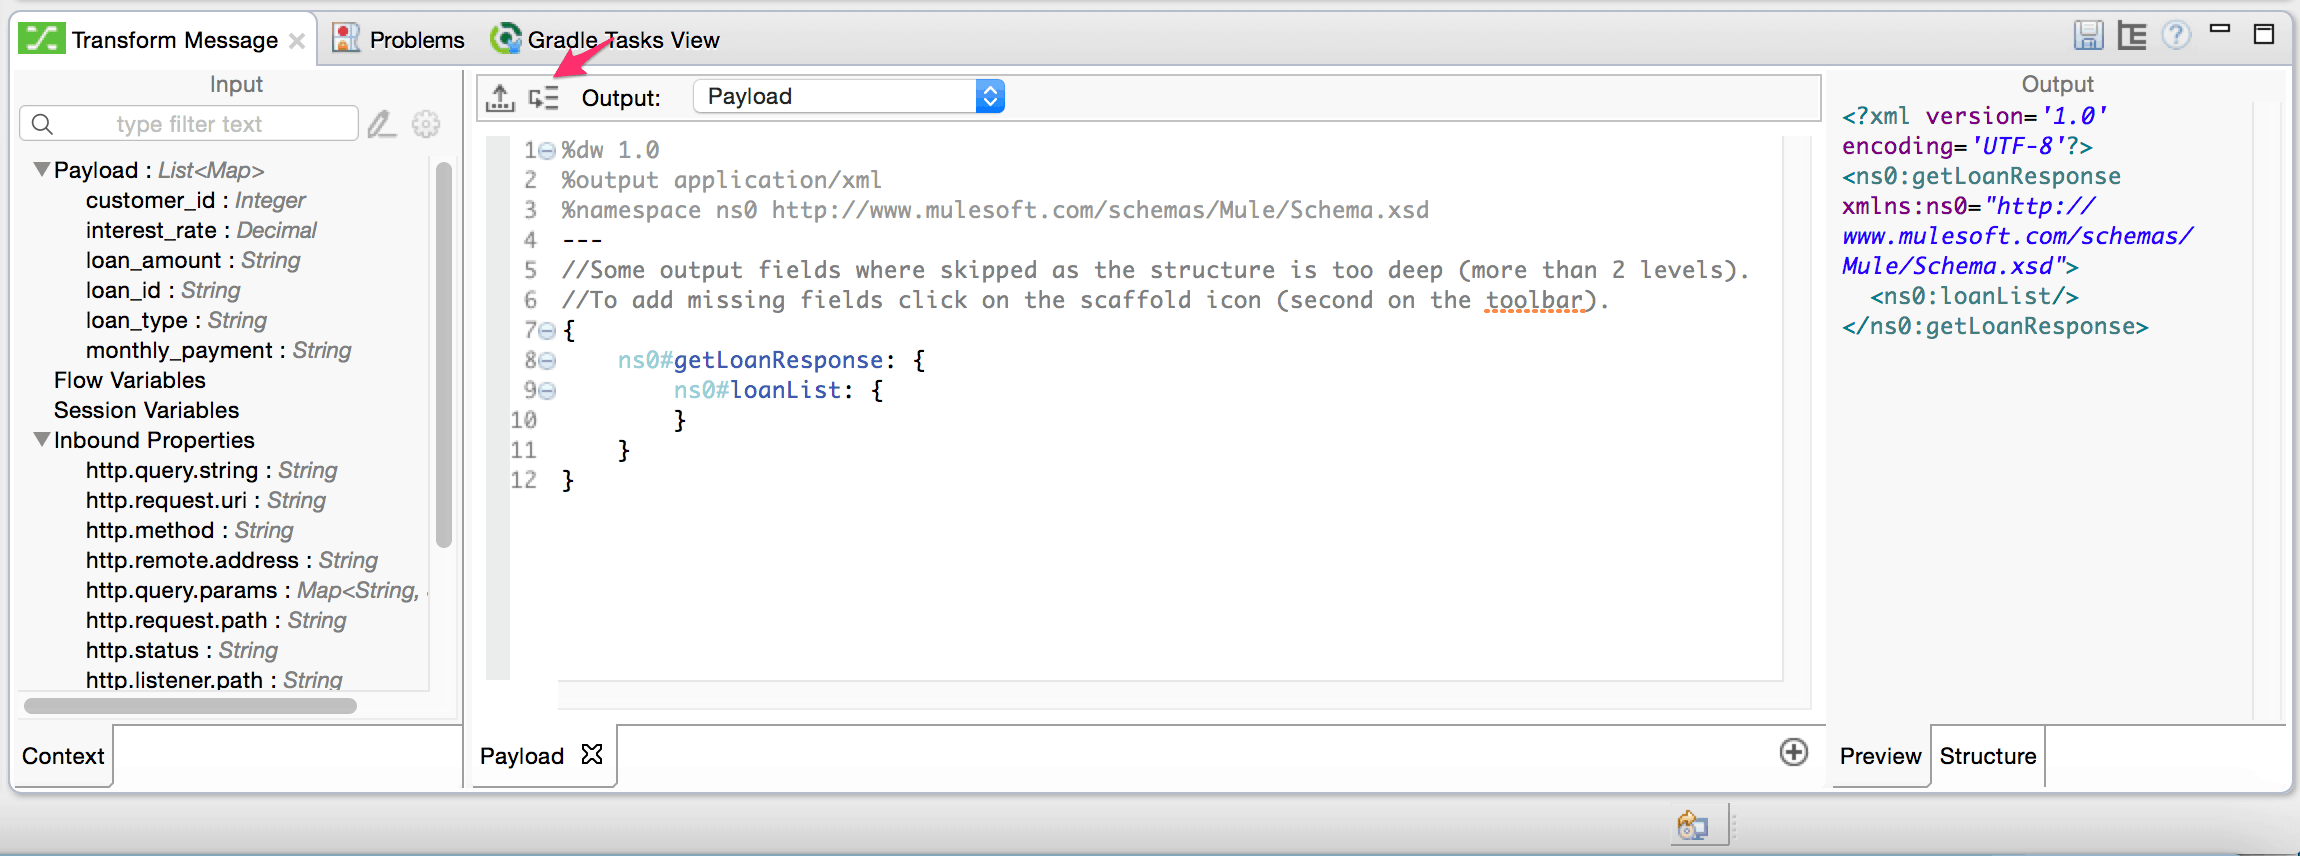
  18. Map the response from the database connector to the SOAP response message.
    picture21
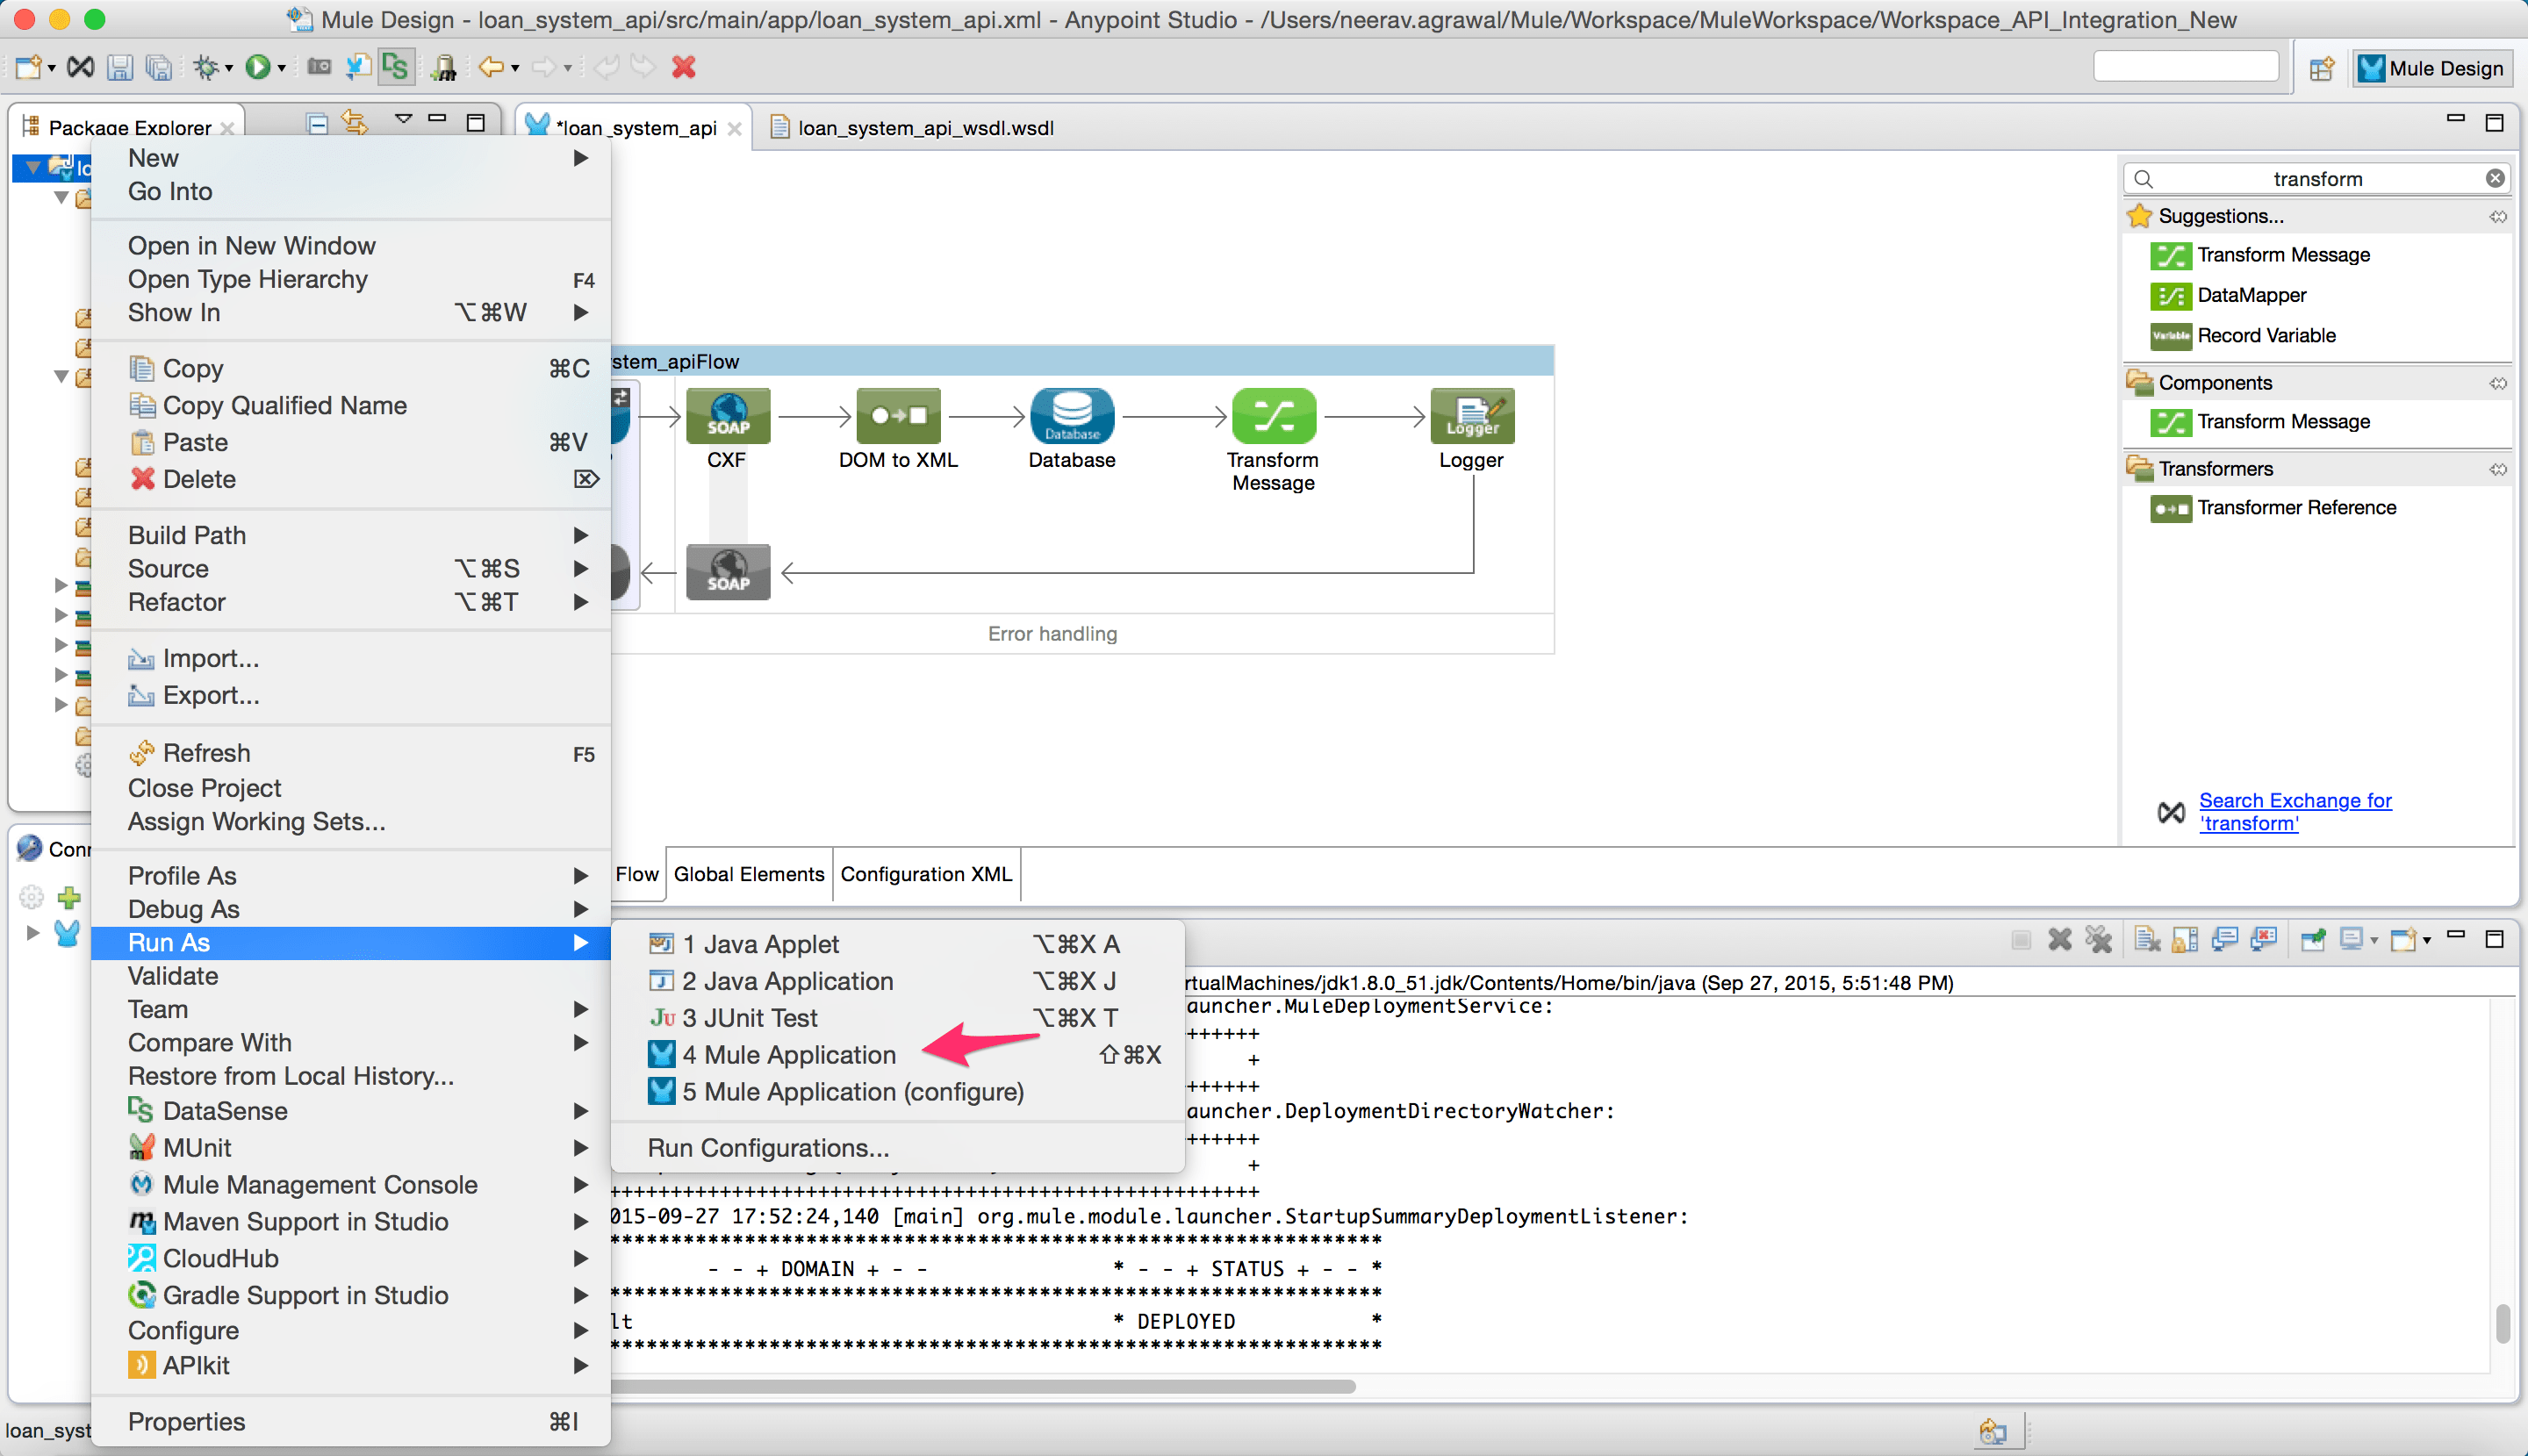
  19. Right-click the project and choose the run as “Mule Application” option. This will run the project in Anypoint Studio embedded Mule runtime.                                                                                      picture22
  20. Start SOAP UI and create a new project. Add a new WSDL and enter the link as follows: http://localhost:8081/bank/loan?wsdl
    Run the request and check the response.
    picture23

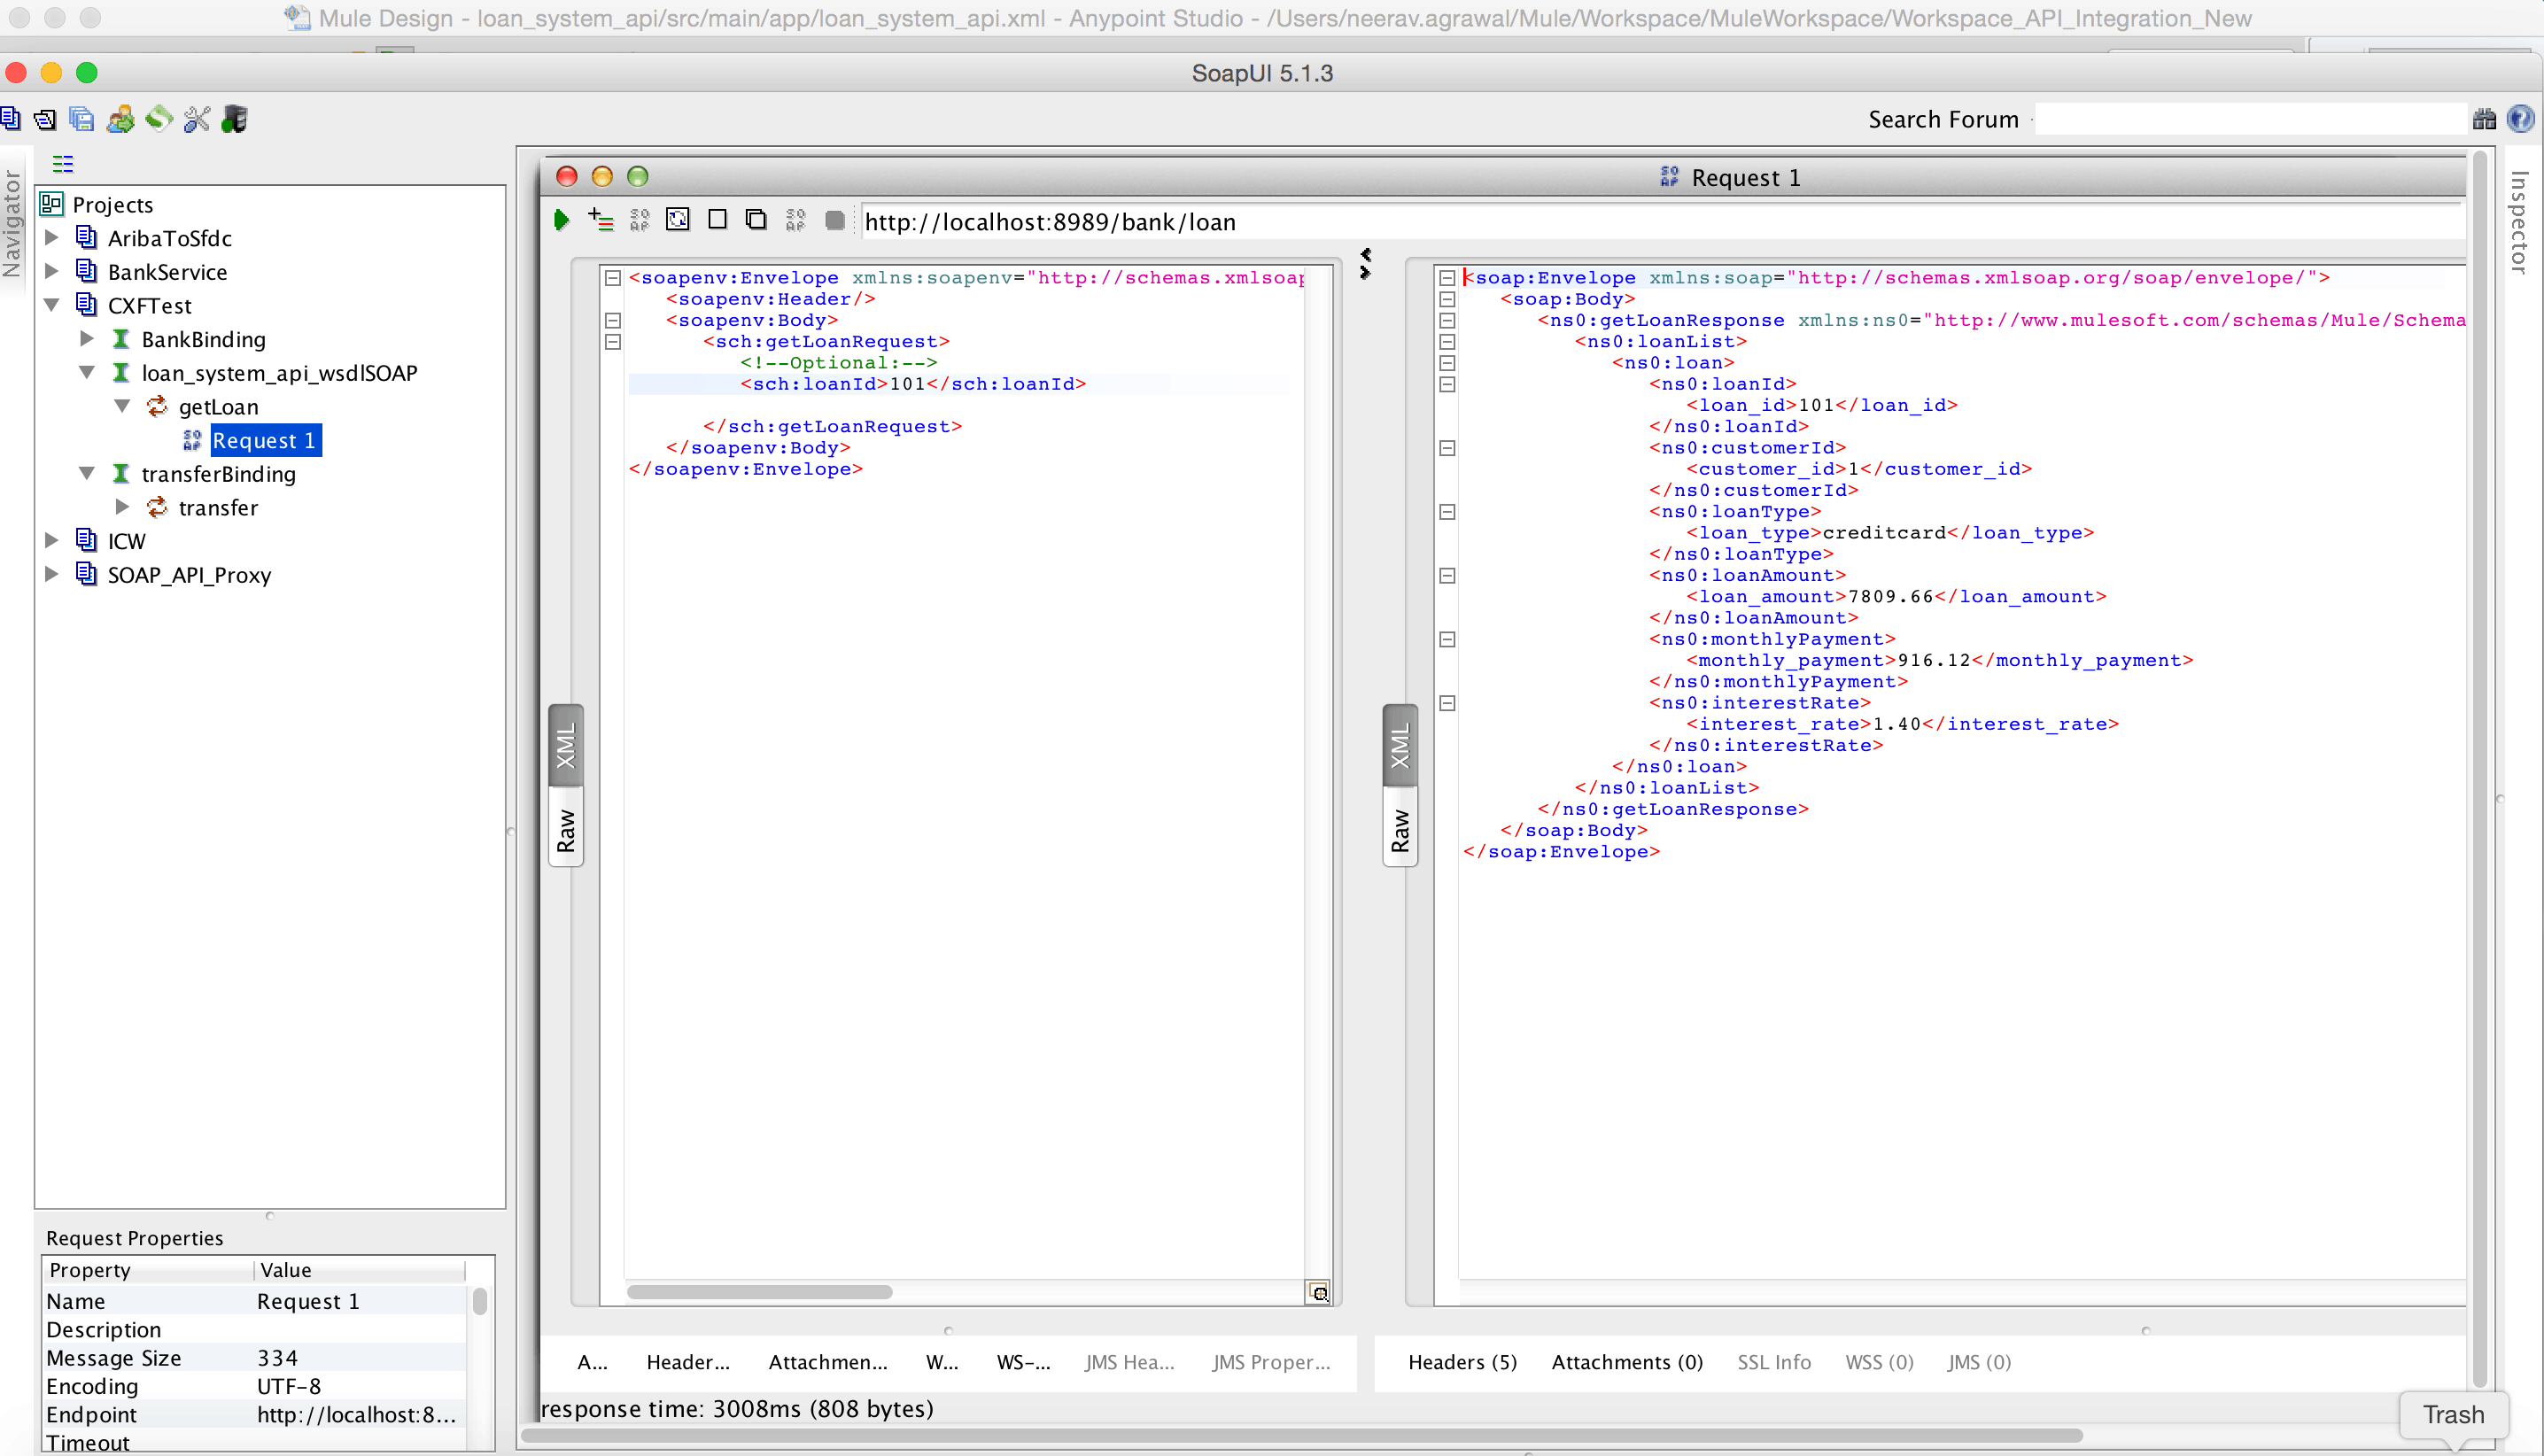
We have now successfully created a system API in front of a database, thus decoupling it from the user requesting the data.

To create this system API we have leveraged the following features of the Anypoint Platform:

  • Open standards support i.e. full support for WS* standards and open source services framework like Apache CXF.
  • Drag and drop and configure the CXF components that speed up development.
  • Database Connector: Allows you to connect to almost any relational database.
  • DataSense uses message metadata to facilitate application design.
  • Mule Expression Language (MEL): Lightweight Mule-specific expression language that can be used to access/evaluate the data in the payload.
  • Transformers/DataWeave:  A simple, powerful way to query and transform data using the platform.  

We have seen a growing need for APIs emerging from new business processes, applications, devices, and interfaces. These requirements from several consumers, it becomes necessary to define a lightweight and easy to consume REST API.

In part 2 of this series we will walk through creating a REST API on top of an existing SOAP service.

MuleSoft at MuleSoft: Anypoint vs. Custom Code Automation

Reading Time: 7 minutes

There are numerous great reasons for using Anypoint Platform at MuleSoft. You might even assume that inside the company there would be little competition. But like many organizations, using Anypoint here required competing with the inherent desire people have to use custom code for integrations.

Custom code integrations have a natural gravity to them. The practice generally starts with the desire to satisfy curiosity about how using a service could be automated with an API and diving in with a common toolset such as Python, Ruby, Javascript, Powershell, etc. From there, the exploration of what is possible within an API begins to evolve into a whole other beast. And thus a custom code integration/automation is born. And from that comes this feeling of self accomplishment – that something was built from scratch  – a custom tool has entered production. The proud creator of the custom code integration is excited.

That’s where IT at MuleSoft started too — custom code automations are a natural part of IT. They evolve out of the desire to automate repetitive work; in addition, they consist of components that IT understands. I myself have built my share of custom code integrations. As proud as I have been of what my team was able to accomplish with custom code, my chief concern revolved around the rigidity of these types of solutions. While writing custom code has significant benefits in developing a solid working understanding of the problem to be solved, I could not help but wonder about the long term value of the work.

  • Would we be able to make custom code flexible enough to evolve with the business or would we end up spending significant effort re-writing whenever processes or needs changed?
  • What value does the custom code bring as a stand-alone solution? How much effort will be required to make this consumable by other departments/services?
  • Would the code used in all of the custom code integrations make enough sense to the team as a whole to be able to support and enhance them?
  • Comparatively how much effort would be required to build solutions with a guaranteed long term value?

Building anything custom requires investment and I want that investment to provide long term value. I know from experience that flexibility and maintenance are the first things to wane as custom code grows.

In looking at achieving those goals using Anypoint, my team discovered very quickly that we could not only get rapid results, but that the process of prototyping, building, modifying, and testing were terrific. My team enrolled in the “MuleSoft.U Developer Essentials” course (it’s free!) and found ourselves exploring the platform’s capabilities at record pace. After only a half-dozen modules in the coursework we were already prototyping solutions to replace custom code.

But the much larger reason to pursue this effort has to do with the full yield we plan to get. Building the integrations helps us become deeply familiar with the business process associated with the systems and data. But what we really begin to see is the beginnings of a model for how we could build APIs around business functions. Building integrations with Anypoint allows us to create scalable automated processes now that we can later make consumable as business APIs using the exact same tools! Anypoint provides a common symbolic approach. My team can look at a “flow” in the UI and understand the function quickly. Other team members can modify and work with the integrations visually. Thanks to the assortment of connectors (especially the incredibly flexible HTTP connector) and the logical visual elements in the tool, my team can do much more than before and we can accomplish our goals in ways that have long term strategic value.

For more about how MuleSoft uses MuleSoft, check out this upcoming webinar:

Why DataWeave Matters

Reading Time: 3 minutes

Data transformation

Data transformation is a core requirement for most integrations. Anypoint Platform provides multiple types of transformers, including XSLT, DataWeave and DataMapper.

DataWeave, our new data query and transformation language, offers significant performance advantages over Anypoint DataMapper, our earlier data mapping and transformation solution. The below benchmark shows transformations performance using DataWeave and Anypoint DataMapper with payload size of 100KB (1000 records) with simple complexity.

image (2)

On average, DataWeave transformations process 6 times faster than DataMapper transformations –  a result our engineering team is extremely proud of.  We encourage you to take advantage of our new state of the art language and approach.  

DataWeave with 1MB payload on CloudHub

When the input payload size is over 150KB for csv and json input type, DataWeave writes the request objects to disk.  Therefore, payload threshold tests were set up to range from 150KB to 1 MB in size.  The tests ran in the performance lab and on the CloudHub worker cloud and results validated that higher disk writes resulting from larger payload sizes don’t impact performance.

The plot below shows that DataWeave’s throughput when deployed to CloudHub is stable.

chDW

Anypoint Platform Performance Whitepaper

To learn about these performance tests and check out more Anypoint Platform benchmarks, download our whitepaper.   

10 steps to design and build the perfect API

Reading Time: 9 minutes

When you’re designing an API, you don’t just want to build an API. You want to design and build an API with a long life that your users will love. An API that is carefully created to be extendable and flexible, and will save your users time, money and energy in the long run. To design and build the perfect API, you’ll need to follow some best practices. While some of these may seem a little painful or like they just create more work, you’ll find that by adhering to these guidelines you will not only create a better API, but save a lot of time and money.

  1. The first thing you’re going to want to do is choose an API type.  To design an API well, you need to understand why that type of API is best for your application, and then design it to work effectively.
  2. The next step is planning out your API’s capabilities. Surprisingly, while being one of the most crucial steps in API development, this step is usually rushed through by companies excited to generate a product map and start working on code. You need to consider who the API will be used by, to what actions do they need access, and then you must list out those actions. You need to explain how the API will interact with existing services, how the API will be maintained, how the API will be versioned, how it will be documented, how developers will interact with it, and how you are planning to manage support. There is a lot to consider in this stage, but careful thought now will save you time and effort later.
  3. Next you create a blueprint or spec for your API. Using a process called Spec-Driven Development, you will be able to build your API for the long-term, while also catching glitches, inconsistencies and generally bad design early on. While this process usually adds 2–4 weeks onto the development cycle, it can save you months and even years of hassle as you struggle with poor design, inconsistencies, or worse—find yourself having to build a brand-new API from scratch.
  4. We recommend RAML as a tool to build your spec as it offers the most support for Spec-Driven Development and provides interactive tools that are truly unique. RAML also lets you incorporate design best practices while being able to reuse code and take advantage of design patterns to ensure that your API is consistent throughout.
  5. We also recommend that as you’re building your spec you involve your users, getting crucial feedback to ensure it meets their needs, is consistent and is easily consumable. The best way to do this is to prototype your API and have your potential users interact with it as if it was the actual API you are building. MuleSoft’s Anypoint Platform for APIs lets you easily create mocks of your API that you can share with other developers. And with tools like Postman or the API Notebook, users can try out your API without having to write any code.
  6. The next step in building APIs for SaaS providers is authentication, or enabling users to access their accounts via the API.  Because you are dealing with user accounts and security, it’s important to understand the different options available to you, such as Basic Auth, OAuth 1, and OAuth 2, as well as the pros and cons of each both from a security, and development aspect.
  7. Resources are the primary way the client interacts with your API, and as such it’s important to carefully adhere to best practices when designing them, not only for usability purposes, but to also ensure that your API is long-lived.
  8. Next you need to design your methods.  For most APIs you’ll want to implement a standard response format such as XML or JSON, as well as take advantage of existing HTTP method definitions.  One of the most important aspects of designing your resources and methods is consistency, or ensuring that they operate similarly across your entire API.
  9. Since APIs are designed to be consumed, it is important to make sure that the client, or consumer, is able to quickly implement your API and understand what is happening. As you build out your API you want to ensure that you not only provide informational documentation to help your developers integrate/ debug connections, but also return back relevant data whenever a user makes a call—especially a call that fails.
  10. Understand how to use hypermedia with your API to improve its longevity and long-term usability.

Once you’ve designed and built your API, then you can begin the process of managing it, documenting it, and sharing it with other developers.

Mike Stowe, our developer relations manager, has written Undisturbed REST: A Guide to Designing the Perfect API, which is a comprehensive guide to designing and building the perfect API. Be sure to take a look!