One to map them all: Google Cloud Connectors Suite Part 3/3

Reading Time: 18 minutes

Hello There! If you remember a couple of months back we started a series regarding the Google Cloud Connectors Suite. In the first post we introduced the suite, took a look at how to install the connectors in Studio and built a very simple yet cool iApp that takes contacts from a Google Spreadsheet and turns them into Salesforce contacts, Google Contacts, Google Calendar Events and Tasks.  Then on the second post we gave some quick code examples of common usage on the connectors.

On this post we’ll wrap up the series by discussing a very important element of the first post’s sample iApp: The DataMapper. If you’re not familiar with it you can find more information about it on its documentation page, but in a nutshell it’s Mulesoft tool for mapping complex data structures (XML, CSV, JSon, Pojos, Maps, Fix width record files, etc) into any other format while optionally adding some transformations on the way. If you follow the documentation link you’ll find DataMapper most common use case scenarios. But here I’m going to show DataMapper in a different light: Uses of DataMapper that goes beyond the obvious.

Why is DataMapper important to a Google Connectors series?

Simple: Google has a gazillion of APIs. Each one targets a different set of business requirements and thus specifies its own domain model which in turn translates to different sets of data structures. If like in our example you want to turn a spreadsheet row into a Google Contact, you’ll need to transform those different Pojos into instances of each other. Make no mistake: This is not something you need  because Google APIs are so very different. Most integration scenarios will require you to map different data formats into each other. The more complex the integration, the most often you’ll find yourself in this situation. For example, in our application we need to transform data from a Google Spreadsheet into a Map that Salesforce can read. Additionally, real life apps will have additional requirements like skipping certain records, adding transformation rules and so forth. These are the kind of stuff that we’re going to discuss on this post and that you will certainly need when combining more than one Google connector in the same app.

DataMapper Rules!

In the first example we’re going to show the rules feature in DataMapper. Rules are basically expressions that you apply into the source data. When evaluated, each of those rules generate a value that is then used on the output. So, let’s consider the first case in the example in which we have a list of Row objects that need to be transformed into a List of Maps.

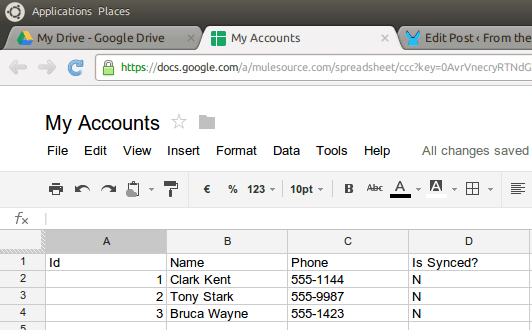
It all beings with a spreadsheet that looks like this:

The Google Spreadsheetes connector represents this Structure using classes that look pretty much like this:

We’ll start by creating a new mapping that goes from a List<Row> to a List<Map, Object> using the File->New menu:

Then give it a name:

Next step is to select your source/destination data structures. The source is a List<Row> so you first need to select “Pojo” and use the options button to select the type. Once you’re there, select “Collection” and provide the actual Pojo class as shown in the next figure:

Then, to select the destination type use the Maps option and select the user defined option:

After pushing into the edit fields button, you’ll get a dialog like the one below. We’ll create fields in the map, one per each column in the spreadsheet. Also notice that on the upper right corner of the dialog the List option was selected to tell DataMapper we don’t want to just reduce the List<Row> into one Map<K,V> but instead we want to create a List<Map<K,V>> in which each map represents the data on each element of the list (aka each row):

The resulting empty mapping looks like this:

So now is when the need for rules appears. If you look at the List<Row> in the left hand side of the mapping, it turns out that the data that we actually want to map is not at the top level Row object itself but in each of the elements of the cells collection. It also turns out that we want the value of the cell at position zero to go to the first map field, the one at position one to go the second and so forth. So let’s see how we can create rules that extract this values and make it available for mapping:

First right click on the rules label and select the add rule option:

The rule then should look something like this:


The magic happens in the XPath expression field. You’ll see, if the input source were an XML, you could actually use XPath here. But when the input is a Pojo or a List of pojos, you can actually use a jxpath expression. Mega cool huh? So, in this expression we select the cell item with column number one and then we extract its evaluated value. Finally, repeat the process for the other fields. Presto! you have a set of rules that are assignable. All you have to do next is drag & drop those rules into the fields in the right hand side of the screen (aka the destination data structure). The finished mapping looks like this:

That’s it! You have just transformed data coming from a Google Spreadsheet into a List of Maps that you can feed into the Salesforce connector!

Self Transformation

Another use case present on the example is the one in which you have a list of items that you don’t want to map into something else but simply modify it. DataMapper can also be used for that by simply defining a mapping in which source and destination are of the same type. Can’t I just do the same with Java or Groovy transformers? You can indeed, and for the simple example we’re about to show that could even be a better approach. However, DataMapper adds value by allowing you to do everything graphically without the need of coding. Also, a DataMapper transformation would be easier to maintain if it turns out that new requirements makes the transformation more complex.

In the examples case, what we want is to take the List<Row> that the Google Spreadsheet connectors gave us and change the value of the “AtSalesForce” flag that indicates if that given row has been synced.

Let’s start by creating a new mapping just as we did before, only that in this case the source and destination types will be the same: List<Row>. The mapping will look like this:

As you can see, DataMapper is smart enough to identify that the two data structures are much alike and therefore automatically generated the “trivial transformations” for you, automatically mapping fields that have the same name and are of the same type. However, if you look at the upper center corner of the figure above you’ll see a small combo box that says “for each lists” and “for each cell”. The first (and selected one) makes reference to the top level Row objects that are being mapped. The second option makes reference to the child List<Cell> lists. If you select that option your mapping view will change to something like this:

The figure above shows you the mapping for the child cells list. As before, DataMapper fills into the obvious mappings for you. So what we want to do now is to change the valueOrFormula field of the cell that corresponds to the “AtSalesForce” column. How do we do that? Well, if you click on the valueOrFormula field on the right hand side of the mapping you’ll see something like this:

The image above shows that for each mapping item, you get a text box with the mapping expression. In this case, it says “just use whatever value came in the input”. However, we can change that to this:

This simple ternary expression basically says:”if column number is 4 and the rowNumber is not 1 (because at row one we have the headers) the map a “Y”, otherwise,  just use whatever value the source carries.

That’s it, you just modified a value in a nested list of objects without writing one single line of code!!

Loosing weight

Finally, let’s see a final use case in which what you want is to filter a collection. Again, this takes basis on a mapping in which the source and destination types are the same. Considering the following mapping in which we go back to the List<Map<K,V>>:

The two sides of the mapping look a like but there’s one small difference: The one at the right has lost the AtSalesForce flag. No particular reason for that other than in the context of the example app, that flag was no longer needed after the transformation. As before, DataMapper has automatically filled the obvious transformations but, wasn’t this about filtering? Yes it was! This mapping is going to be fed with a List<Map<K,V>> in which some of those maps are going to have an entry with key “AtSalesForce” with a value of “Y” and others are going to have a value of “N”. We want to loose those and generate a List<Map<K,V>> in which only the entries with the “N” remain.

Again: Can’t I just do this with Groovy? Yes you can! But consider what happens if you don’t only have to filter, you also need to do some transformations. DataMapper becomes king in that scenario. So, look at the top of the figure above and click on the pencil icon:

This will allow you to edit the underlying element mapping where you can add a condition like this:

So the condition is clear, do the mapping if AtSalesForce has “N” as a value. Otherwise, that particular element is dropped.

Summary

What you should take away from this post is:

  • Whenever you’re integrating two APIs, you’ll much likely need to transform the data in both format and sometimes values
  • DataMapper documentation shows you the basic and most common use cases for it.
  • In this post, we’ve demonstrated some “not as usual ones” that are nevertheless quite handy when dealing with complex real life applications

I hope you have find this useful. Remember that if you want to check out the code of the example app you can find it following this link.

Please reach out with any comments/questions.

See you next post!

Data encryption with Mule Enterprise Security

Reading Time: 3 minutes

Mule Enterprise Security is a set of capabilities that build on top of Mule Enterprise’s existing security capabilities, including:

  • Secure Token Service and OAuth 2.0 Provider
  • Digital signing and data encryption
  • Credentials vault
  • Security filters

In this post we are going to look at how to use the data encryption capabilities in Mule Studio. We’re going to be using Mule Enterprise. Consider the following flow

We want to return the xml sensitive information  in a way only authorised recipients can see it (encrypted).  With the new mule enterprise security module, encrypting information is easy, just follow 3 steps:

1)  Insert the encryption module into your flow:

2) Create your config reference  (click on + and then Ok):

3) Write your encryption key:

And you are done!

What else could you do with this module?

1) Select three encryption strategies:

2) Use keystores to store your keys
3) Change your encryption configuration at runtime
4) Use multiple encryptions strategies with the same module
Enterprise integrations running across trust boundaries demand robust security solutions. Mule Enterprise Security provides end-to-end protection of your integration ecosystem.  Data encryption is just one step towards bullet proof integration.

Mule and Quartz – Scheduled jobs and long running tasks

Reading Time: 3 minutes

Recently I had a situation where I needed to get confirmations from an external system (webservice) at frequent intervals and add them to a database. All available confirmations were retrieved in a batch when the service was invoked. A confirmation was sent to the Service after a successful retrieval.

Of course, Quartz came to mind. Piece of cake I thought and implemented the scenario using Mule ESB. Everything seemed to work as planned until we started to notice duplicates of confirmations in the database. After some investigation it turned out that occasionally there were thousands of confirmations retrieved and inserted into the Database. Since inserting thousands of records took longer time than the scheduled interval, a new request for confirmations was made before the retrieval process could complete.

So how do we prevent this?

First of all we have to make the quartz connector thread pool only hold one thread, otherwise a new thread could start the same job even though an active job is running.

This is easily done:

Is that enough? No, since Mule is so well designed, all message processors has it’s own thread pool so even if Quartz only serves one thread that one appears to be finished when the next message processor in the flow takes over. Since that processor has it’s own thread pool it can handle multiple jobs coming from Quartz.

So what we need to do is to make sure that the whole flow is using the same thread all the way through. This is easily achieved using processingStrategy:

Setting the processingStrategy to synchronous makes sure that one thread is used through out the flow and Quartz can’t create a new one before that one is finished.

No more duplicates…

Using in-memory database to help with flat file integration

Reading Time: 4 minutes

Even today, when integrating with critical backend systems (e.g. order fulfillment system and shipping management system), it is quite common to encounter data being transferred in flat file format. Often the records to be transferred will need to be sorted and de-duped before they can be inserted into another system. For example, there could be multiple update entries for the same item and the sequence of the update calls is important. Here we would like to show you an example of how to leverage Mule’s built-in support for in-memory databases to make it really easy to perform such tasks when working with flat files.

Out of the box, Mule supports HSQL, H2, and Apache Derby. The example here will use Apache Derby but the configuration is essentially the same for all three.

First thing you will need to do, is to configure your JDBC connection. Note that the use of Apache Derby JDBC driver, also, where you put the name of the database (e.g. “blogdemo” in this case.):

<spring:bean id="datasource" name="datasource" class="org.enhydra.jdbc.standard.StandardDataSource" destroy-method="shutdown">
     <spring:property name="driverName" value="org.apache.derby.jdbc.EmbeddedDriver"/>
     <spring:property name="url" value="jdbc:derby:memory:blogdemo"/>
</spring:bean>

In addition, you will need to initialize the database by implementing the Spring InitializingBean interface. When Mule starts, the initialization process will create the tables you plan to use. For our example, we will just create couple tables to illustrate the process:

package org.mule.blogdemo.init;

import java.sql.Connection;
import java.sql.DriverManager;
import java.sql.Statement;
import org.springframework.beans.factory.InitializingBean;

public class DBInitialization implements InitializingBean {
	
	public void afterPropertiesSet() throws Exception {
		
		String dbURL = "jdbc:derby:memory:blogdemo;create=true";
		Connection conn = null;
		try {
			Class.forName("org.apache.derby.jdbc.EmbeddedDriver").newInstance();
			// Get a connection
			conn = DriverManager.getConnection(dbURL);
			Statement stmt = conn.createStatement();
			stmt.executeUpdate("CREATE TABLE table1 (Name VARCHAR(255), External_ID__c VARCHAR(255), Value__c INTEGER, Last_Modified TIMESTAMP)");
			stmt.executeUpdate("CREATE TABLE table2 (somecolumn VARCHAR(20), somecode VARCHAR(80))");
		} 
		catch (java.sql.SQLException sqle) {
			sqle.printStackTrace();
			throw sqle;
		}
	}
}

With the corresponding element in your flow:

<spring:bean id="dbinitialization" name="dbinit" class="org.mule.blogdemo.init.DBInitialization"/>

These should be global elements of your application:

From here on, you can just use your in-memory database like any regular relational database in your application:

<jdbc-ee:connector name="apache-derby" dataSource-ref="datasource" validateConnections="false" queryTimeout="-1" pollingFrequency="0" doc:name="Database">
     <jdbc-ee:query key="insertRecord" value="INSERT INTO table1 (Name, External_ID__c, Value__c, Last_Modified) VALUES (#[map-payload:name], #[map-payload:externalid], #[map-payload:value], #[map-payload:lastmodified])"/>
     <jdbc-ee:query key="selectRecord" value="SELECT Name, External_ID__c, Value__c FROM table1 ORDER BY Last_Modified"/>
</jdbc-ee:connector>

For example, if your requirement calls for upserting records from a csv input file into Salesforce.com in sequence based on last modified time:

name,externalid,value,lastmodified
order1,1,10,2012-09-22 13:40:00.00
order1,1,1,2012-09-22 10:00:00.00
order1,1,5,2012-09-22 11:00:00.00

With in-memory database, the flow can be simplified down to just a handful of steps:

<flow name="mainFlow" doc:name="mainFlow" processingStrategy="synchronous">
     <file:inbound-endpoint path="src/test/resources" moveToDirectory="src/test/archives" responseTimeout="10000" doc:name="Input File"/>
     <jdbc-ee:csv-to-maps-transformer ignoreFirstRecord="true" doc:name="CSV to Maps" mappingFile="src/main/resources/mules-csv-format.xml"/>
     <foreach doc:name="Foreach">
      	<logger message="#[payload]" level="INFO" doc:name="csv record" />
        <jdbc-ee:outbound-endpoint exchange-pattern="one-way" queryKey="insertRecord" queryTimeout="-1" connector-ref="apache-derby" doc:name="insert-record"/>
     </foreach>
     <jdbc-ee:outbound-endpoint exchange-pattern="request-response" queryKey="selectRecord" queryTimeout="-1" connector-ref="apache-derby" doc:name="select records"/>
     <sfdc:upsert config-ref="salesforce" externalIdFieldName="External_ID__c" type="Demo_Object__c" doc:name="upsert.record.in.salesforce">
         <sfdc:objects ref="#[payload]"/>
     </sfdc:upsert>
</flow>

With the records now stored in a relational database table, all the SQL query functionality can be utilized to process the data to meet your requirements.

Finally, please don’t forget to include Apache Derby library in your project. Support for Derby is out of the box but the driver still needs to be added to the project manually:

Quick tips for developers new to Mac

Reading Time: 9 minutes

Hi and welcome to Mac, fellow developer

In this post, I will go over some tips I’ve been collecting which can make your life as a developer just a little bit easier if you come from other operating systems. Of course the list can grow, but here is my list. This article is based on MacOS X 10.8.2 (Mountain Lion), but should be helpful for other versions as well.

Using your Mac – essentials

You can easily find any application in a way that resembles the Start Menu on Windows using Spotlight. Just press command + space and type until you get a hit. In order to right click you can use two fingers on the lower part of you pad, or CTRL-click. You scroll using two fingers – Mac uses ‘natural scrolling’ by default (so up is down and down is up). Three fingers up and down will give you an overall of open applications, and on the side they will switch through full screen applications. Four fingers going out on a circle from the center will quickly display your desktop.

When typing, command + left arrow and command + right arrow take you to the beginning and the end of the line, and fn + delete is what you probably knew as just ‘delete’ (that is, deleting the character following the caret), while delete is what you probably knew as ‘backspace’ (deleting the character preceding the caret).

If you need to quickly capture a region of your screen, command + shift + 4 will present a cross style mouse pointer and allow you to select a region, which will be automatically sent as an image to your desktop.

Finder

Mac’s graphical file system browser is called Finder. If you’ve used the latest versions of Windows and/or many flavors of Linux, you’ve seen you can go back to any part of the path with a click. Finder does not bring this by default. Luckily, you can add a button that performs a similar function.

Just open a Finder window, and select View -> Customize Toolbar… from the menu bar. There is a button labeled Path you can drag and drop onto the Finder window toolbar. Do so and it will appear in all future Finder windows!

See below how this is done:

path button

Another usual requirement in developers is the ability to see hidden files. These are hidden by default. You can choose to show them, just override the appropriate setting and restart Finder by executing the following two commands:

defaults write com.apple.finder AppleShowAllFiles TRUE
 killall Finder

And now you can see hidden files:

hidden files

Yet another ‘powertoy’ (as it was at some time called under Windows) is the ability to launch a new terminal at a specific location you are browsing. Mac OS X brings this but, as with many services, it is disabled by default. You can enable it by going into Keyboard (command + space and type), Keyboard shortcuts, Services and ticking New Terminal at Folder.

enable new terminal at folder

This option will now appear under the Services option within Finder, in the menu bar, or when you right-click on any folder.

new terminal here

Lock Screen

There are several ways of having quick access to this. This is one I like. Open Keychain Access (command+space and type), access Preferences from the menu and tick Show keychain status in menu bar.

keychain access preferences

A small lock will now show on the menu bar, one click + lock screen will launch the screen saver.

lock screen

Applications

Sometimes you really need to use an application that did not come from Mac Store or a known developer. A feature called gatekeeper prevents you from accidentally launching it. But if you do want to do so, just right click and select Open, this will present an additional button in the dialog shown, which will allow you to proceed (and your preference will be remembered for future occassions).

International keyboard

If you need quick access to latin characters, you can change the keyboard layout accessing Language & Text, Input Sources and ticking U.S. International – PC. You can get accented characters with ‘ + letter as usual (á), ñ with ~+ n, ¿ with option + shift + ? and ¡ with option + !.

Here is how:

international keyboard

Developer essentials

The OS brings java, but I needed an updated JDK from java.sun.com so I downloaded it and installed as usual. Then with /usr/libexec/java_home -X a list with all JVMs installed can be requested, and /usr/libexec/java_home -v version filters the list by the version passed as parameter.

OS X comes with a maven install, but I added export M2_HOME=/usr/share/maven to my ˜/.bash_login script.

SCM

An svn client is no longer included by default. You can get an official one without downloading the whole XCode bundle. Just install Command Line Tools (OS X Mountain Lion) for XCode from developer.apple.com, which is a much smaller download.

For GIT, you can use any client you want. I got mine from git-scm.com and generated my SSH key with ˜/.ssh/ssh-keygen -t rsa -C “myemail@mydomain.com” and added the contents of id_rsa.pub to my SSH keys in my github.com user settings.

What are your Mac productivity tips?

Cheat Sheet: Asynchronous Message Processing

Reading Time: < 1 minute

You want to get more done in 2013 so you’re going to need to switch from synchronous to asynchronous processing to do more with the same resources.  Mule started life as an asynchronous message engine and has a lot of capabilities and optimisations built in for processing data concurrently. To help you understand asynchronous processing in Mule we have created this cheat sheet that will help you understand the basics.  Feel free to ask questions on this blog or on the forums. Enjoy.

Handling File Attachments: handling multipart requests in Mule

Reading Time: 4 minutes

Recently, I came across the following situation while working with Mule: I needed to handle an http post that would carry not one but N > 1 uploaded files.

If I were to do this back in the days where I didn’t know about such a thing called “Mule”, I would have needed to:

  • Handle a http multipart stream
  • Identify all the parts in the message
  • Read each file
  • Clean up

Of course there’re libraries and frameworks that can help you with this, but all of them still require some level of understanding of the multipart request beneath.

And then came Mule into my life, and this task became as simple as navigating the properties of a MuleMessage interface. Let’s explain a little bit….

As you probably know, what the MuleESB does is to carry packages of information (messages) from one system to another, allowing for software integration without the need of the involved systems to know about each other, their transport, protocols or any API changes. Each of those packages of information are represented by a MuleMessage. This object acts as a facade to access of a great deal of information about the message including, headers, payload and attachments, but today I want to focus on a property called inbound attachments.

When the message is coming through an http post that sends N >= 1 files through a Multipart Request, each of those files will be automatically read by Mule and stored in the message under the inboundAttachments property.

Pretty cool uh? No more worrying about Multipart, streams or anything like it, you just need to access this property as a Key-Value pair where the key is the filename and the value is the content itself. MuleMessage also provides a  getInboundAttachmentNames() that returns all the keys.

So, let’s see a couple of examples. Suppose you want to retrieve the content of an expected file named foo.txt:

Now, let’s suppose that you want a flow that receives N >= 1 amount of attachments and logs all of them:

That was easy wasn’t it? If you’re thinking that this is pretty simple stuff compared to the average post in this blog, then mission accomplished! We have succeeded in demonstrate how easy it is to do every day chores using Mule. Please let us know if this post makes your life easier, that would really make us happy.

Get Loaded! With the new Dataloader.io

Reading Time: 4 minutesWe’ve just started 2013 and we already have something to celebrate! Dataloader.io January release is out with many improvements that will make your data loading life even easier than before, including:

> Related object exports – e.g. export contacts and their related accounts in a single operation.
> Filter exports by related objects – e.g. export accounts for a certain user.
> Create custom SOQL queries for advanced reporting.
> Friendlier error messages for data problems.

Continue reading

A New Year a New Mule

Reading Time: 3 minutes

If you have queued up for more than twelve hours to see an opening-night showing of a Lucas- or Jackson-produced film, or slept outside to be the first to obtain a Jobs-ian product, or requested an invitation to pre-pre-order anything produced by Activision or EA, then you might be someone we’re looking for.

We want early adopters. We have a new, pre-beta version of Mule ESB, and we want to know what you think. Are we on the right track with our incarnation of a visual flow debugger? Will our DataMapper enhancements be welcome improvements? Was it a good idea to include an animated paper clip to offer assistance when building a flow?  (Just kidding.)

Download Mule and give us your feedback.  While not production ready, this version is something in which to discover, to explore, and to constructively criticize. Get your hands dirty. Try it on for size. Give us the feedback  through the forums or commenting on this post.

Want to see the movie trailers?

Visual Flow Debugger

DataMapper Enhancements

We’ve also added a few features like connection management, documentation generation, and transaction demarcation to improve the lives of integraters everywhere. Read the blog post that accompanied the initial December 2012 launch of Mule ESB 3.4 early preview to get a full account of all the juicy details.

Think you know Mule? Think again. 2013 is going to be interesting.

Cheat Sheet: Mule Expression Language

Reading Time: < 1 minute

Since Mule 3.3 the Mule Expression Language (MEL) has been the default scripting language for expressions in Mule. It is very powerful and based on the MVEL language (note you can also use JavaScript, Groovy, Python and Ruby).  MEL provides a very easy way to access the current message in a flow, write conditional filters and perform content based routing.  The MEL Cheat Sheet, gives you an overview of the commands you can use.

Other Resources